Installation & Update
Checking your server configuration
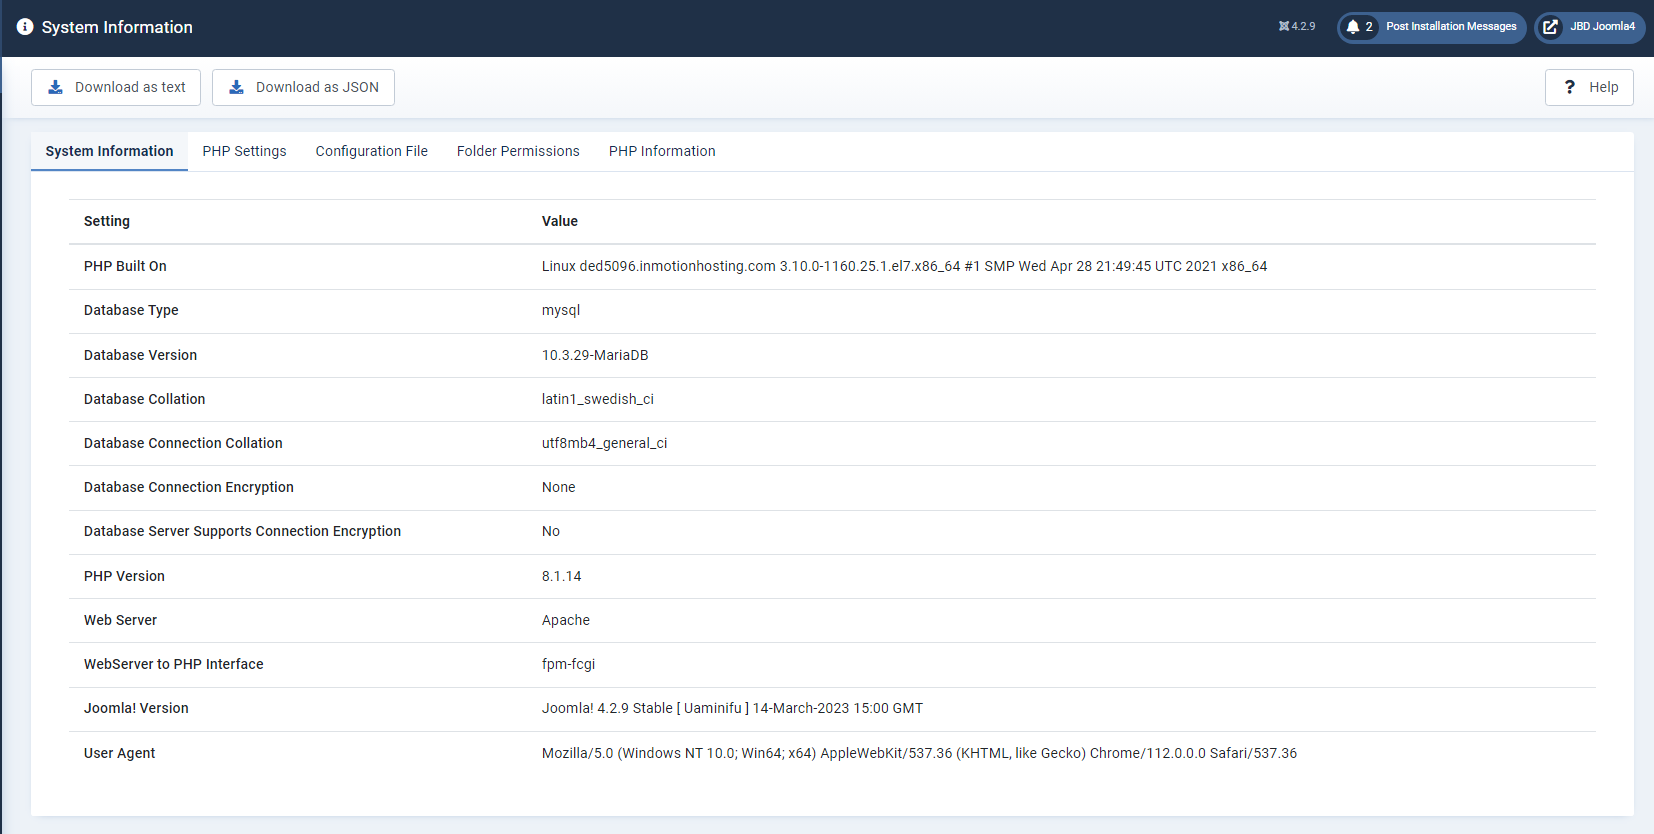
Checking your server configuration can be easily done by accessing System –> System Information, from the drop-down menu on the Back-end of your Joomla! installation.
This tool provides useful information about your host server environment, including operating system, database and PHP settings, and directory information. You can navigate to five different screens: System Info, PHP Settings, Configuration File, Directory Permissions, and PHP Information. Each screen provides detailed information about that aspect of your Joomla! website. This information is very helpful when you are troubleshooting setup problems.
Note that none of these settings can be changed from these screens. This must be done in different locations throughout your Joomla! installation, depending on the specific setting.
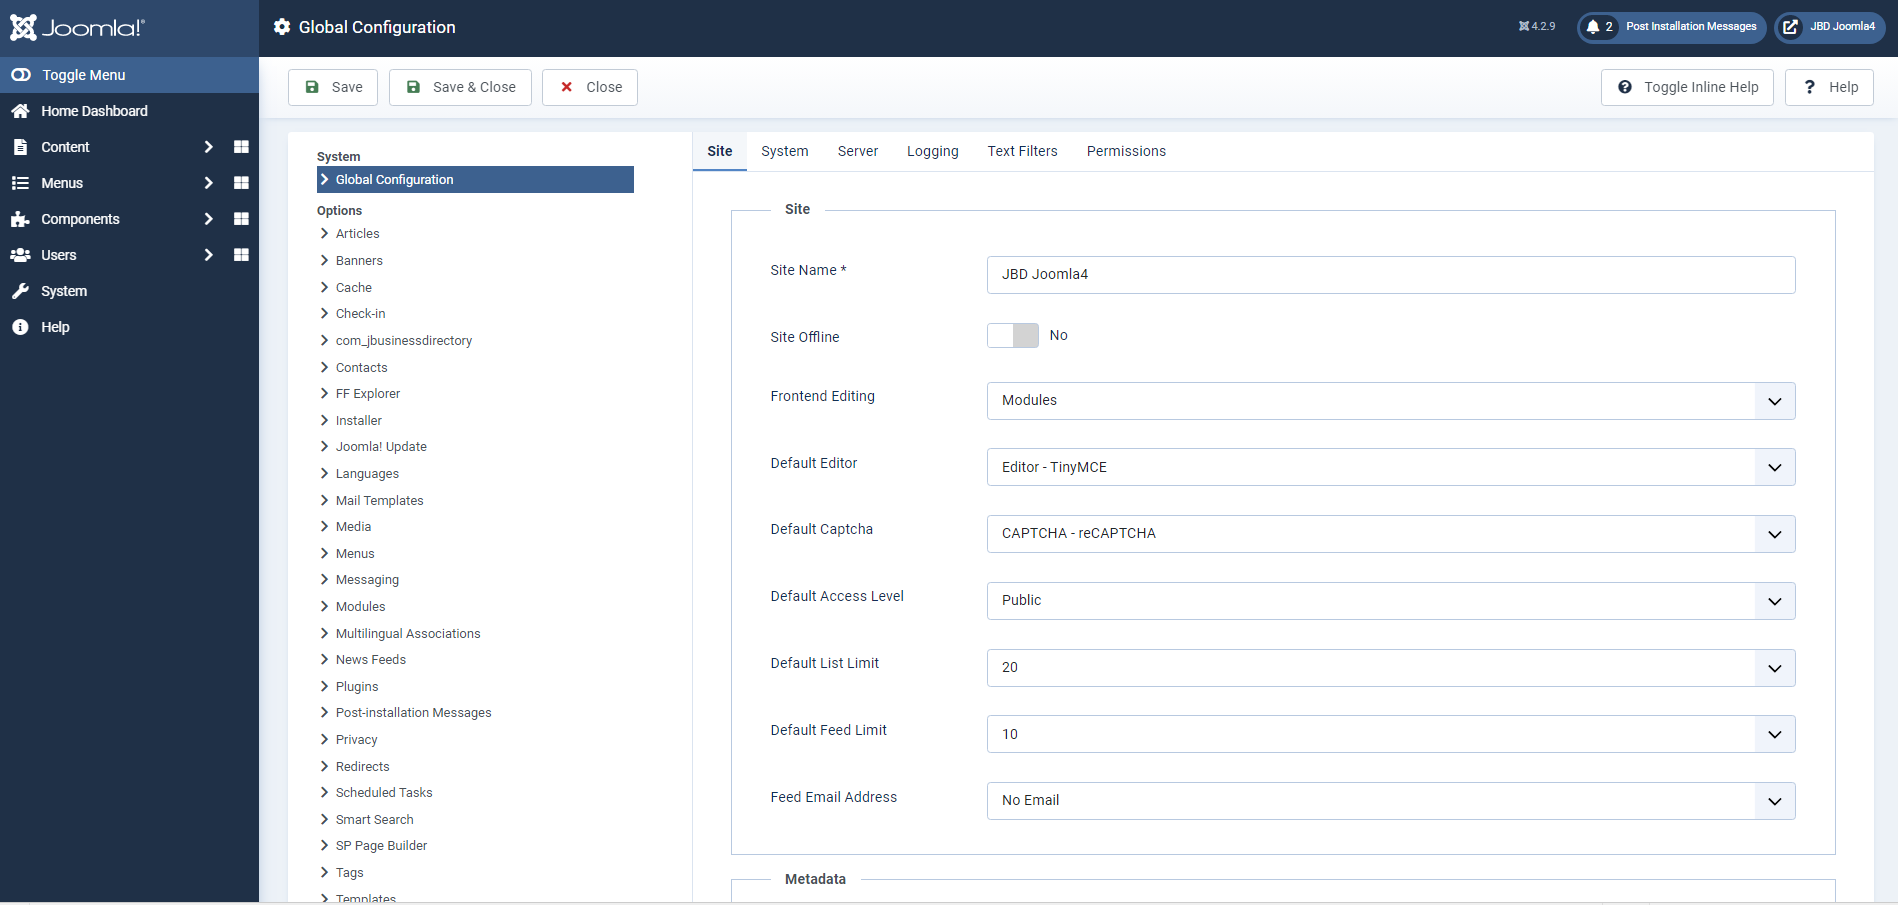
Many settings on the Configuration File screen can be changed from the Global Configuration screen.Some settings shown here depend on your host server configuration and cannot be changed from inside Joomla!.
A key aspect that is important and might cause issues during J-BusinessDirectory component installation is that the actual installer package is usually over 2M and there are two PHP settings that could cause the normal installation process to fail. These parameters are: the ‘upload_max_filesize’ php parameter which (unfortunately) is restricted by many hosting environments to just ‘2MB’ and the ‘post_max_size’ parameter. Both of these parameters must be set to at least 16MB.
Installing the Extension
The current installation includes a component,several modules and a plugin. All are installed when installing the J-BusinessDirectory, so you don’t need to worry on installing them separately. After running the installation you will be able to access the component from the component menu in the backend, and the installed modules from the modules menu.
To begin installation of the J-BusinessDirectory component, log in into your Joomla backend and follow the steps described below:
In the main menu go to Extensions from the System
Click the Or browse for file button to locate your downloaded copy of the J-BusinessDirectory (J-BusinessDirectory.zip).
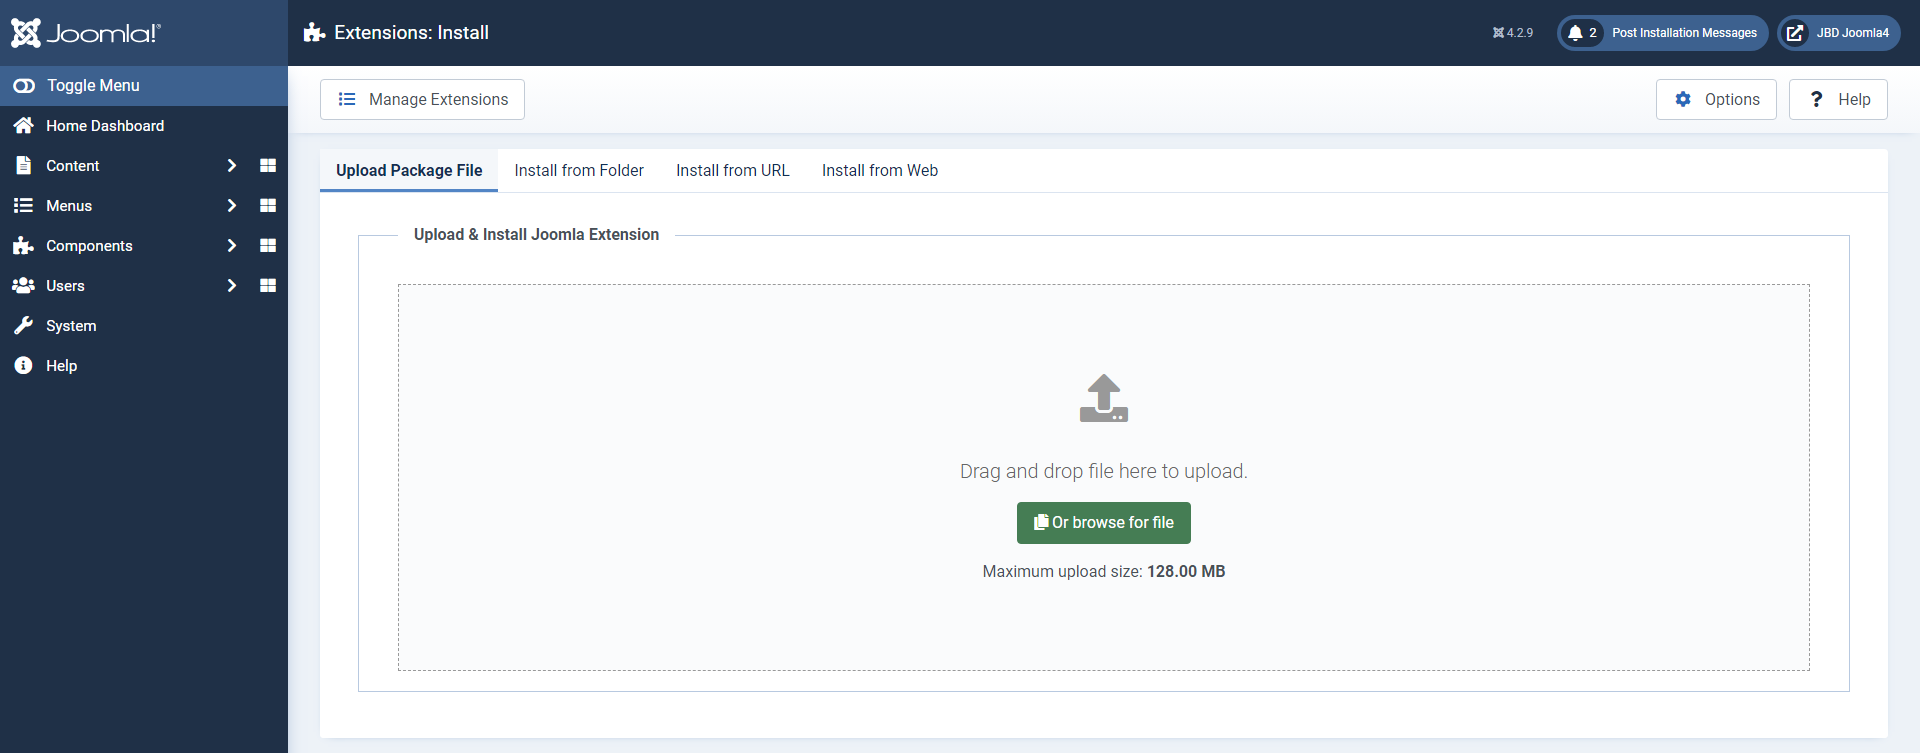
After selecting the component click the Open button
You will receive a confirmation message upon installation completion
Note
Due to multiple features of J-BusinessDirectory extension the size of installer is higher than 2MB which is the default upload limit set by hosting providers. If you experience any errors on installation please check the upload limit and directory write permission. In some cases it is recommended to contact the hosting provider to fix this.
In some cases, the hosting provider allows you to override the php settings by adding a php.ini file in your document root. Php.ini file should contain the following lines of code.
upload_max_filesize = 64M |
post_max_size = 64M |
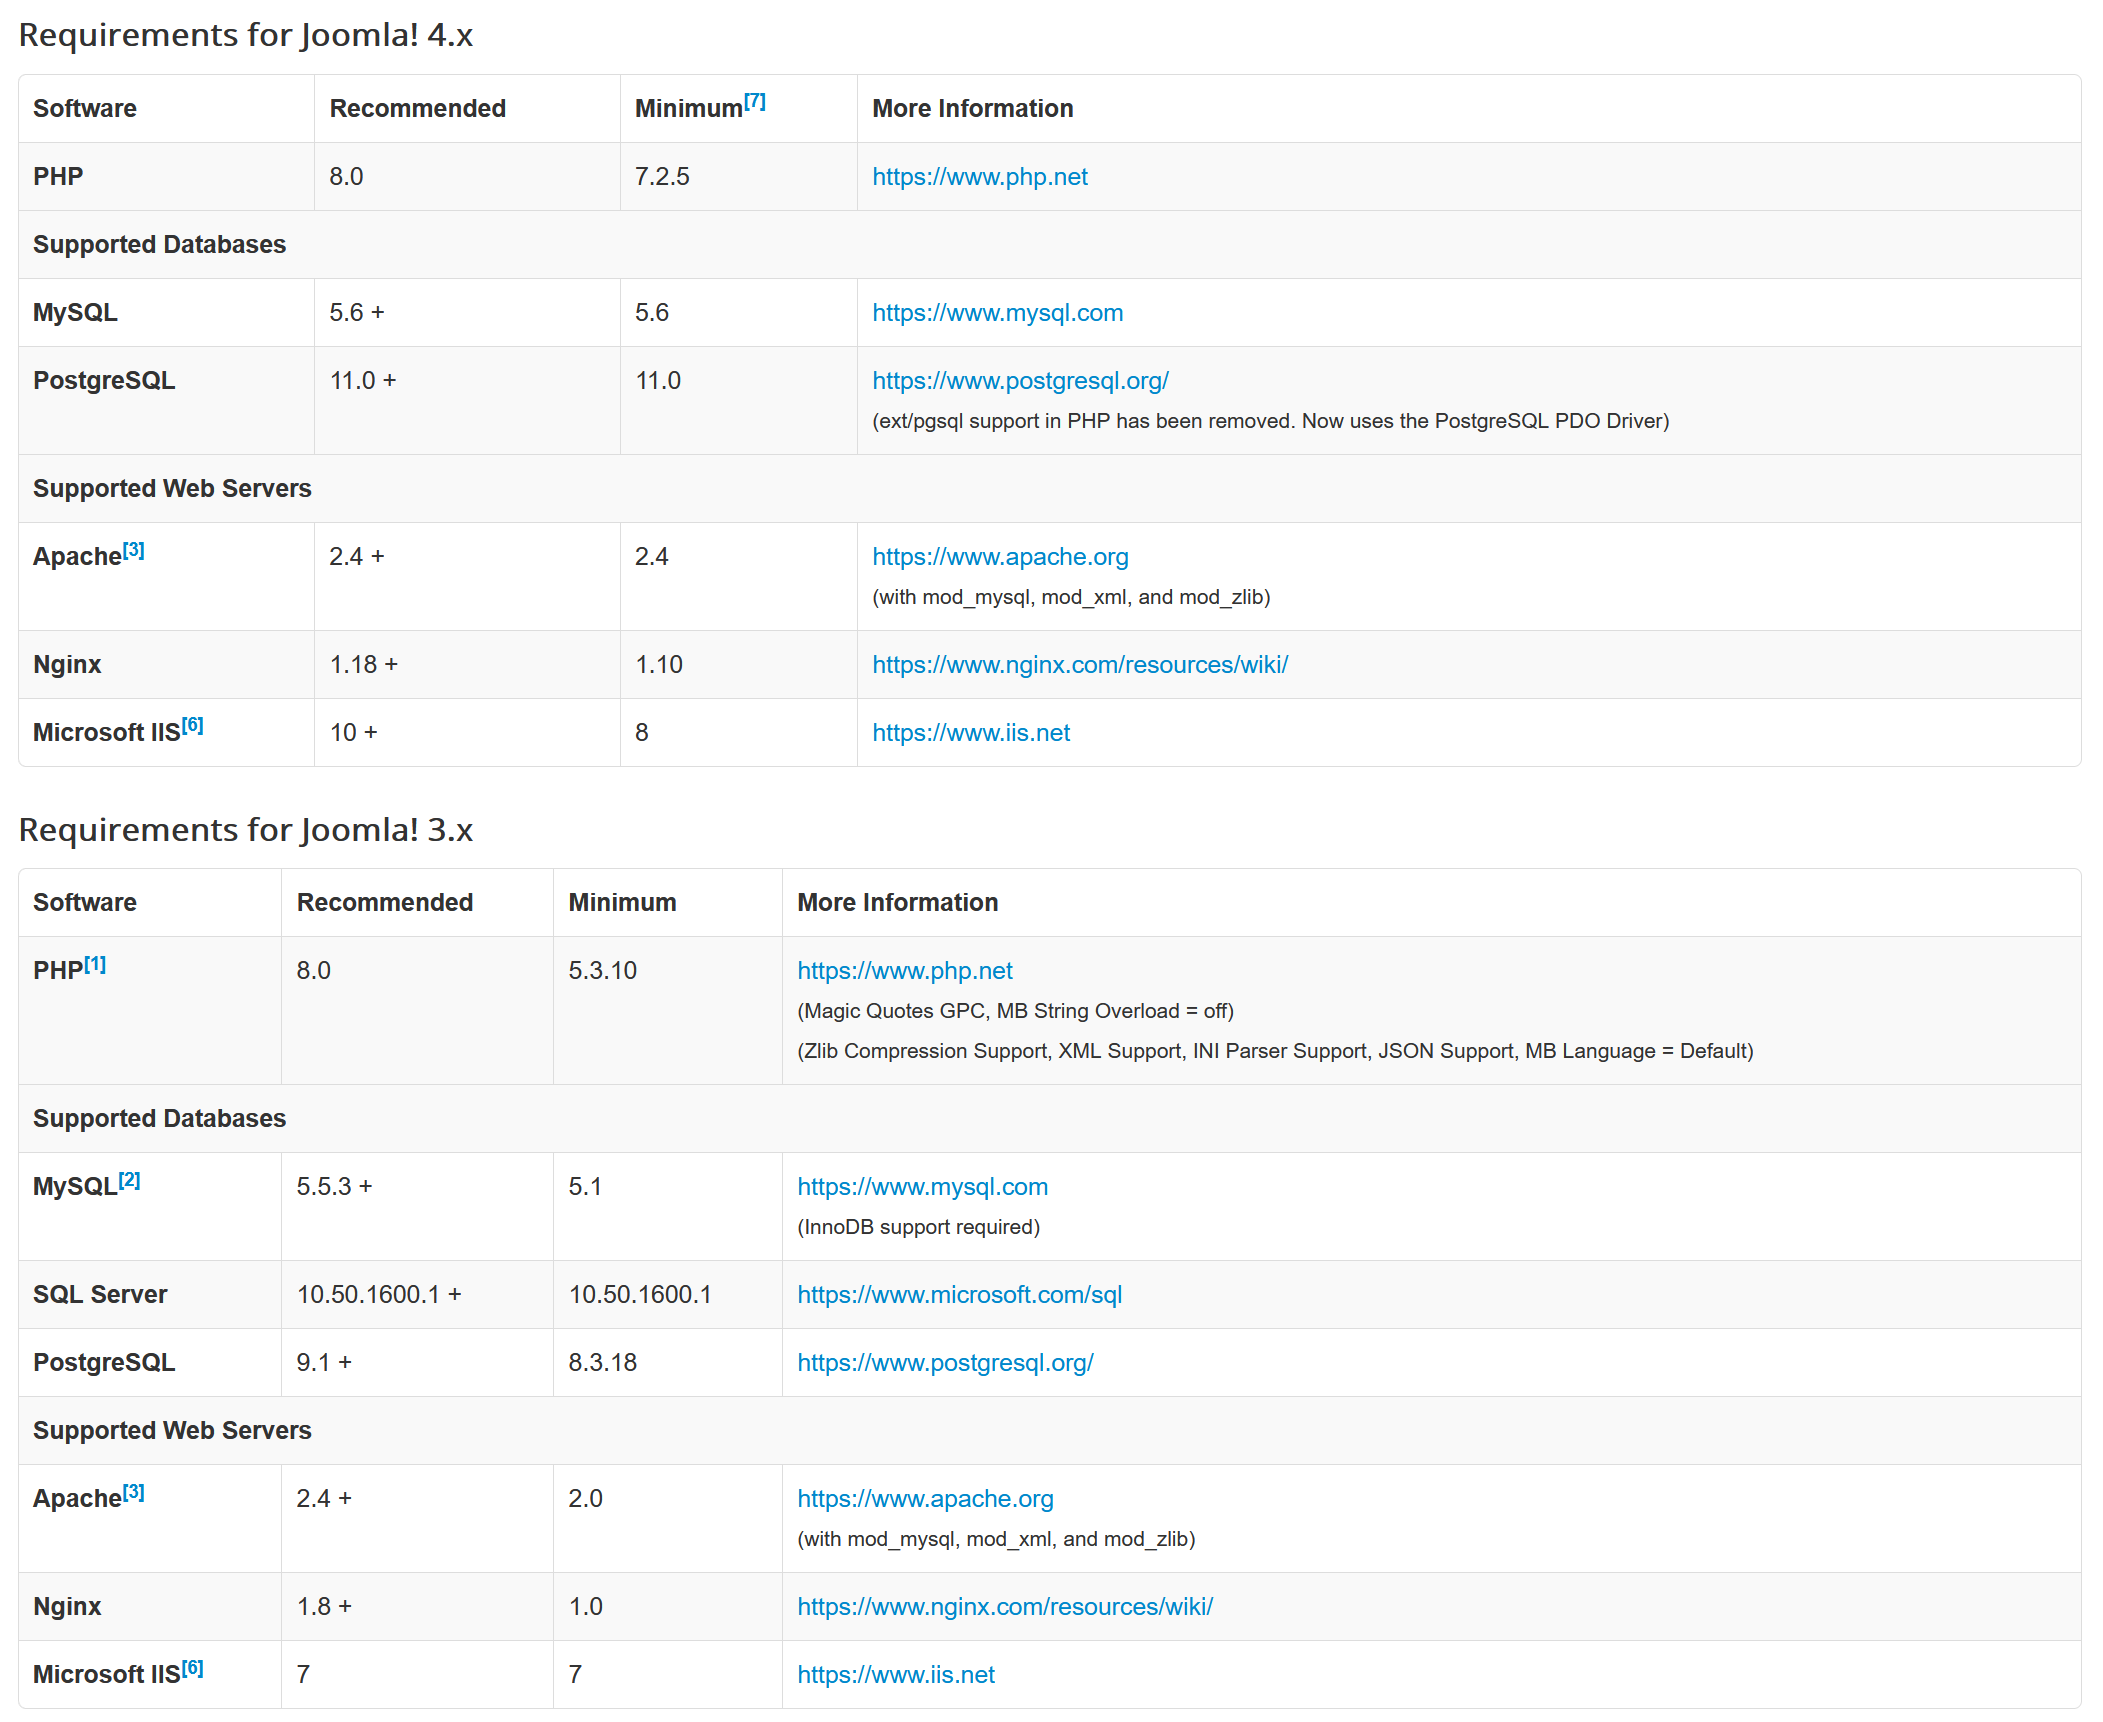
Server Requirements
QuickStart Installation
Quickstart is a Joomla installation kit that comes with whole setup like on our demo site. Installing the Quickstart is easy and it saves you a lot of time.
Note
The quickstart is available only if you purchase also a template together with the extension.
Downloading and Uploading J-Directory Quickstart Package Files
Download the current release of J-Directory Quickstart.
Move the downloaded installation package to the server. Use a FTP Client to transfer the Joomla! 3.x files to your server. If you don’t already have an FTP client, we recommend Filezilla
Hint
This can be accomplished by simply moving the downloaded package to your server, then unpacking it. Or you can unpack the files on your local computer, then move the Joomla installation over to your server. Either way, the Joomla installation needs to be unpacked in the root of your site.
Warning!

Database for Joomla! Installation
If you need to create a database, please read ” Create a database for use with Joomla! ” first or skip to step #2.
You will need to note basic database information needed when the actual installation is started.
Location of database, localhost Or a specific host’s server such as dbserver1.yourhost.com
The database name
The database user’s name
The database user’s password
Start Install
Main Configuration
With the above requirements met, a database created and the required quickstart files in place, you are ready to install J-Directory quickstart. Start the by opening your favorite browser and browsing to the site’s domain name. On host installation you will use http://www.yoursitename.com. If you are installing the quickstart locally, you will use http://localhost/<path to Joomla files>, and you should see the installation screen.
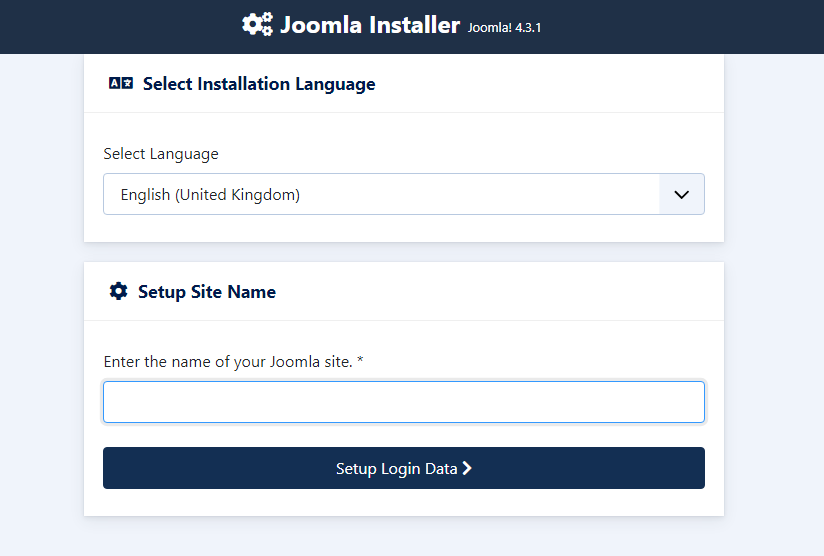
If the Joomla! source files have been correctly placed in your root folder, the Joomla! page for selecting the language appears:
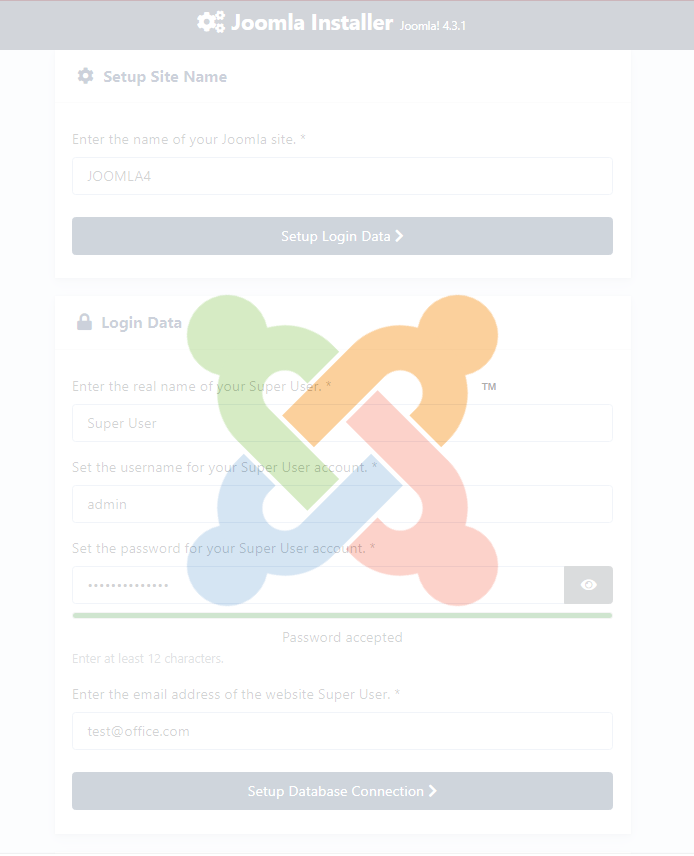
Select the language, enter the name of your website, and click Setup Login Data.
Set access to your Joomla! back office:
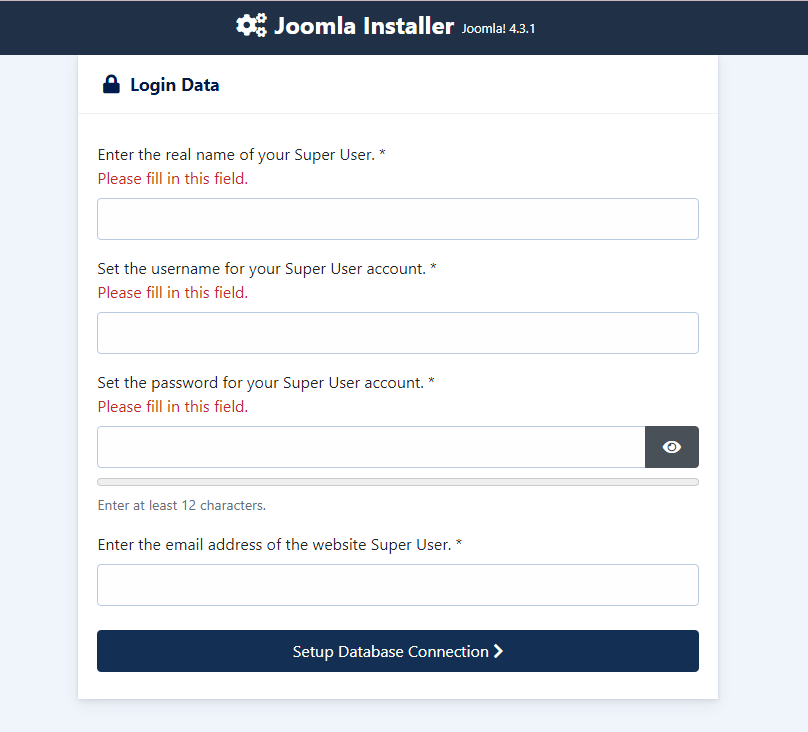
Real name: Enter your real name.
Username: Choose a username that will allow you to log in to your Joomla! admin panel.
Password: Choose a password with a minimum of 12 characters.
Email: Please enter a valid email address. It will be used to receive notifications sent by Joomla!.
Check the information entered, then click on Setup Database Connection.
Database Configuration
Enter the information requested for the database:
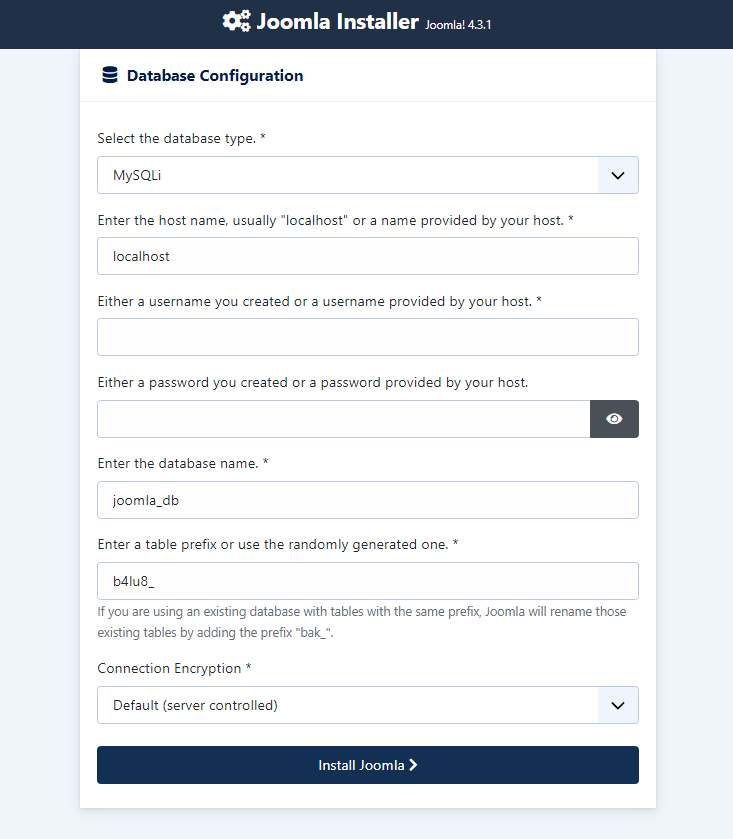
For simplification, these instructions are a reference to installing with a MySQLi database. The instructions on the installation page are self-explanatory, but here they are again:
Database Type: Select your database type from the types available for Joomla!. If you are using an OVHcloud shared database, you can keep the default MySQLi value.
Hostname Enter the name of your database server, specified in the installation email and displayed in your OVHcloud Control Panel.
Username: It is identical to the database name if you are using a database included with your web hosting plan.
Password: You defined it yourself when you created your database. You may have modified it in the meantime.
Database Name: This name was defined when the database was created in the OVHcloud Control Panel. It is identical to the database username if you are using a database included with your web hosting plan.
Table Prefix: If you are installing with a brand new database, enter your preferred prefix.
Connection Encryption: Keep the value Default.
Click Install Joomla.
The installation is complete, but you can add additional languages to your CMS if you need to.
Finishing Up
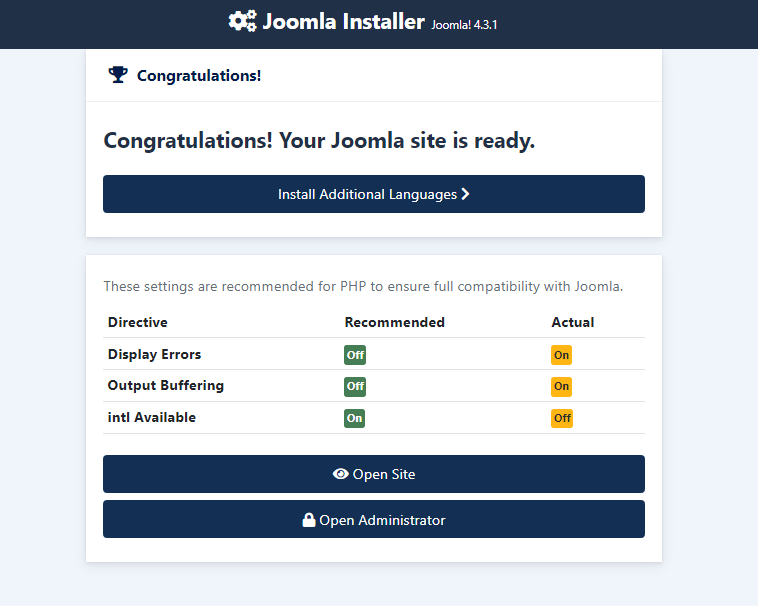
Success and Finishing Up the Installation
Congratulations! Joomla! 4 is now installed. If you want to start using Joomla! right way without installing extra languages there is one last step to complete the installation. You must delete the Installation Folder. Click on Remove Installation folder and a success message will appear. Now you can navigate to the Administrator log in by clicking Administrator or go right to your site by clicking Site.
Upgrade to Joomla! 4
Certainly! Here’s a general set of instructions on how to upgrade to Joomla 4:
Backup Your Website: Before proceeding with any upgrade, it’s essential to create a backup of your Joomla website, including all files and the database. This ensures that you have a restore point in case anything goes wrong during the upgrade process.
Check System Requirements: Verify that your hosting environment meets the minimum system requirements for Joomla 4. Ensure that your PHP version is compatible and that all necessary extensions and plugins are updated and compatible with Joomla 4.
Update Joomla Extensions: Update the J-BusienssDirectory extension to the latest version and all of your installed extensions, templates, and plugins to their latest versions. Visit the respective developer’s website or the Joomla Extensions Directory to download the compatible versions for Joomla 4.
Disable Non-Core Extensions: If you have non-core extensions installed that are not compatible with Joomla 4, it’s recommended to disable or uninstall them temporarily before starting the upgrade process. This helps prevent any potential conflicts during the upgrade.
Test the Upgrade: Set up a testing environment or a staging site where you can perform a trial upgrade. This allows you to test the compatibility of your website, extensions, and templates with Joomla 4 without affecting your live site.
Update Joomla Core: To upgrade to Joomla 4, you need to download the Joomla 4 installation package from the official Joomla website. Follow the provided installation instructions to update the core Joomla files. Make sure to choose the upgrade option during the installation process.
Verify Functionality: Once the upgrade process is complete, thoroughly test your website’s functionality, including front-end and back-end features. Check for any errors, broken links, or missing components. Test different sections, forms, and interactions to ensure everything is working as expected.
Re-enable Extensions: If you disabled any extensions earlier, verify their compatibility with Joomla 4 and reinstall or enable them one by one. Update to the latest compatible versions if necessary.
Monitor and Fine-tune: After the upgrade, closely monitor your website for any issues, performance problems, or compatibility conflicts. Fine-tune your website by adjusting settings, optimizing performance, and ensuring that all features are functioning properly.
Remember, the upgrade process may vary depending on your specific website setup and extensions. It’s crucial to carefully follow the official Joomla documentation, consult with extension developers if needed, and seek assistance from Joomla community forums or support channels if you encounter any difficulties during the upgrade.
As always, it’s highly recommended to perform these steps on a test or staging site before upgrading your live production site to minimize any potential disruptions.
Update the extension
We are continuously improving the extension by releasing new versions. You can benefit of the latest features and improvements by updating to the latest version. When an update is performed all extension files are overwritten with the latest version, the database and current settings are preserved.
Attention
It is highly recommended that you should do a backup before you update. All custom changes that are applied to the directory extension files are overwritten.
Manual update
You can download the latest version by login on your CMSJunkie store account and go to My Downloadable Links section. You can install the new version over the existing one by following the instruction from chapter 1.2 Installing the extension.
If your current version is older than 5.0.0 version please update to 5.0.0 version first (request that on support) and then update to the latest version.
Automatically update
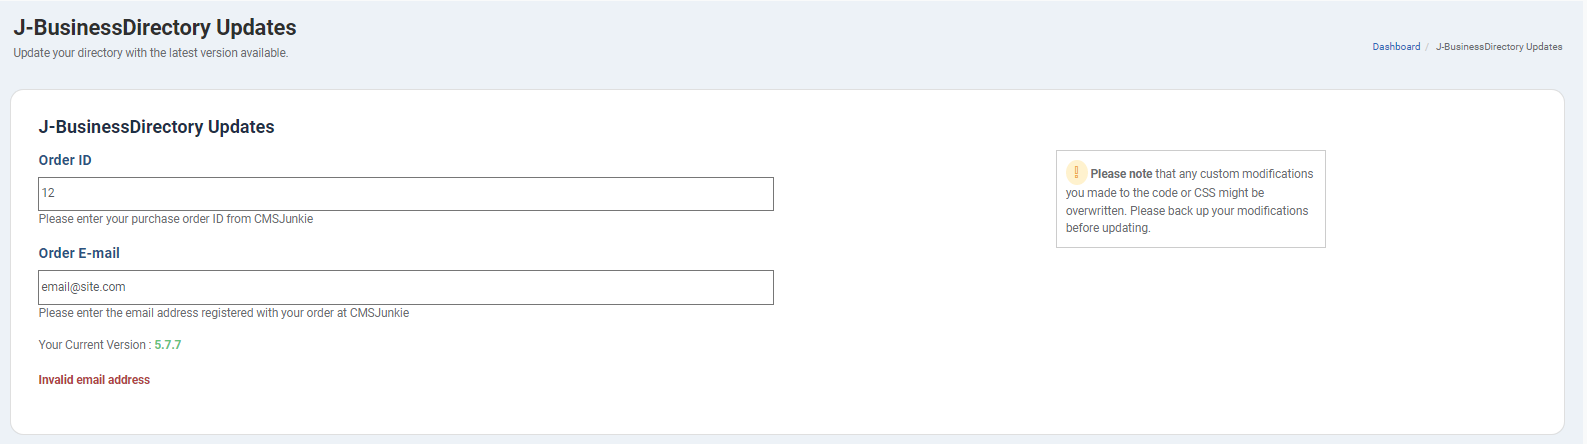
There is also the possibility of doing an automatic update. You can update directly from your Joomla website, from Update section of J-BusinesssDirectory extension, not from Joomla Update section.
First you will have to enter your order id and order email and click on Save order details button like in the image below. Once the details are entered you will be able to get the latest version if you subscription is still active.
If your current version is older than 5.0.0 version please perform a manual update to 5.0.0 version first (request that on support) and then update to the latest version.