Business directory administration
You can access the component settings in the backend, at any time by selecting from the main menu WP-BusinessDirectory. You will be presented with a list of options that will allow you to setup your business directory.
The administrator has the following features available
General Settings (extension settings)
- Business Listings
Business Categories
Custom Attributes
Business Types
Menu/Price List
Business Projects
Memberships
Announcements
- Offers
Offers
Offer Categories
Custom Attributes
Coupons
- Events
Events
Event Categories
Custom Attributes
Event Types
Messages
Packages
Discounts
Orders
Taxes
Payment Processors
Countries
- Reviews
Reviews
Review Questions
Review Criteria
Review Responses
Review Abuses
Marketing
Reports
Statistics
Search Logs
E-Mail Templates
Articles
Mobile App Config
Linked Listings
Update

The dashboard section provides useful news, links and statistics. The statistics are associated with a chart (for business listings, offers, events and income).
In order to provide an easier setup for your directory we have created a status section that will show if all necessary details are completed. The details about each status can be found below.
Google MAP API– shows if there is an API key entered in the general settings.
Translation plugin – If SEO is set to yes then the WP-BusinessDirectory URL Translator plugin setup is required.
Front-end ACL – If the “Front-end ACL” setting from the directory general settings is set to yes then it is required to configure also the user groups permissions, otherwise the box will turn to red. The user group permission configuration is needed in order for the front-end to function in normal parameters.
CAPTCHA – When Captcha is set to yes on general settings then it is required for CAPTCHA to be enabled in Joomla general configuration and also the CAPTCHA plugin to be enabled and configured properly, otherwise an error will be shown.
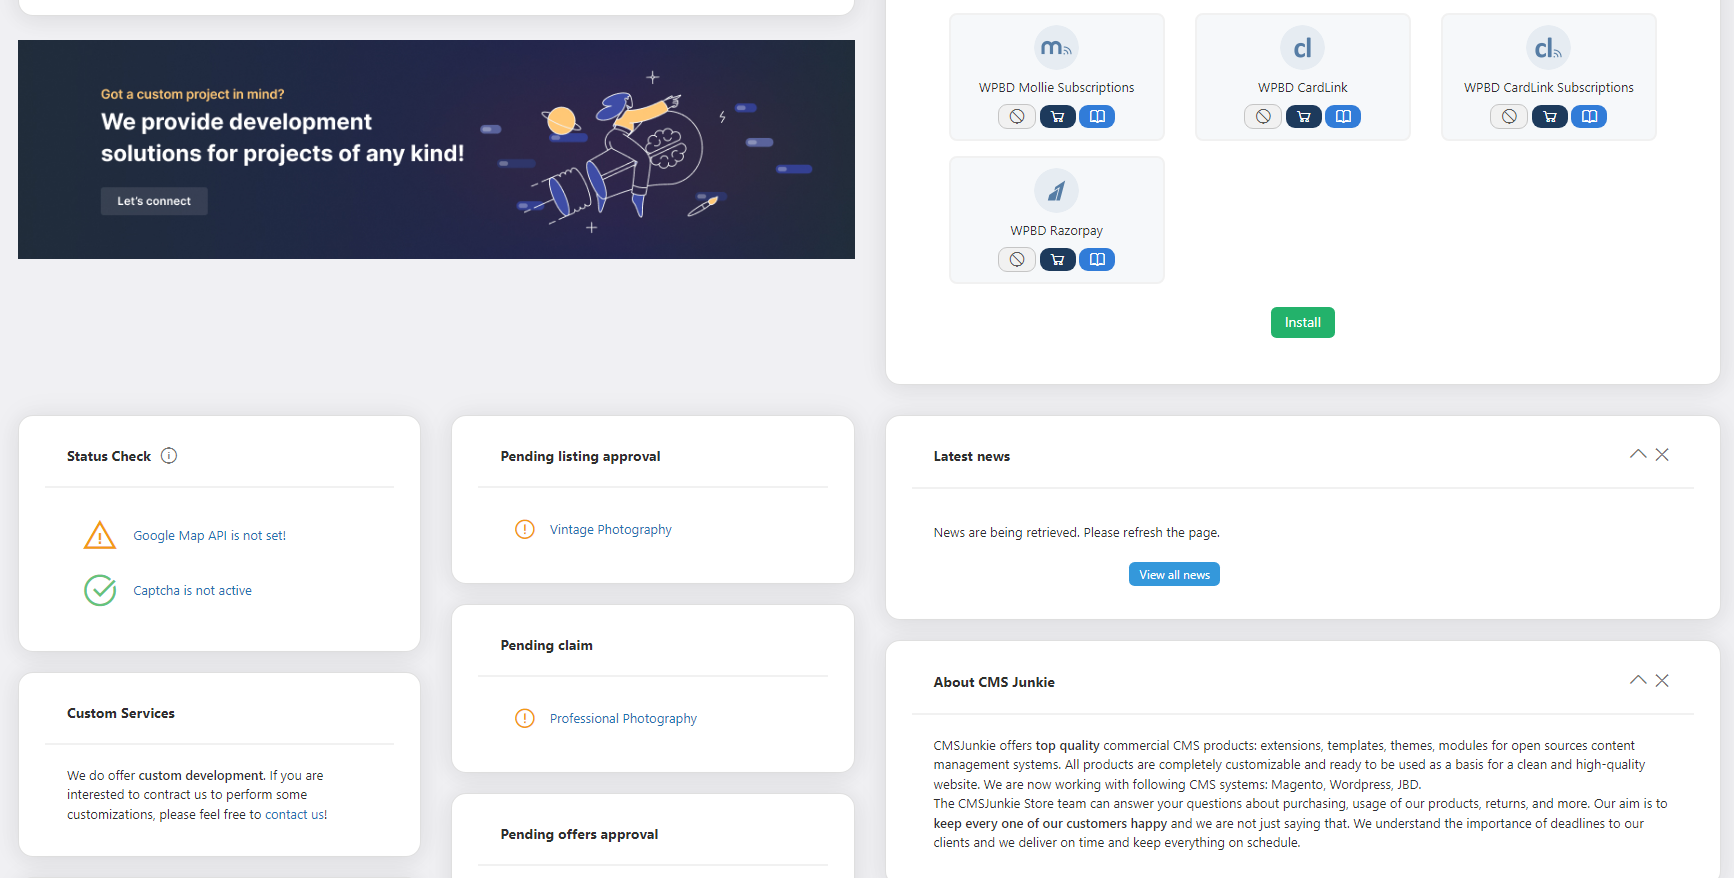
The site administrator, also, has the possibility to check the pending items on the extension’s dashboard. All the items, that need approval, are listed in this section:
pending listings
pending offers
pending events
claim listing pending approval
pending reviews for listings and offers
Only after each item will be approved or disapproved by the administrator, it will not be shown anymore in this section.
General Settings
In the application settings screen a series of global settings can be set. Available settings are organized in the following sections:
General Settings
Business Details
SEO
Metadata settings
Frontend
Business Listings
Attribute Configuration
Offers
Events
Languages
Conferences (if JBD Conferences is present)
Custom CSS
General Settings
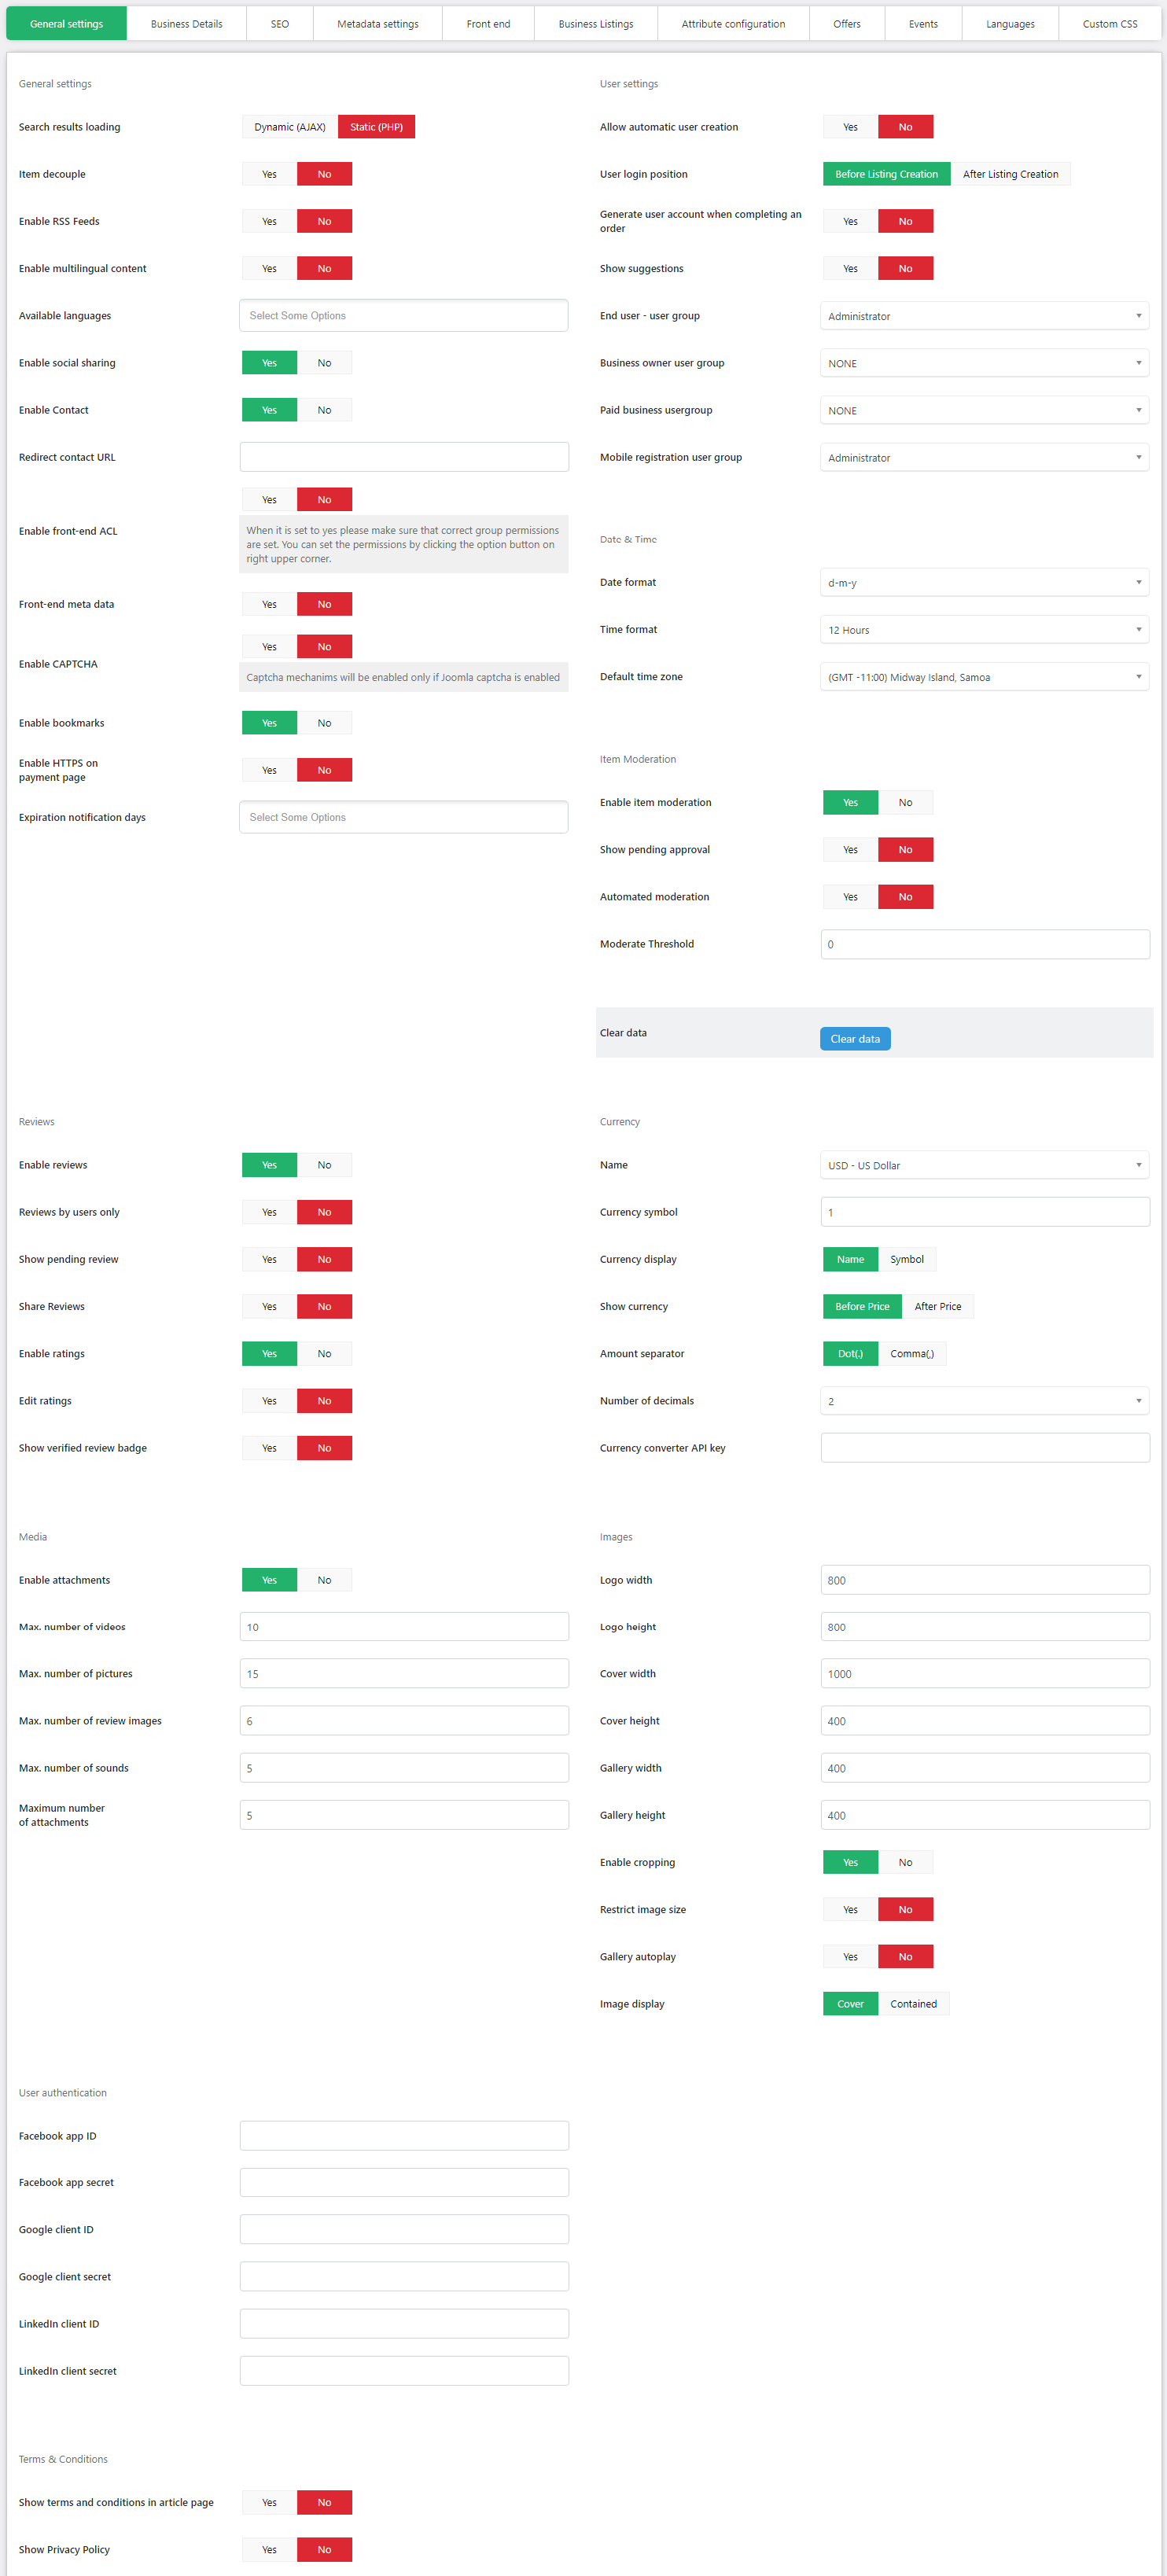
General Settings
Search results loading - loads the results dynamically with AJAX or statically with PHP
Item decouple: when set to yes, will allow offers and events to be shown independently from listings.
Enable RSS Feeds: You can set whether you want to activate RSS Feeds or not. If the mechanism is enabled an RSS icon will appear on catalog, offers and events list view.
Enable multilingual content: A separate tab, linked to each language located in extension language folder, will appear above the principal items of the extension.
Available languages : Select between the languages on the drop-down menu.
Enable social sharing: You can set whether you want to activate social sharing or not. If the mechanism is enabled a button will be displayed on a business listing, offer and event view.
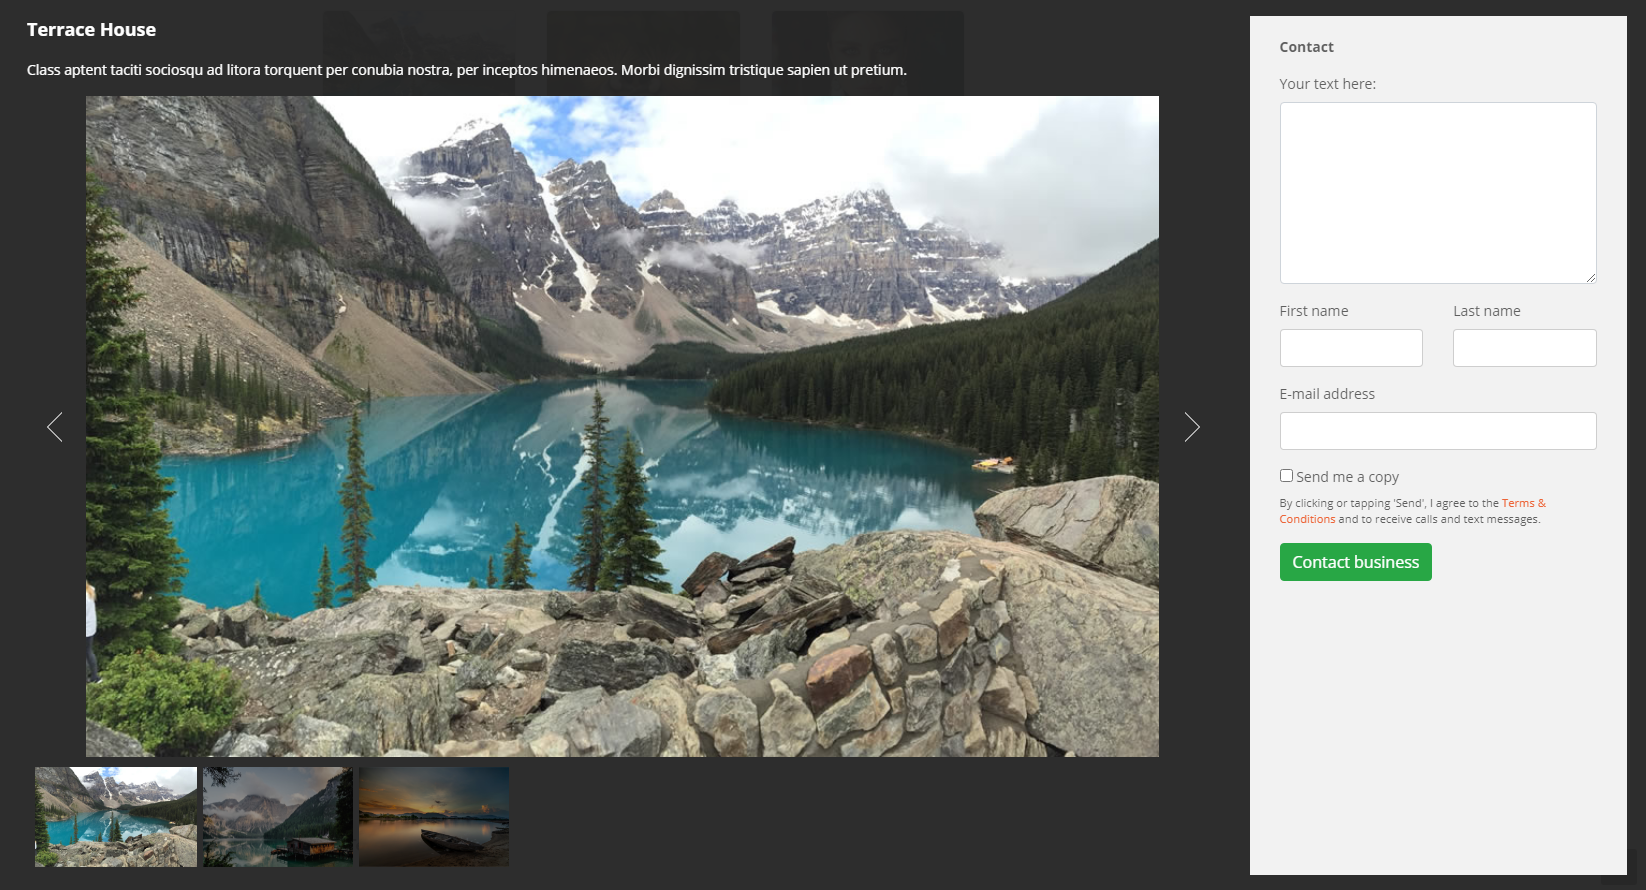
Enable Contact: When setting to yes, it enables the contact button on listings, offers and events
Redirect contact URL:The admin has the possibility do add an URL, so that after any company contact, the user could be redirected to this URL Enable front-end ACL: enables the Access Control List on front-end. If disabled the ACL would not be activated on front-end. Before enabling the front-end ACL please make sure that permissions are correctly defined on Joomla ACL. For more details please check How to set user group permissions in the “How to” section.
Front-end meta data: enables meta data fields on all front-end edit views, all items
Enable CAPTCHA: Enable CAPTCHA on contact form and review form Notice: When enabling CAPTCHA on J-BusinessDirectory you must enable also CAPTCHA plugin in manage plugins and set default captcha in Joomla General Configuration.
Enable Bookmarks: You can set whether you want to activate bookmarks or not. If the mechanism is enabled, it gives you the possibility to add a new bookmark on a listing or on an offer and also a new box will be displayed in the control panel section.
Enable HTTPS on payment page: Allows the possibility to perform the payments on a secured page. In order for this feature to be active, you have to make sure that your site supports https protocol. If you face any issues related to https protocol please contact your hosting provider.
Expiration notification days: An e-mail will be sent to business owner (if the link from chapter 6 is called) before expiration with the number of days provided. E.g. If the number of days equals 5, the user will receive an expiration notice 5 days before the business listing expires.
Service notification email days before : set the number of days in order to send an email to the end user before service date from the number of days selected. Please make sure that the cron job is set daily.
User Settings
Allow automatic user creation: you can set whether you want to allow user creation during the creation of a business listing.
User login position: require the user login/registration , before/after listing creation
Custom registration: a custom user registration mechanism will be activated, that will not break the user flow.The user is automatically confirmed in Joomla and he will have to confirm only the mail address to make sure all email are received on the correct email address.
Generate user account when completing an order: when the order is created, the user can choose to complete the order as a guest or the system can generate an account for him
Show suggestions: the end-user will be presented with a list of suggestions for listings, offers, events, conferences based on the area of interest from the user profile. (this option can be used together with the jbd user plugin)
End user - user group: User group that will be associated to the users that are going to register on the front-end through J-BusinessDirectory registration forms. The user group is associated when a regular account is created.
Business owner user group: It sets the usergroup that will be added for the users that are going to create a new business listing.
Paid business user group: It sets the user group that will be added for the users that are going to perform a payment. You can leave it empty for no assignment.
Mobile registration user group: User group that will be assigned to newly registered mobile users.
Quote request user group: User group that will be associated with newly created user account during the quote request process.
Date & Time
Date Format: The format of the date displayed throughout the application, front end and backend.
Time Format: The format of the time displayed throughout the application, front end and backend.
Default time zone: The admin can set the default time zone to display in the business listings edit view when first creating the listing. Of course, the option to change this default time zone is also possible at the business listings edit view, if the user desires to select a different time zone.
Item Moderation
Enable item moderation: when set to no, all the items created will be approved by default.
Show pending approval: allows the possibility to show on search results the businesses that have approval status to pending approval. The business listing will be shown directly on front-end without the site admin action to validate the business listing
Automated moderation: when set to yes, once the business owner has a number of items approved (for each item type: business listings, offers and events) that is equal with the Moderate Threshold, all the following items that will be created are automatically approved.
Moderate threshold: if a user has a number of approved items higher than the threshold, all the items will be automatically published.
Reviews
Enable Review: Enable/disable reviews
Reviews by users only: When set to yes, reviews can be posted only by logged in users
Show pending review: When setting to yes, the review will show on front-end business listing view, without being approved by the admin of the site on back-end
Share Reviews: Enables the social sharing of reviews
Enable Ratings: Enable/disable ratings
Edit ratings: Enable/disable the possibility for users to edit their own ratings.
Show verified review badge: Show the verified review badge & policy instead of review report actions.
Currency
Name: the currency that will be used in the directory
Currency symbol: the currency symbol (it can be HTML code or text)
Currency display: how will the currency be displayed, name or symbol
Show currency: the position of the currency related to amount, in front or after
Amount separator: the decimal separator
Number of decimals : set the number of decimals for the price format
Currency converter API key: set the currency converter API key
Media
Enable attachments: You can set whether you want to activate attachments or not. If the mechanism is enabled the attachments upload section will be displayed.
Maximum number of videos: You can set the maximum number of videos that can be added for listings, if packages are not enabled. This maximum number is also applied to offers and events. For e.g. if the max number of videos is set to 4, the user cannot add more than 4 videos. If the max number is reached, then the “Add video” button will not display anymore on the edit view of the listing, offer or event. And if some of the videos are removed, the listing/offer/event should be saved for the “Add video” button to display again. If on a listing/offer/event is added the max number of possible videos, and after that, the admin decides to set a lower/higher number on general settings, this will not affect none of the detail views, but only the edit views. This number will be applied to the listings as long as the packages are not enabled, whereas for the offers and events will be always applied.
Maximum number of pictures: Maximum number of pictures that can be uploaded to a business listing page, if packages are not enabled. This maximum number also affects the offers and events. The user cannot upload more pictures than the set number in general settings. For e.g., if the set number on general settings is 10, the user cannot upload more than 10 pictures. If less than 10 pictures are added in the drop zone, than all of them will be uploaded and the drop zone will be still shown, but if more than 10 pictures are added in the drop zone, then only 10 of them will be uploaded. When the maximum number is reached, the drop zone will not be displayed anymore. This number will be applied to the listings as long as the packages are not enabled, whereas for the offers and events will be always applied.
Maximum number of review images: You can set the maximum number of images that can be added in a review. When set to 0, the image upload will not display.
Maximum number of sounds - You can set the maximum number of sounds that can be added.
Maximum number of attachments: You can set the maximum number of attachments that can be added, if packages are not enable. This maximum number is also applied to offers and events. The set max number of attachments, also affects the number of attachments added before, for e.g. if the max number was 6 and you have added 6 attachments, but then the admin sets this number to 4, then on the listings/events/offers details view, will display only 4 attachments. On the edit views, if the max number of added attachments is reached, then the user cannot upload any attachments anymore and a popup will display in the top of the page notifying that the max number of allowed attachments is the number set on general settings. This number will be applied to the listings as long as the packages are not enabled, whereas for the offers and events will be always applied.
Images
The user can now set the logo image, cover image and the gallery images widths and heights.
Logo width: Enter the default width for logos
Logo height: Enter the default height for logos
Cover width: Enter the default width for cover images
Cover height: Enter the default height for cover images
Gallery width: Enter the default width for gallery images
Gallery height: Enter the default height for gallery images
Enable cropping: if this option is set to yes, the user can crop the images before uploading them in and on the cropped image will be applied the sizes set in the above fields.
Restrict image size: if this option is set to yes, the resolution of the pictures uploaded from the user, will be restricted to the sizes set in the above fields.
Gallery autoplay: set whether the pictures on the gallery will be autoplayed or not
Image display: affects the front-end grid views pictures, whether they’re shown as cover or fit to container
User Authentication
The site admin will have to enter the authentication keys on the directory’s general settings, for the social networks login to work. For more details please check the J-BusinessDirectory User module manual
Terms & Conditions
The terms & condition for directory listings: can be viewed when a business listing is added.
The terms & condition for reviews: can be viewed when a new review is added to a business listing or on an offer.
The terms & condition for contact: it appears whenever a listing, offer or event is being contacted.
Content responsible person: in the listings’ details views, a drop-down button will be shown containing the company name, address and the email of the actual company.
Show Privacy Policy: It enables showing the privacy policy section in all forms
Business Details
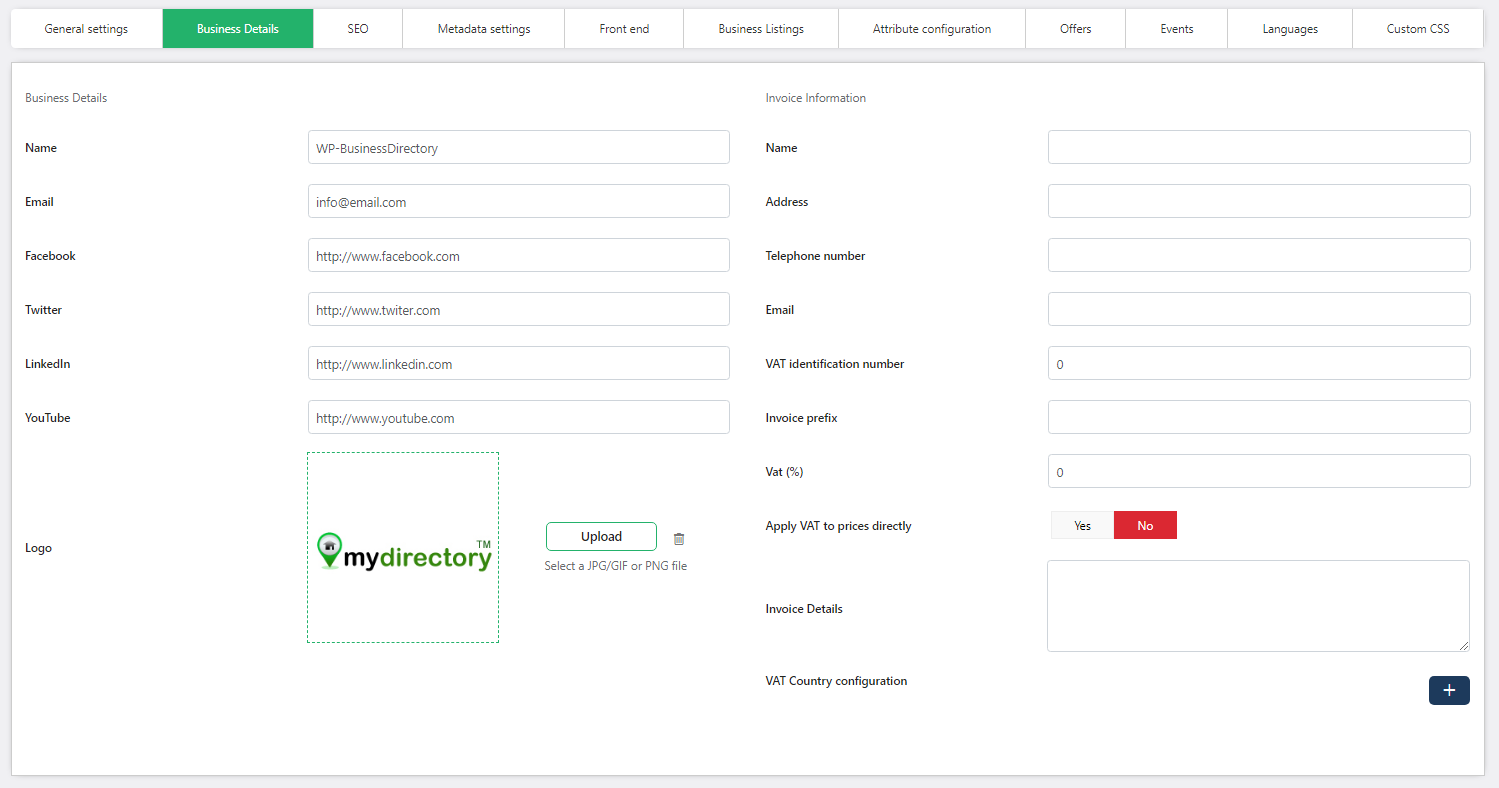
Business Details
Name: Name of the business directory. The value of the name field is used to replace the [company_name] email tag when used in the email template.
Email: E-mail used when sending e-mails.
Facebook: Facebook of the business directory.
Twitter: Twitter of the business directory.
LinkedIn: LinkedIn of the business directory.
YouTube: YouTube of the business directory.
Logo: The logo used on the business directory. This option is mandatory.
Invoice Information
Name: Name of the business directory that will be applied on user invoice.
Address: Address of the business directory that will be applied on user invoice.
Telephone number: Telephone number of the business directory that will be applied on user invoice.
Email: Email of the business directory that will be applied on user invoice.
VAT identification number: VAT ID number of the business directory that will be applied on user invoice.
Invoice prefix: You can use this prefix to assign the invoice number.
VAT: Value-added tax – it will be applied on user invoice.
Apply VAT to prices directly: If set to yes, this setting shows packages prices directly with VAT applied.
Invoice Details: The invoice details of the business directory that will be applied on user invoice.
VAT country configuration: Add different VAT values for each country for which you offer services and products
Appointments commission: set the percentage for the appointments commission , the commission will be calculated on the Reports > Payment reports.
Offer selling commission: set the percentage for the offer/product selling commission , the commission will be calculated on the Reports > Payment reports.
Event booking commission: set the percentage for the event booking commission , the commission will be calculated on the Reports > Payment reports.
SEO
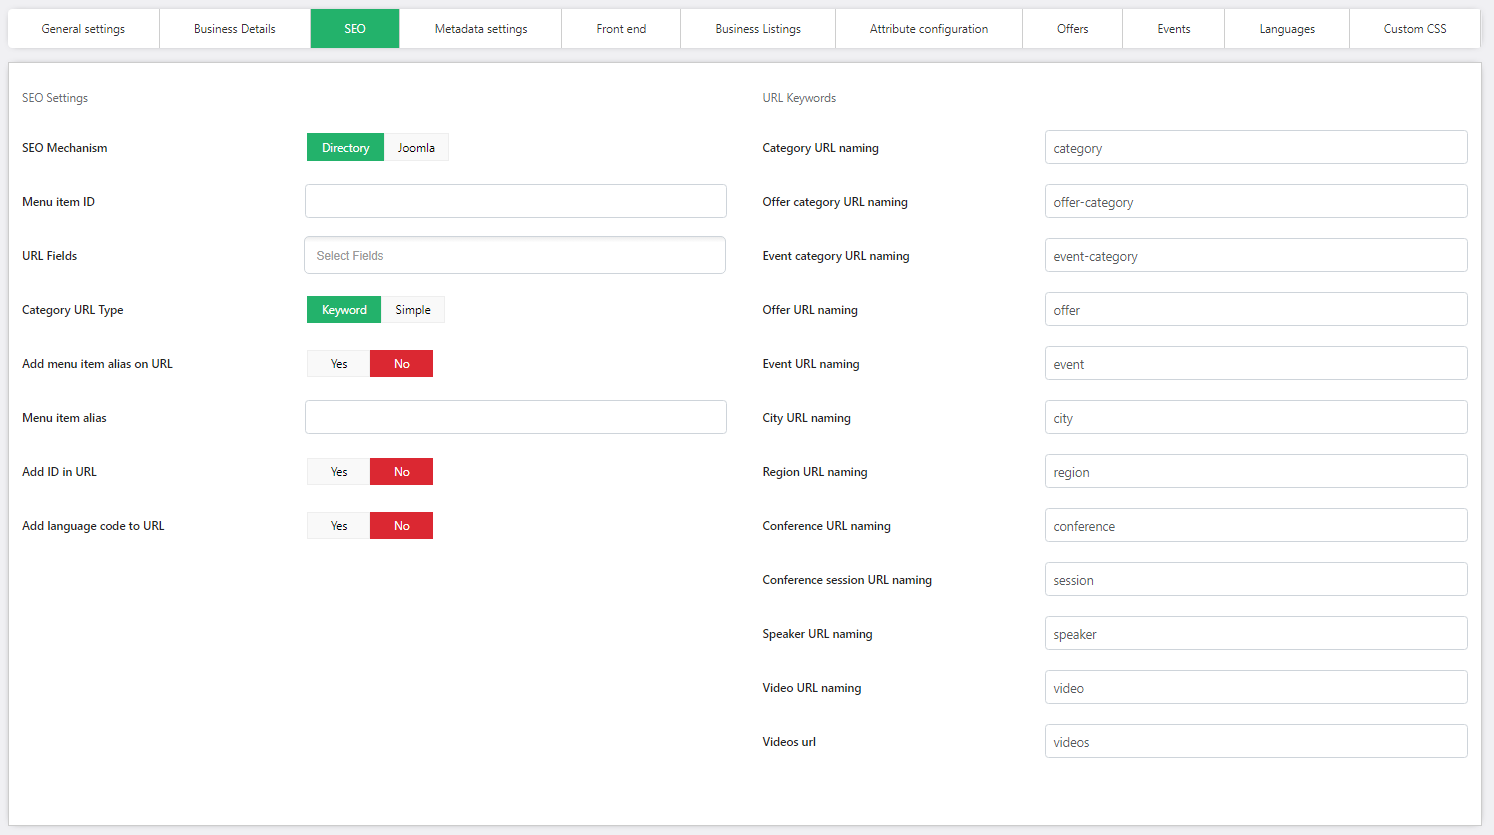
SEO Mechanism: You can set whether you want to set SEO related to the directory extension or to Joomla.
Menu item ID: If SEO is set to yes then the menu item id has to be entered also. The menu item id has to be from a menu item of directory type.
URL Fields: provides the possibility to set the business listing URL in different types, such as:
City – the URL will contain also the city of the listing
Category – the URL will contain also the category of the listing
Region - the URL will contain also the region of the listing
Province the URL will contain also the province of the listing
Category Url Type: provides the possibility to add/remove the category keyword on category URL.
Add menu item alias on URL: provides the possibility to add/remove the menu item alias from URL.
Menu item alias: specify the menu alias that will be added to directory item links (the alias is added only if the Add menu item alias on URL setting is set to yes)
Add id in URL: Add/remove the item id from URL.
Add language code to URL: provides the possibility to add/remove language code to/from URL
URL Keywords: You can set a custom URL naming keyword for each of the listed views.
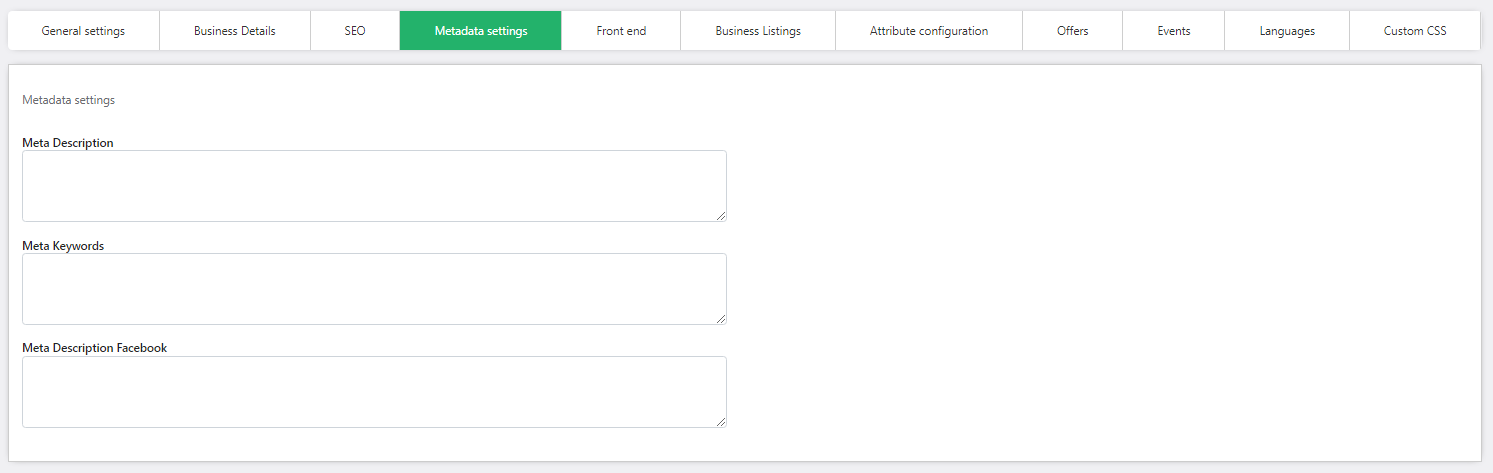
Metadata settings
This section allows you to enter the metadata that will be shown for each business listing page. It gives also the possibility to introduce the text that will be published on Facebook on business listing sharing.
Front end settings
Frontend settings allow you to choose certain views when it comes to categories, some general settings and map results.
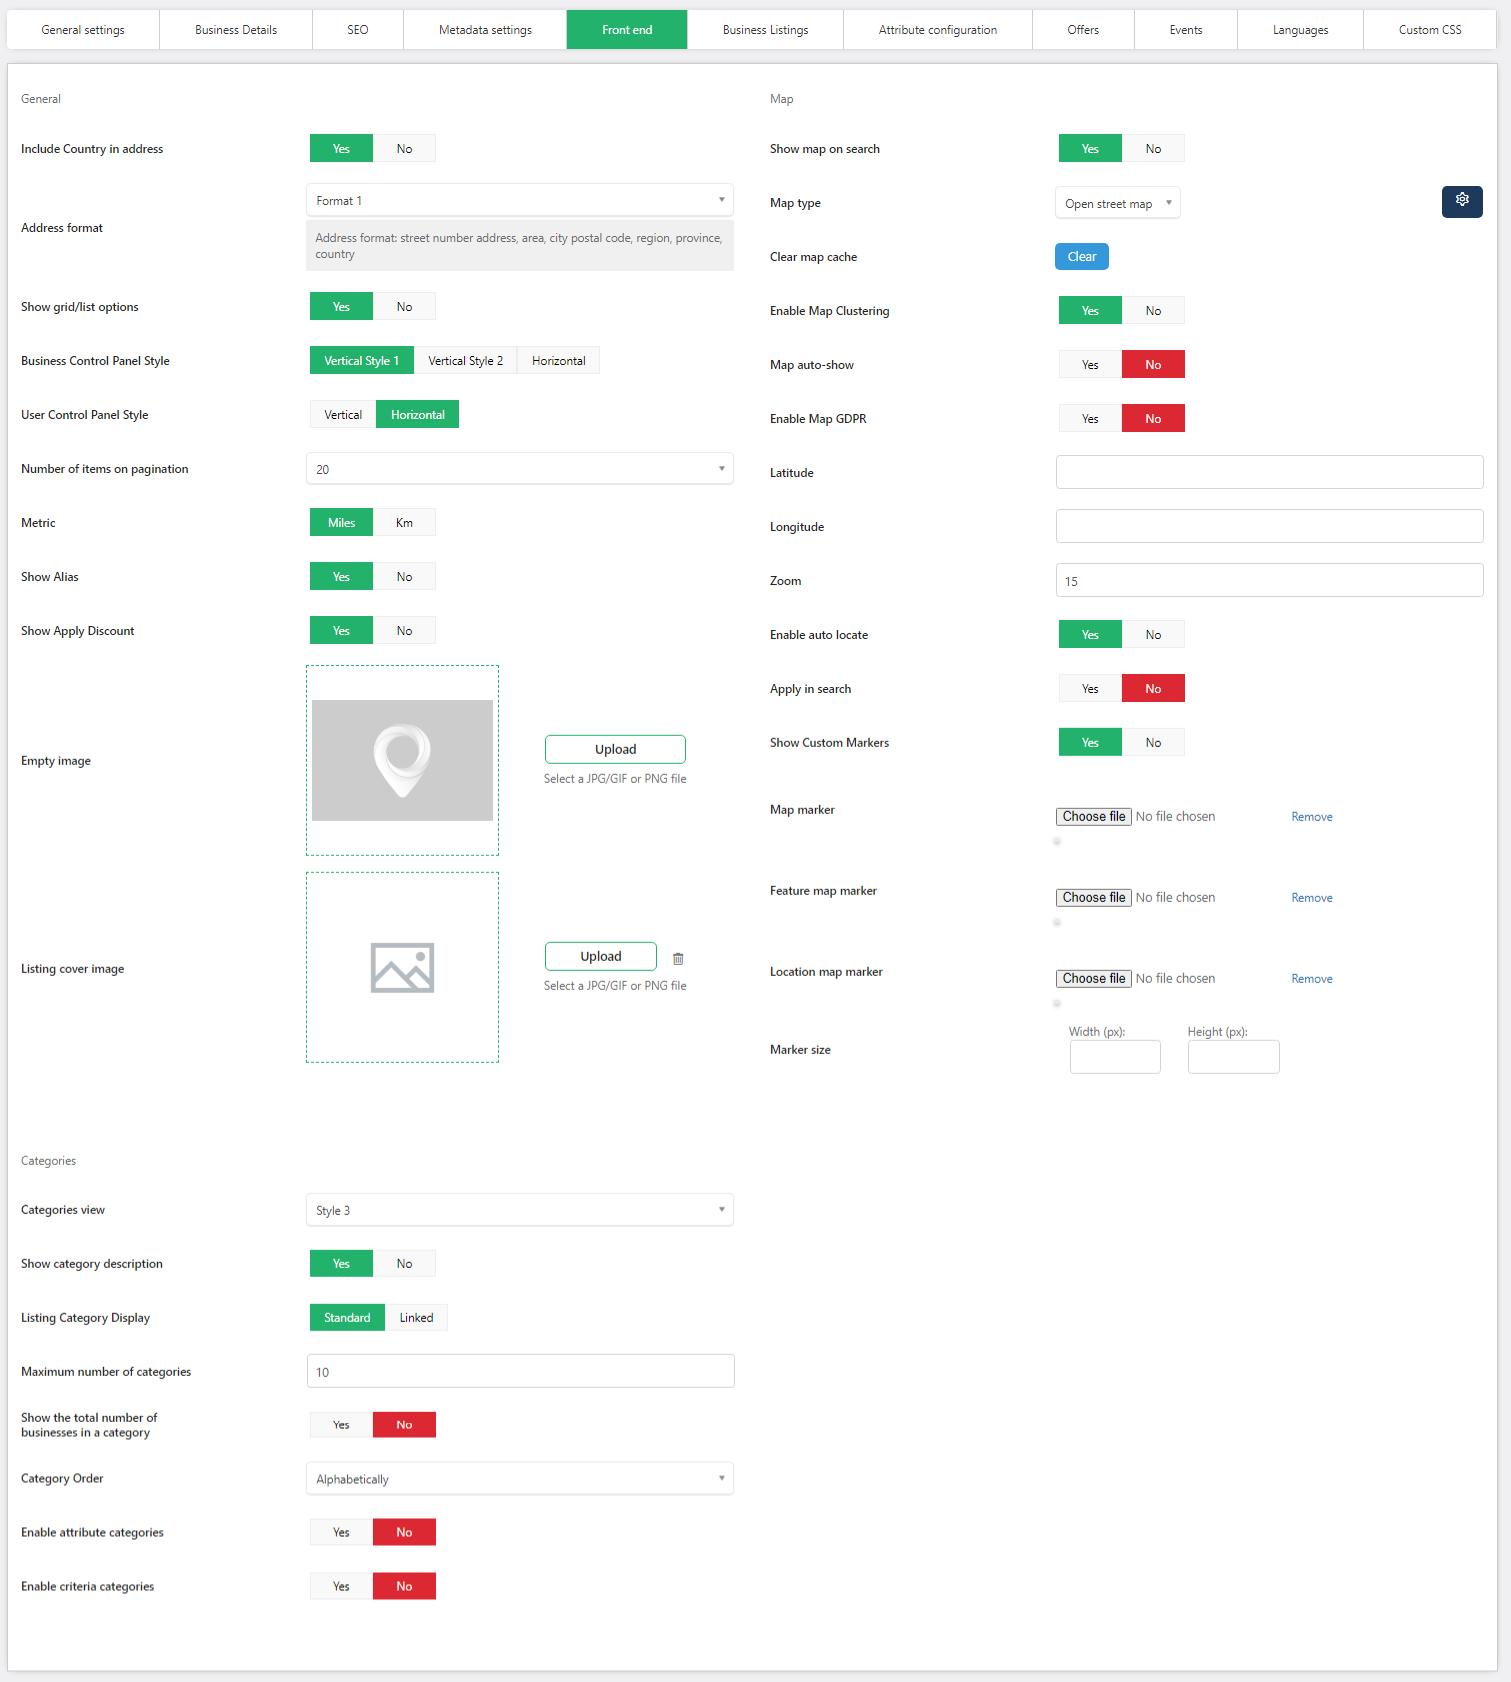
General
Include country in address: You can set whether you want to include the country in address or not.
Address format: You can choose one from the eight address formats available:
Format 1: street number address, area, city postal code, region, province, country
Format 2: address street number, area, city postal code, region, province, country
Format 3: street number address, area, city, region postal code, province, country
Format 4: address street number, area, city, region postal code, province, country
Format 5: street number address, area, postal code city, region, province, country
Format 6: street number address, area, postal code city, region, province, country
Format 7: postal code province, city, area, street number
Custom address: custom order of the address fields
Show grid/list view options: Select yes or no to display the options on search pages
Business Control Panel Style: Select the display style, vertical or horizontal for the business control panel.
User Control Panel Style: Select the display style, vertical or horizontal for the user control panel.
Number of items on pagination: The admin can set the number of items displayed on the front-end pagination. But if the pagination is changed afterwards by a front-end user, it won’t be affected anymore by this setting.
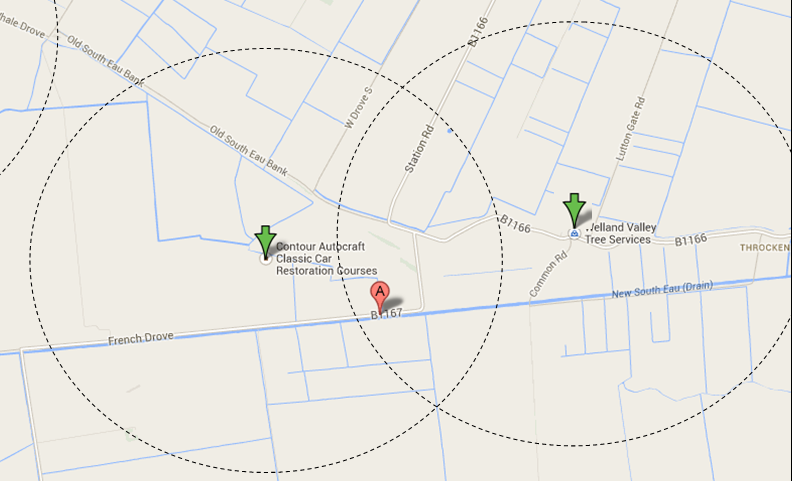
Metric: Set the metric to miles or km. This is used for calculating the distance between 2 points and to show the current search area.
Show Alias: enables alias input fields on the items front-end edit views
Show Apply Discount: enables the discount application on the payment page
Empty image: the uploaded image will be shown for all the items that do not have an image
Listing cover image: default cover image for all listings ( it is used if no cover image is uploaded for the listing or the selected package does not include a cover image)
Map
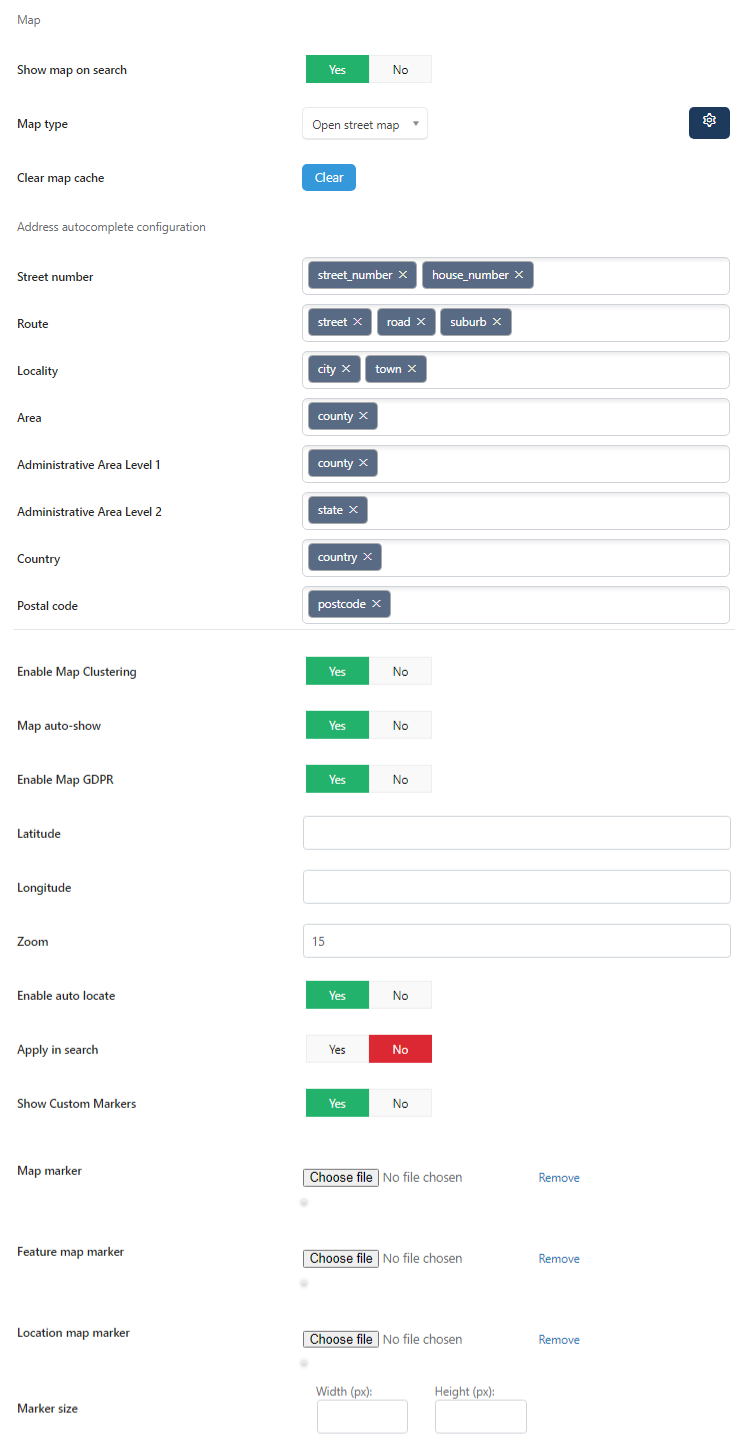
Show map on search: Show/hide map on business/offers/events search results.
Map type: Allows the possibility of choosing between different types of maps: Google map, Bing map, and Open Street map.
Google map key: Map key that can be retrieved from your Google API Dashboard
Google map key-zipcode: Map key that will have no restrictions. This key will be used for extracting the map coordinates from the zip code and it will not be available on front-end. For more details please check Google map is not working or location has disappeared? in FAQ section.
Address autocomplete configuration: add the possibility to map the address fields that are coming from the map to the business directory map address fields
Enable Map Clustering: You can set whether you want to activate Map Clustering or not.
Map auto-show: You can set whether you want to show directory the Google Map with the markers on the search results.
Enable Map GDPR: If enabled, it will request consent by the user before showing any map in the front-end views.
Latitude: You can determine the latitude of the initial point that you need to be centered on the map.
Longitude: You can determine the longitude of the initial point that you need to be centered on the map.
Zoom: You can determine the zoom level that fits your needs best, it will be applied in the map.
Enable auto locate: By activating this option you will make sure that all markers will fit within the map borders.
Apply in search: By enabling this option you will activate the initial point that you determined by setting the latitude, longitude and zoom above.
Show custom markers: When set to no, it will be displayed the default marker, or the one that is set below.
Map marker: You can choose a default map marker for the listings to show on the maps. It will display only for those categories that don’t have a map marker on its own. This option is mandatory.
Featured map marker: You can choose a default map marker for the featured listings to show on the maps. This option is mandatory.
Location map marker: set the icon that will be used for the map marker location
Marker size: set the size of the map marker; if empty, the default size will be considered for each map type
Categories
Categories view: Categories can be presented in 5 ways.
Style 1
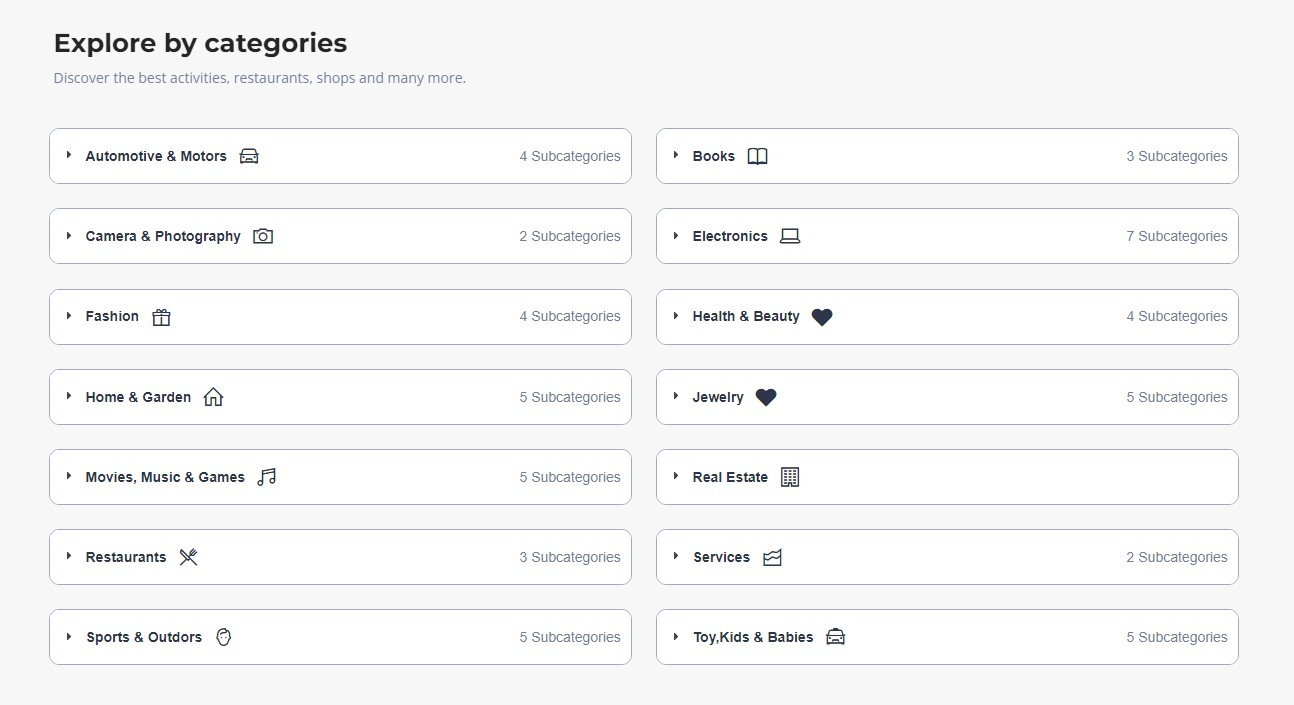
Style 2

Style 3
Style 4
Style 5
Show category description: Show/hide category description on search results (businesses categories, events categories and offers categories)
Listing category display: Select how categories will be displayed on listing details page, standard or linked.
Maximum number of categories: The admin can set the maximum number of categories that can be added in a business listing, only if packages are not enabled. This number affects also the offers and events. The user cannot add more categories for a listing, offer or event, than the number set in general settings. This number will be applied to the listings as long as the packages are not enabled, whereas for the offers and events will be always applied.
Show the total number of businesses in a category: When set to yes, it can show the number of businesses that a category has.
Category order: There are two options for the administrator to display the categories in frontend:
Alphabetically – the categories will display ordered alphabetically in the search filter and the search module
By order – this means that the categories will display in the same order like it is defined on admin.
Enable attribute categories: When setting to yes, the custom attributes for listings, offers and events, will be linked with their main category and only those attributes that are associated with that category will be shown on their edit views and details views. If the category input field is left empty, the custom attribute will display by default for all categories selected.
Enable criteria categories: When set to yes, the review criteria will be linked with the main category of the listings. Only the criteria linked to that category will display in the review section. If the category input field is left empty, the criteria will display by default.
Tips
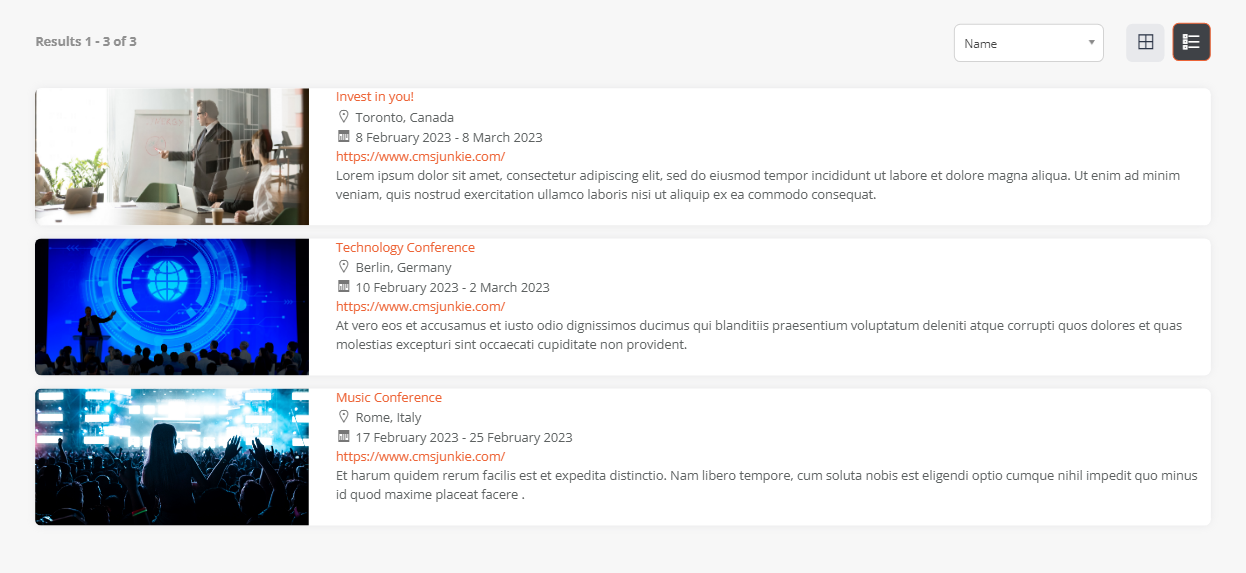
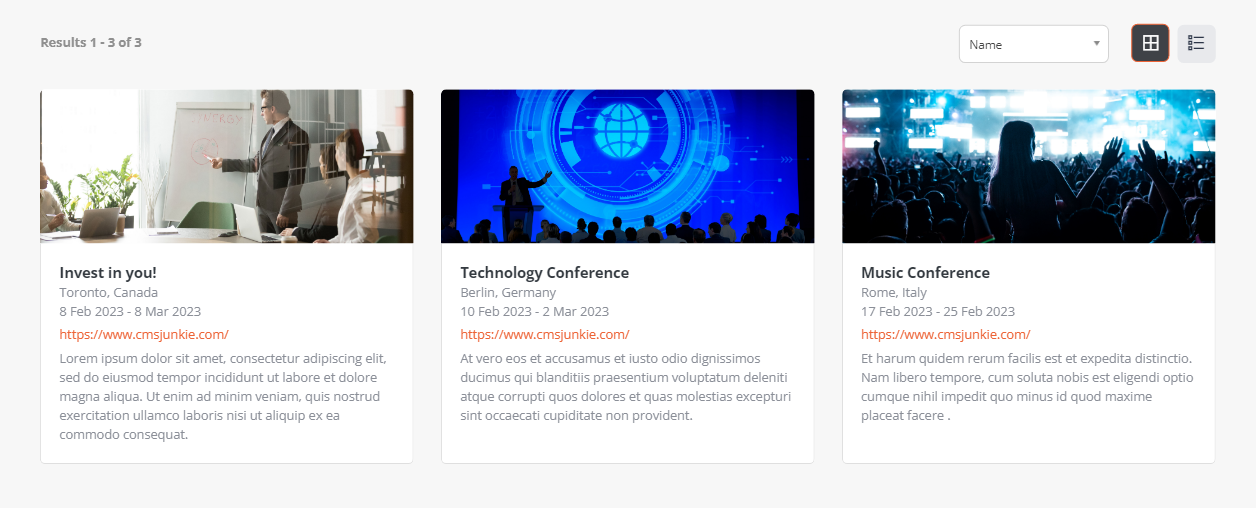
Trips search view mode: select between two different types of views , list or grid view
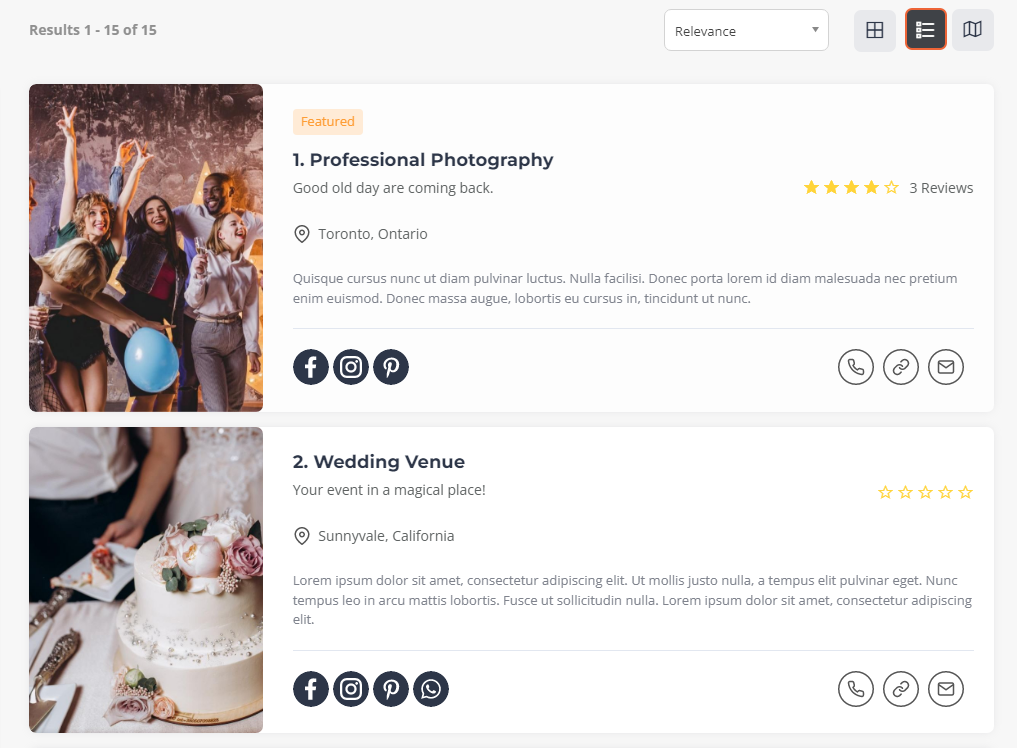
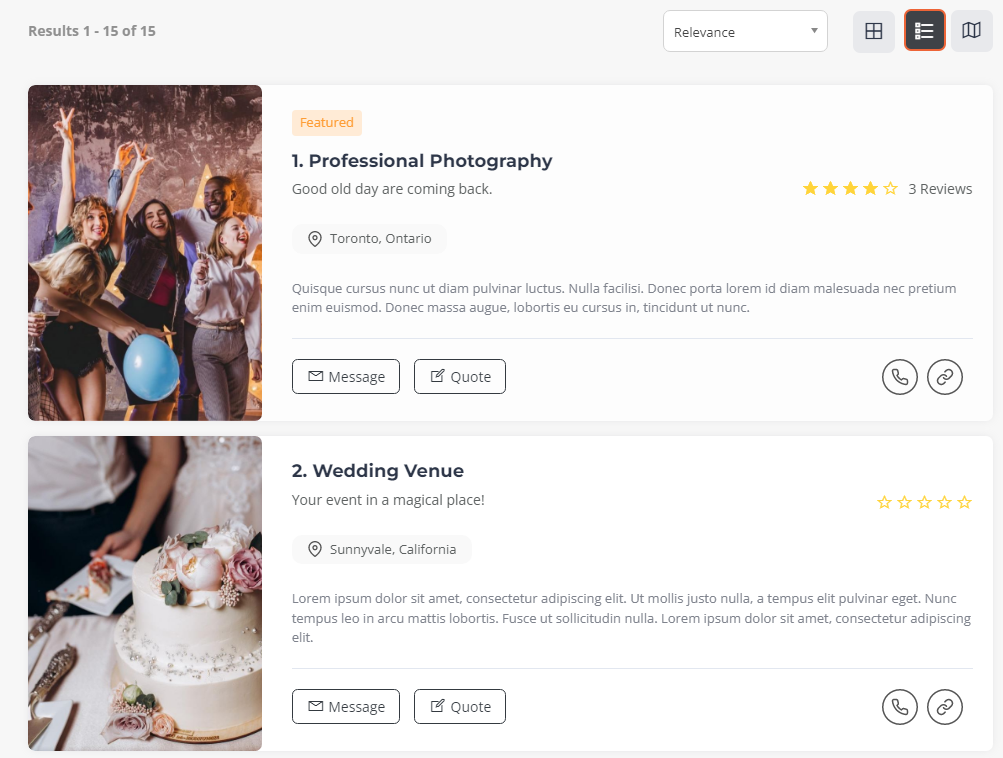
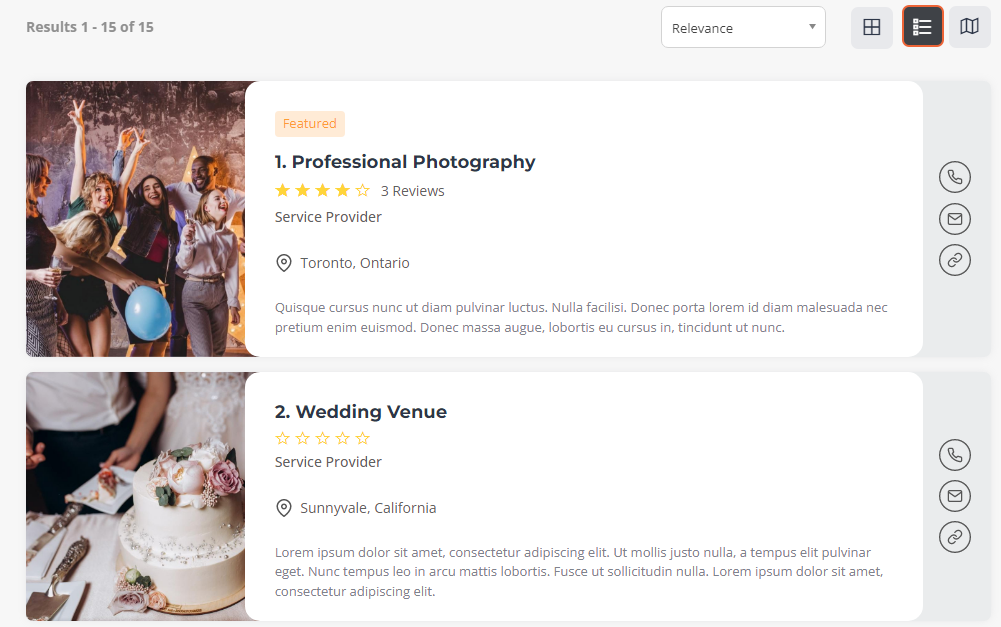
Business Listings
Business listings settings allow you to choose certain views when it comes to business listing and business listing search result.
Listing Settings
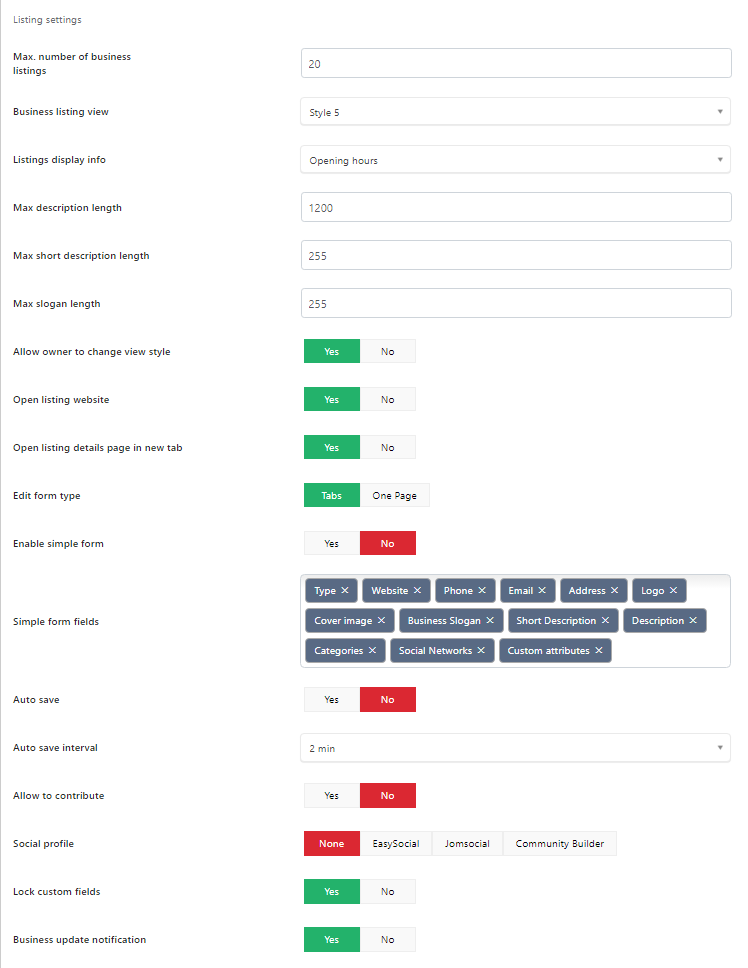
Maximum number of business listing: Maximum number of businesses that can be created by a user account. If set to 0, means that the user has no limits on how many listings can create.
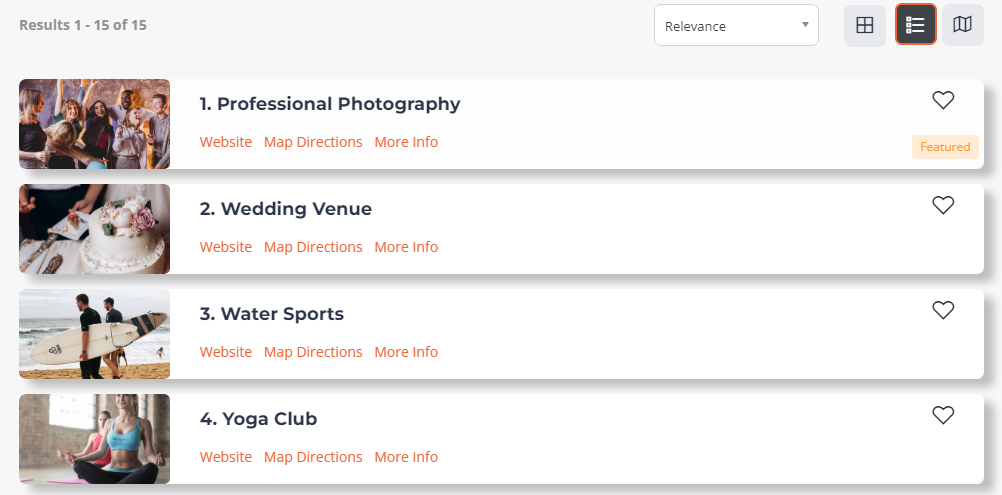
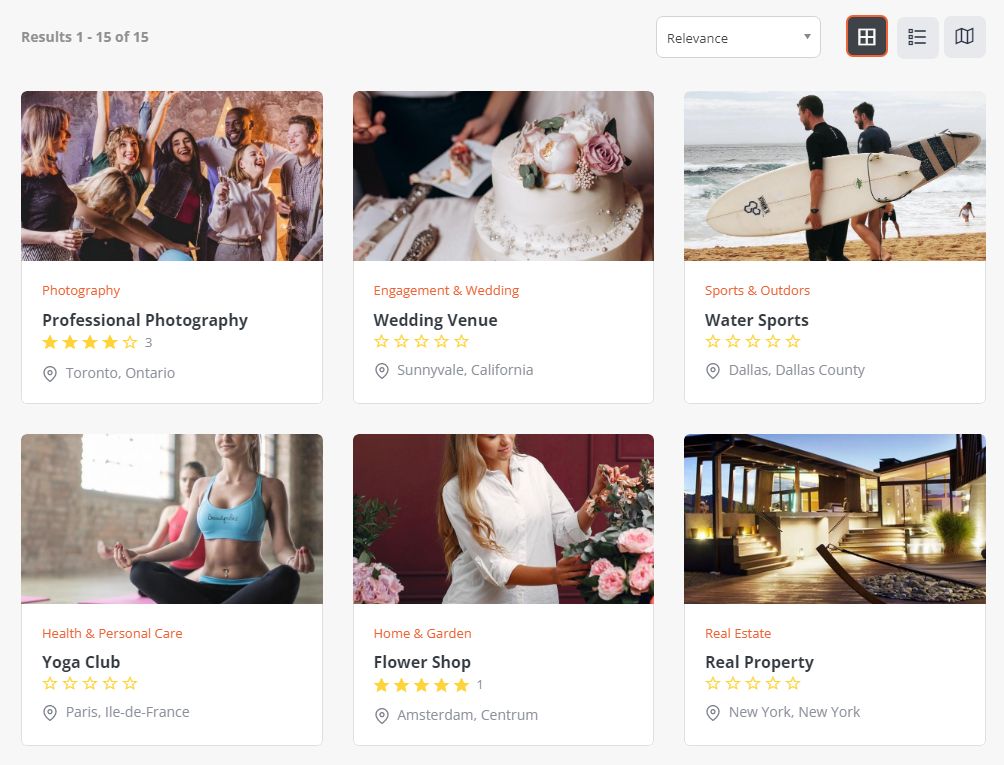
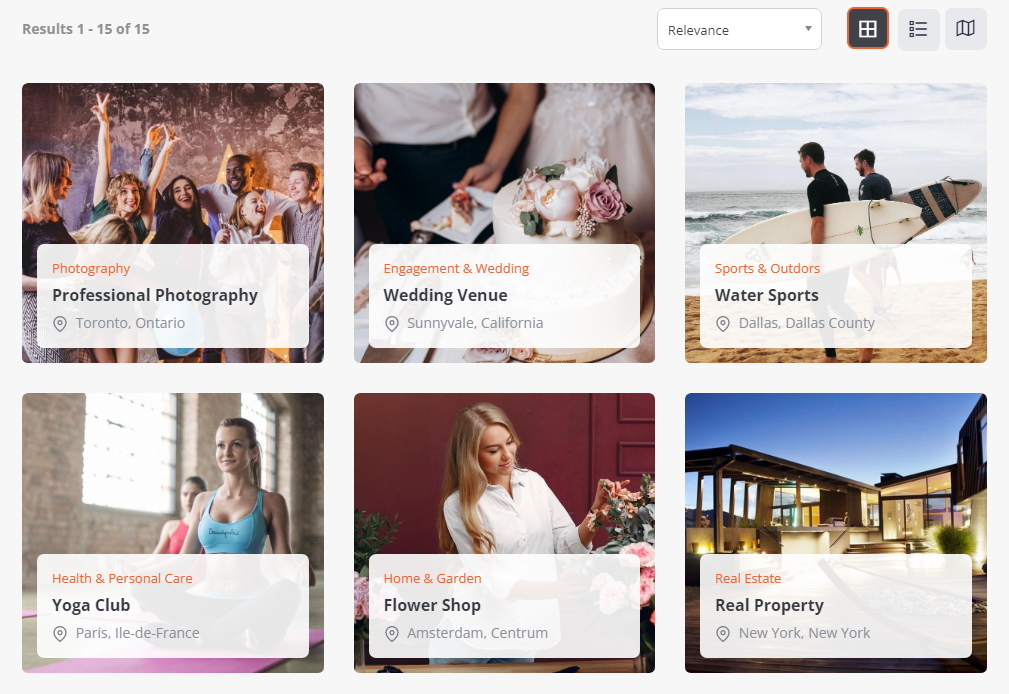
Business listing view: Business listing information can be shown in 8 ways: Style 1, Style 2, Style 3, Style 4, Style 5, Style 6, Style 7 and Style 8. Each view has a different layout.
Style 1
Style 2
Style 3
Style 4
Style 5

Style 6
Style 7
Style 8
Listings display info - the selected info will be displayed on the search results list view depending on the view type. Some of the views do not allow this info to be displayed.
Max description length: You can enter the maximum number of description characters up to 10000
Max short description length: You can enter the maximum number of short description characters up to 500
Max slogan length: You can enter the maximum number of slogan characters up to 500
Allow owner to change view style: allow the business owner to select the style for displaying the listing on the front-end
Open listing website: enables the option to open instead the listings website
Open listing details page in new tab: opens the listing in a new tab, instead of the current one
Edit form type: When setting to tabs, the business listing edit view will display on tabs. When set to one page, all the features will display in one page.
Enable simple form:You can change the listing creation form to a simple one and select below the fields that you want to be present
Simple form fields: Control the fields that will show if the simple form is enabled
Auto save: when set to yes, the business listings changes will be auto saved in the time interval set
Auto save interval: the auto save time interval
Allow to contribute: When set to yes, it allows the user to choose if they want to be the listing owner or just to contribute.
Social profile: It adds a social profile for the extension mentioned on business listing pages and shows the profile of the business owner from this extension.
Lock custom fields: locks the editing of the custom attributes after the listing has been approved
Business update notification: When set to yes, the directory admin will receive an email each time when a change is performed on a business listing.
Payment Plans
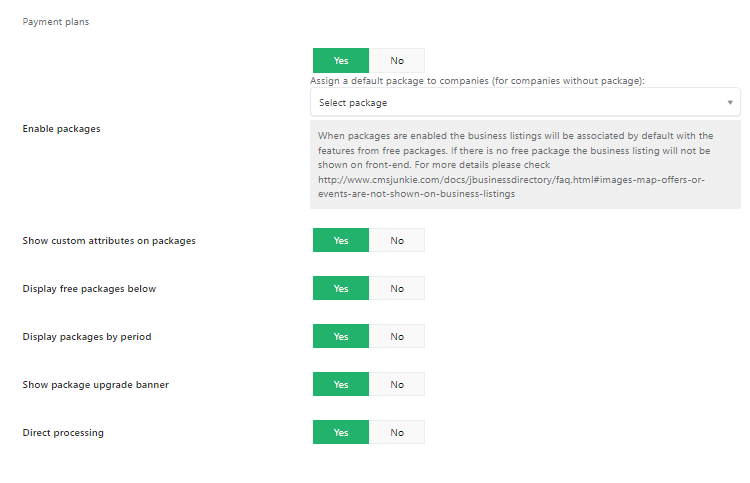
Enable Packages: You can set whether you want to activate Packages or not. More details on the packages can be found in the packages section.
Show custom attributes on packages: Set whether to display or not the custom attributes on the front-end package features (works only on fixed period packages)
Display free packages below: display all free packages after the paid packages
Display packages by period: group the packages by the period when displayed in the front-end on the packages/payment plans page
Show package upgrade banner: Enable to show a banner to upgrade to a higher package if the user has only free listings.
Direct processing: set the order payment status directly based on the first gateway response without the need of the payment notification
Available payment processor: select the available payment processor types
Listing Features
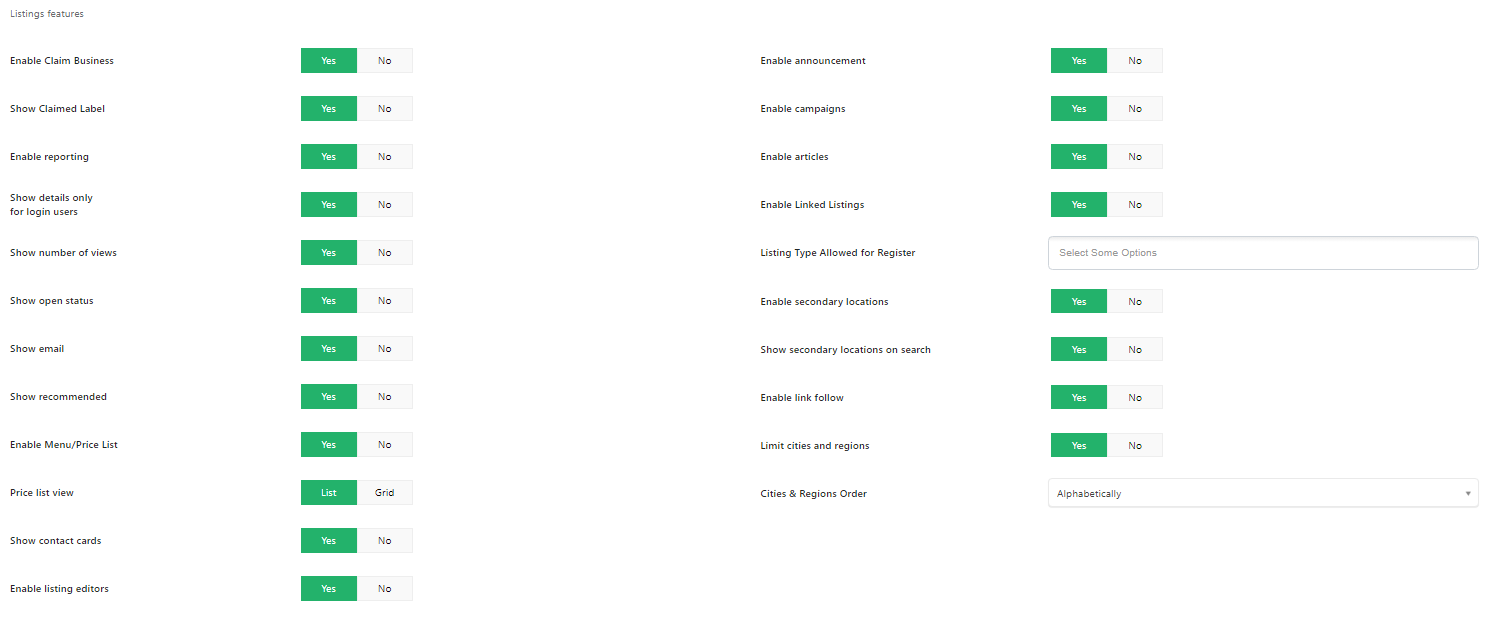
Enable Claim Business: Enable/disable the possibility of claiming a business listing (when set to no, the claim button will not be shown)
Show Claimed Label: Show a claimed label next to the business listing name on details page
Enable reporting: When set to yes, it enables the Report Listing button on the business details view.
Show details only for login users: When this option is active only some basic information is displayed to non-login users. Only after a user logs in, the full information will be shown.
When this option is set to yes and the user is not logged in:
On the search results view - the phone/mobile/fax number, website and map directions won’t display.
On the business listing details view - the phone/mobile/fax number, business email, website, contact persons, attachments, the map and the social networks won’t display.
Show number of views: When set to yes, it shows the number of business views in business listing details, offers and events.
Show open status: Set whether to display or not the open/close status on a listing
Show email: Shows the business listing email on business listing details page
Show recommanded: Show recommended label on list view and details pages.
Enable Menu/Price List: Set whether to activate or not the price list menu item
Price list view: Allows the possibility to change the layout of services price list into grid or list view, on the listings’ details view.
Show contact cards: Decide whether to display or not the vCard and QR code for the business listings on list and details views
Enable listing editors - if the setting is set to ‘yes’ the business owner has the possibility to invite other listing editors.
Enable announcements: Set whether to activate or not the announcements menu item
Enable campaigns: Enables the campaigns functionality and views
Enable videos - enable videos management section
Enable articles: Enables the articles section
Enable linked listings: Enable the possibility for linking the listings between them (E.g. agencies can be linked with their agents)
Listing type allowed for register: Select the listing type that is allowed to be registered
Enable secondary location: Allows the possibility of entering secondary locations for a business listing. Also, this option is connected with the front-end. It allows the possibility of displaying or not the secondary locations on the search module for country/region/city search options, on the search module map and the search results list view map and also on the search filter.
Show secondary locations on search: When this option is set to yes, secondary locations are shown on search results.
Enable link follow: When set to yes, it will display rel=”follow” or rel=”nofollow” depending on the package feature for the listing. When set to no, it won’t display anything, even if the “link follow” is a package feature.
Enable business services: This option will be present only if the jbd-appointment application will be purchased and installed. When set to yes, the menu items of the company services will be activated and shown under the Business Listings menu item.
Limit cities and regions: You can limit the activity cities and regions of a business. The business owner will have the possibility to choose the activity city from a list of cities and also the activity regions from a list of regions. Manage city and manage region sections will be shown when this option is set to yes.
Cities & Regions Order: the order of showing cities and regions,alphabetically or by order
Search

Submit method: You can set the submit method that you need (GET or POST).
Zip code countries: Limit the resolving of zip code (postal code) to the area of selected countries.
Default search view mode: Default view mode for search results (grid or list).
Split edit form: Divides the form in two parts, basic and advanced. The basic form is available only when packages are active and the listing is created from the packages page.
Enable numbering: Enable/Disable numbering on business search results.
Search result list view: Possibility to choose between different list layouts
Style 1
Style 2
Style 3
Style 4
Style 5
Style 6
Style 7
Style 8
Search result grid view: Possibility to choose between two grid layouts
Style 1
Style 2
Default order listings: You can determine the order of the business listings that will be shown.
Secondary ordering criteria - you can determine the second ordering criteria of the business listings when Default order listings is set to relevance.
Show custom attributes on search - you can show/hide custom attributes on search results.
Mix results: when set to yes, mixes the search results within their level, only when the default order is set to relevance
Featured listing background: featured listing background color
Direct listing redirection: Redirect to the business listing page is there is only 1 result from the performed search
Redirect URL: Redirect to provided URL when no results are found
Enable search filter: Enable/Disable search filter on business search results
Search Filter: You can set the type of search filter to regular or faceted. The faceted view allows you to select multiple items within the search filter, while the regular view performs a drill down of the categories
Search filter position: set the search filter position to vertical or horizontal
Show top filter: show the top filter on the listings search results
Search filter view: Select the search filter style that will be shown on front-end
Search filter items: Choose the number of search items
Select categories: here you can select the categories that will be shown in front-end for category filter
Search fields: It allows the configuration of what types of search fields the user can use for his search
Select the search filter fields: Provide the possibility to select the fields that will be used for keywords search.
Select Order By filter fields: set the values for the Order by select box on the listings search results
Zip code search type: Search by zip code (postal code) can be done in 2 ways.
By business activity radius – the search will be done based on the activity radius, business location and zip code entered by user
By distance - the user will have the possibility to choose the distance based on zip code entered
Exact - the exact zip code
Quote Requests
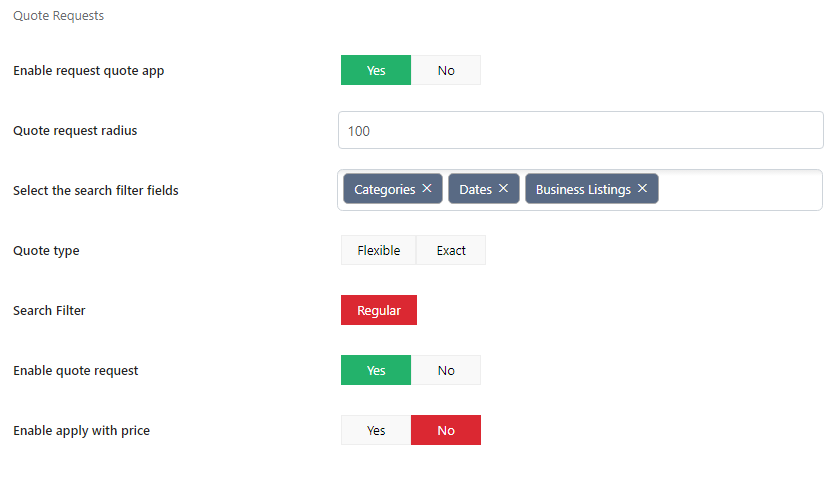
Enable request quote app: enables the request quote views
Quote request radius: choose the radius that will be used for the listings search during the quote request process
Select the search filter fields: you can select the fields that are going to be available on search filter such as categories,dates and business listings
Quote type: select between flexible and exact; if exact, the quote will be sent only to businesses that match the exact location
Search filter: select the search filter type to regular
Enable quote request: enables the request quote button on the listings details views
Enable apply with price: if is set to yes, the companies can reply with a price on the quote request list view
Projects

Enable projects: Enables business projects management section
Project style: Choose between three styles for the business projects.
Style 1
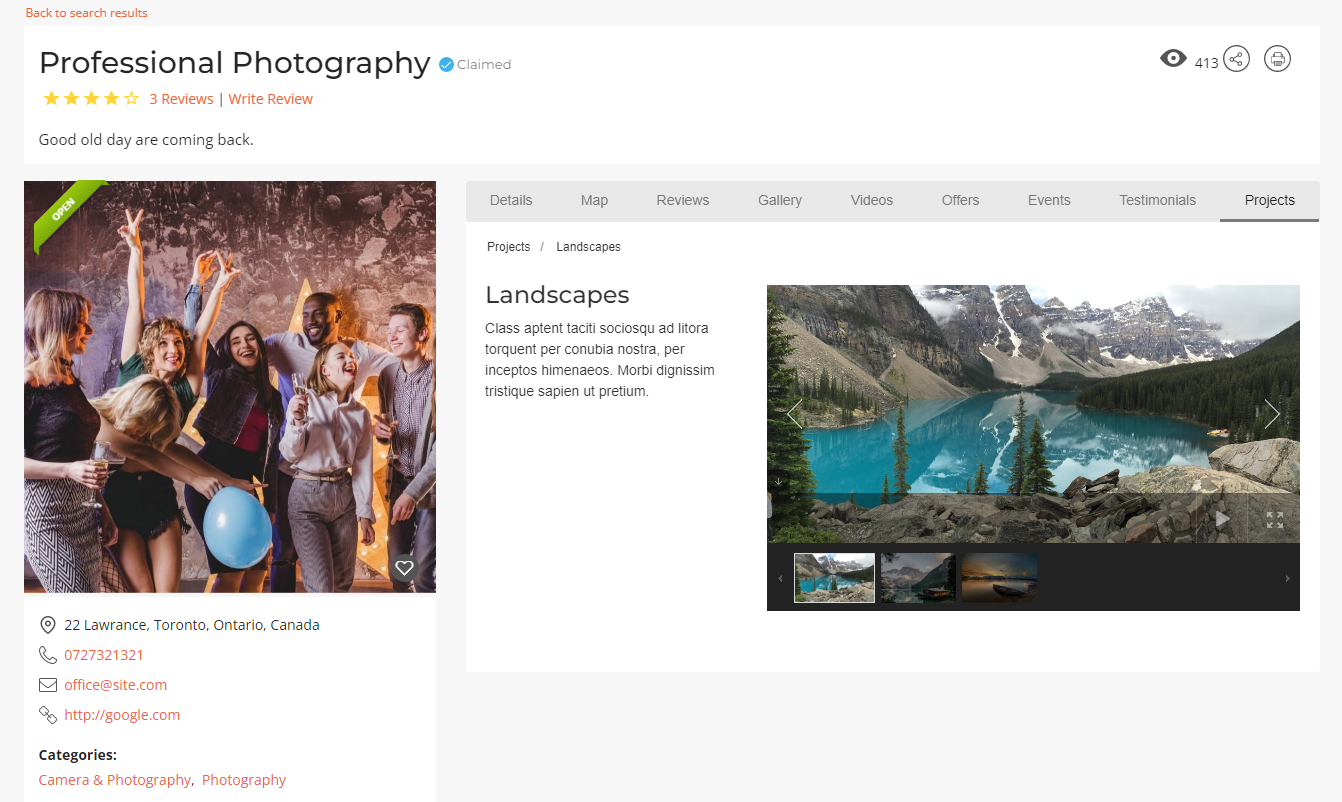
Style 2

Style 3
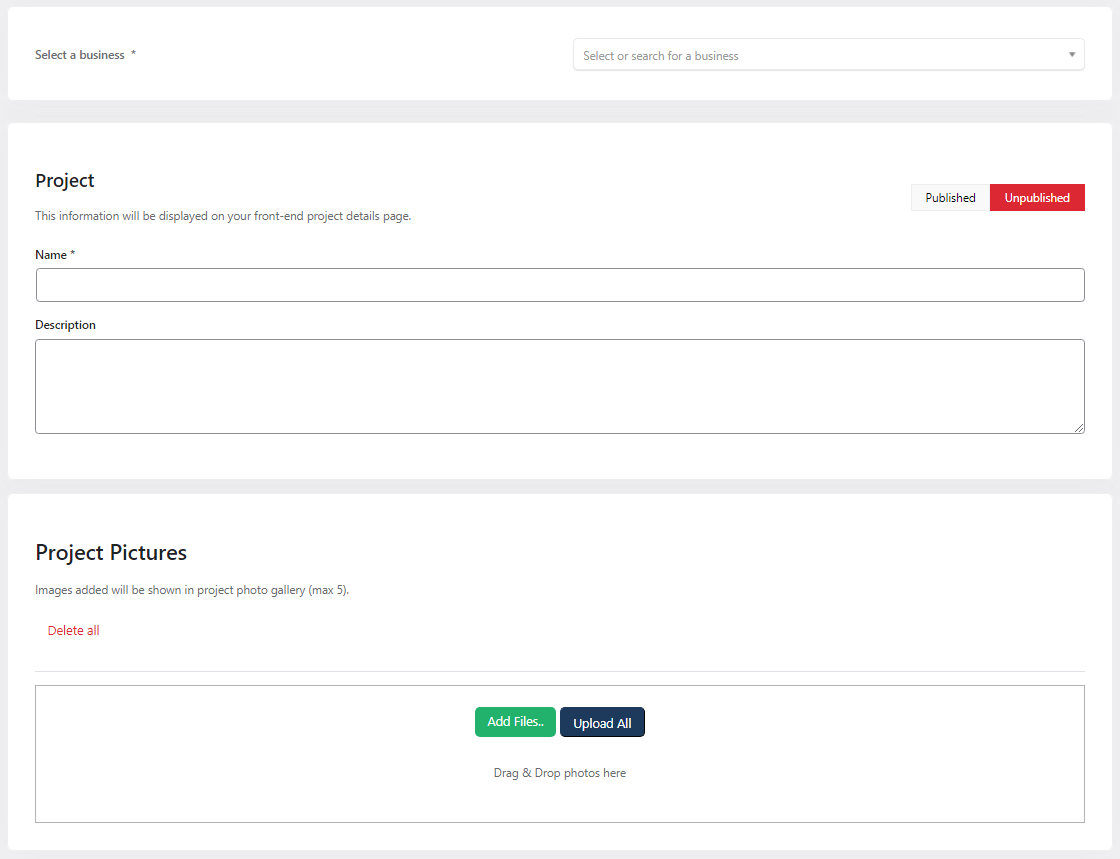
Show project images: Show/hide the additional images displayed on the projects list view.
Attribute Configuration
You can set here which business listing attributes are mandatory, optional or will be not displayed on both, edit views and details views. If set to Mandatory, validation will be applied in the admin area, and the field will become mandatory to be filled. If Optional, the field will be shown and the user can chose to fill or not. And if the setting is set to Not Show, that information will not be displayed in the frontend and the field will not be visible in the backend.
Offers
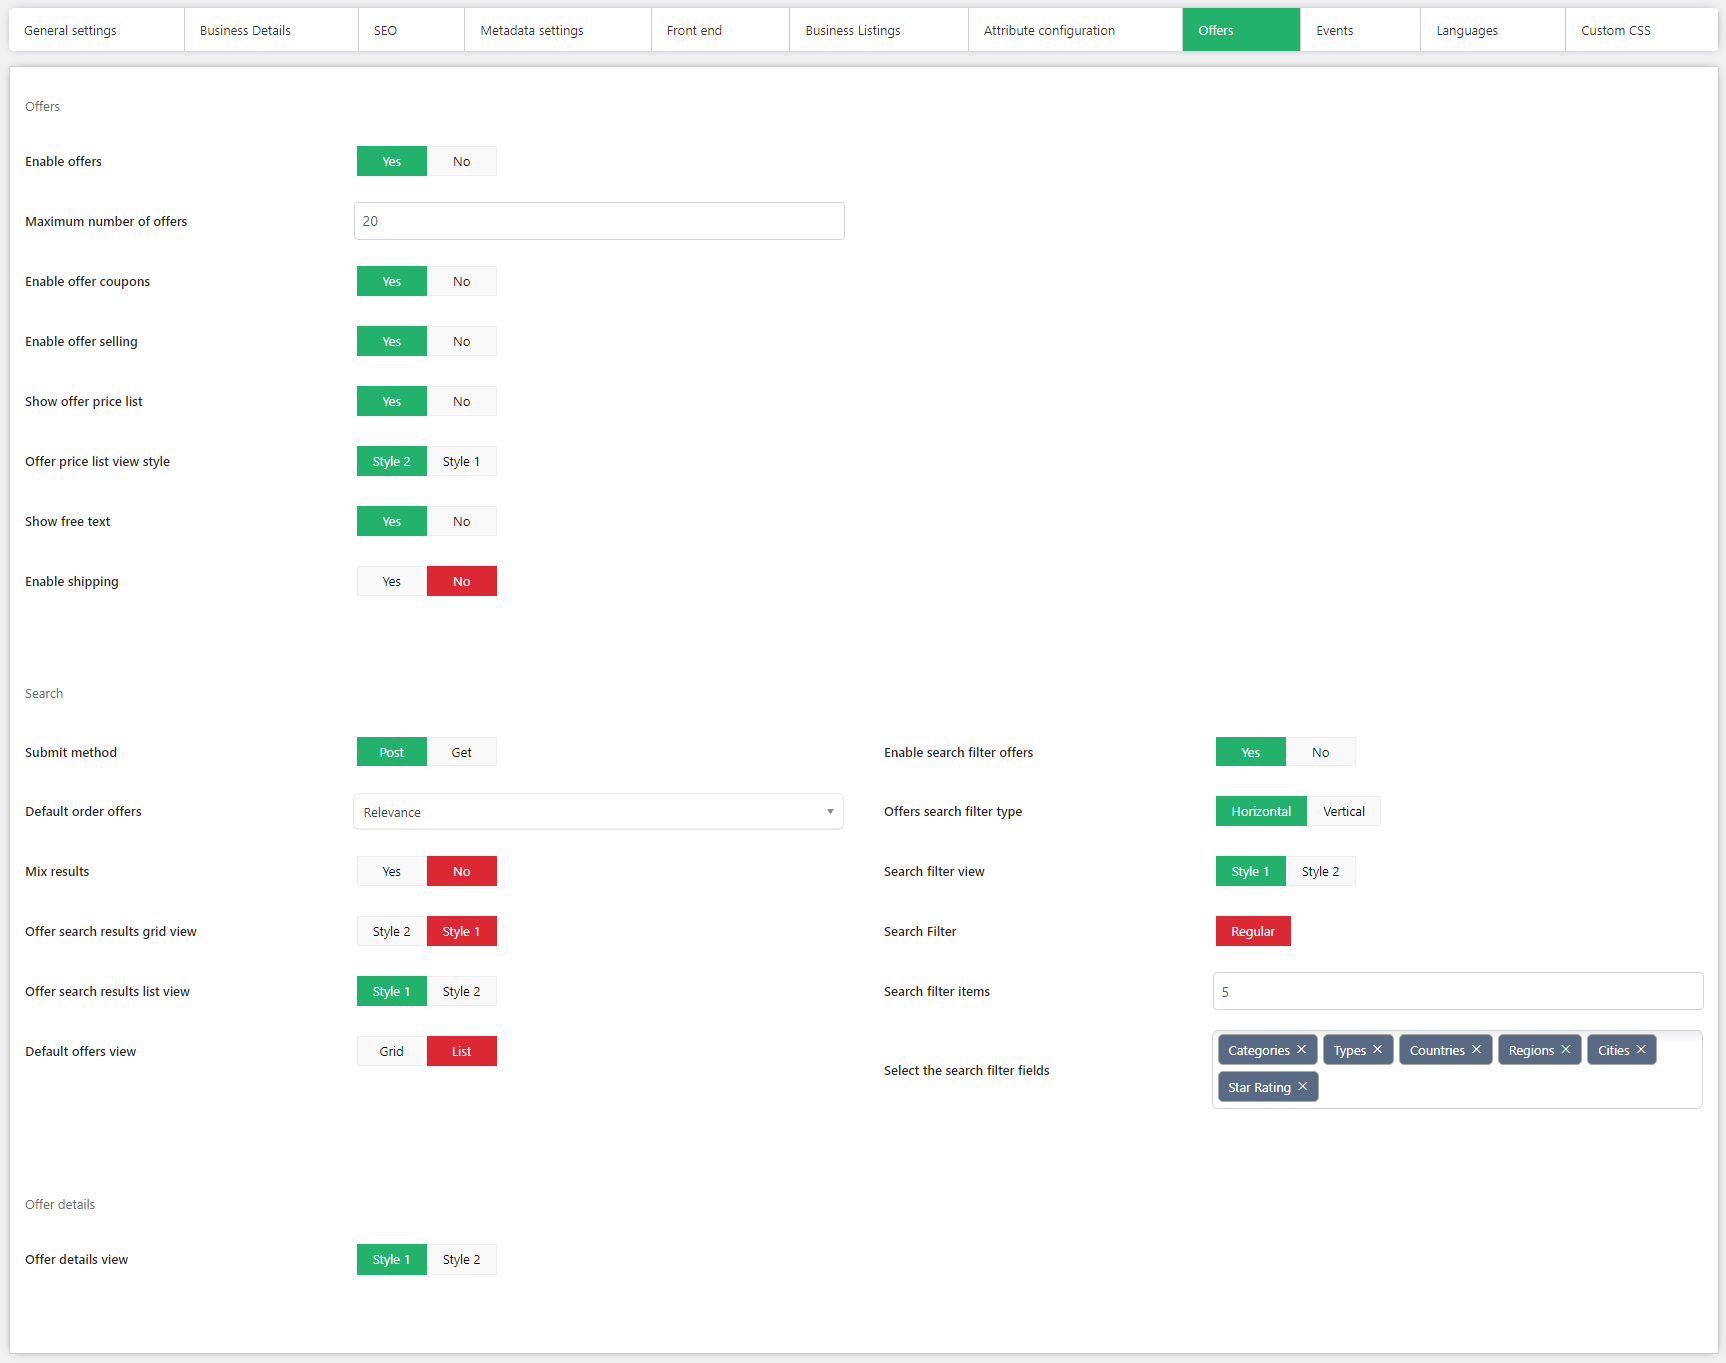
Enable Offers: You can set whether you want to activate offers or not. More details on the Offers can be found in the offers section.
Maximum number of offers: You can set the maximum number of offers that can be created.
Enable Offer Coupons: You can set whether you want to activate or not coupons functionality for offers.
Enable offer selling: This option will be visible only if the wbd-sell-offers app is purchased and installed. When set to yes, the offer orders menu item will be visible and also the purchasing of offers will be possible.
Show offer price list: show/hide the price list on the listing details
Offer price list view style: select between two styles
Style 1

Style 2
Show Free Text: If set to yes and if the offer has no price set and also no price text filled, then on the offers list view, on the offers details view and also on the latest offers module will display the “Free” text, meaning that the offer is free.
Enable shipping: You can set whether you want the shipping mechanism ennabled for offer selling.
Search
Submit method: You can set the submit method that you need (GET or POST)
Default order offers: You can set the default order that the offers will display
Mix results: when set to yes, mixes the search results within their level, only when the default order is set to relevance
Offer search results grid view: Offers the possibility to choose between 2 grid layouts
Style 1
Style 2

Offer search results list view: Offers the possibility to choose between 2 list layouts
Style 1
Style 2
Default offers view: You can choose between two layouts: grid and list.
Enable search filter offers: Enable/Disable search filter on offers page
Offers search filter type - set the position of search filter to be shown as vertical or horizontal.
Search filter view: set one of the two search filter styles
Search Filter: You can set the type of search filter to regular or faceted. The faceted view allows you to select multiple items within the search filter, while the regular view performs a drill down of the categories
Search filter items: Set the number of search items
Select the search filter fields: select what types of the search filter fields you want to use
Offer Details
Offer details view: You can determine the style of the offer details view
Style 1
Style 2
Events
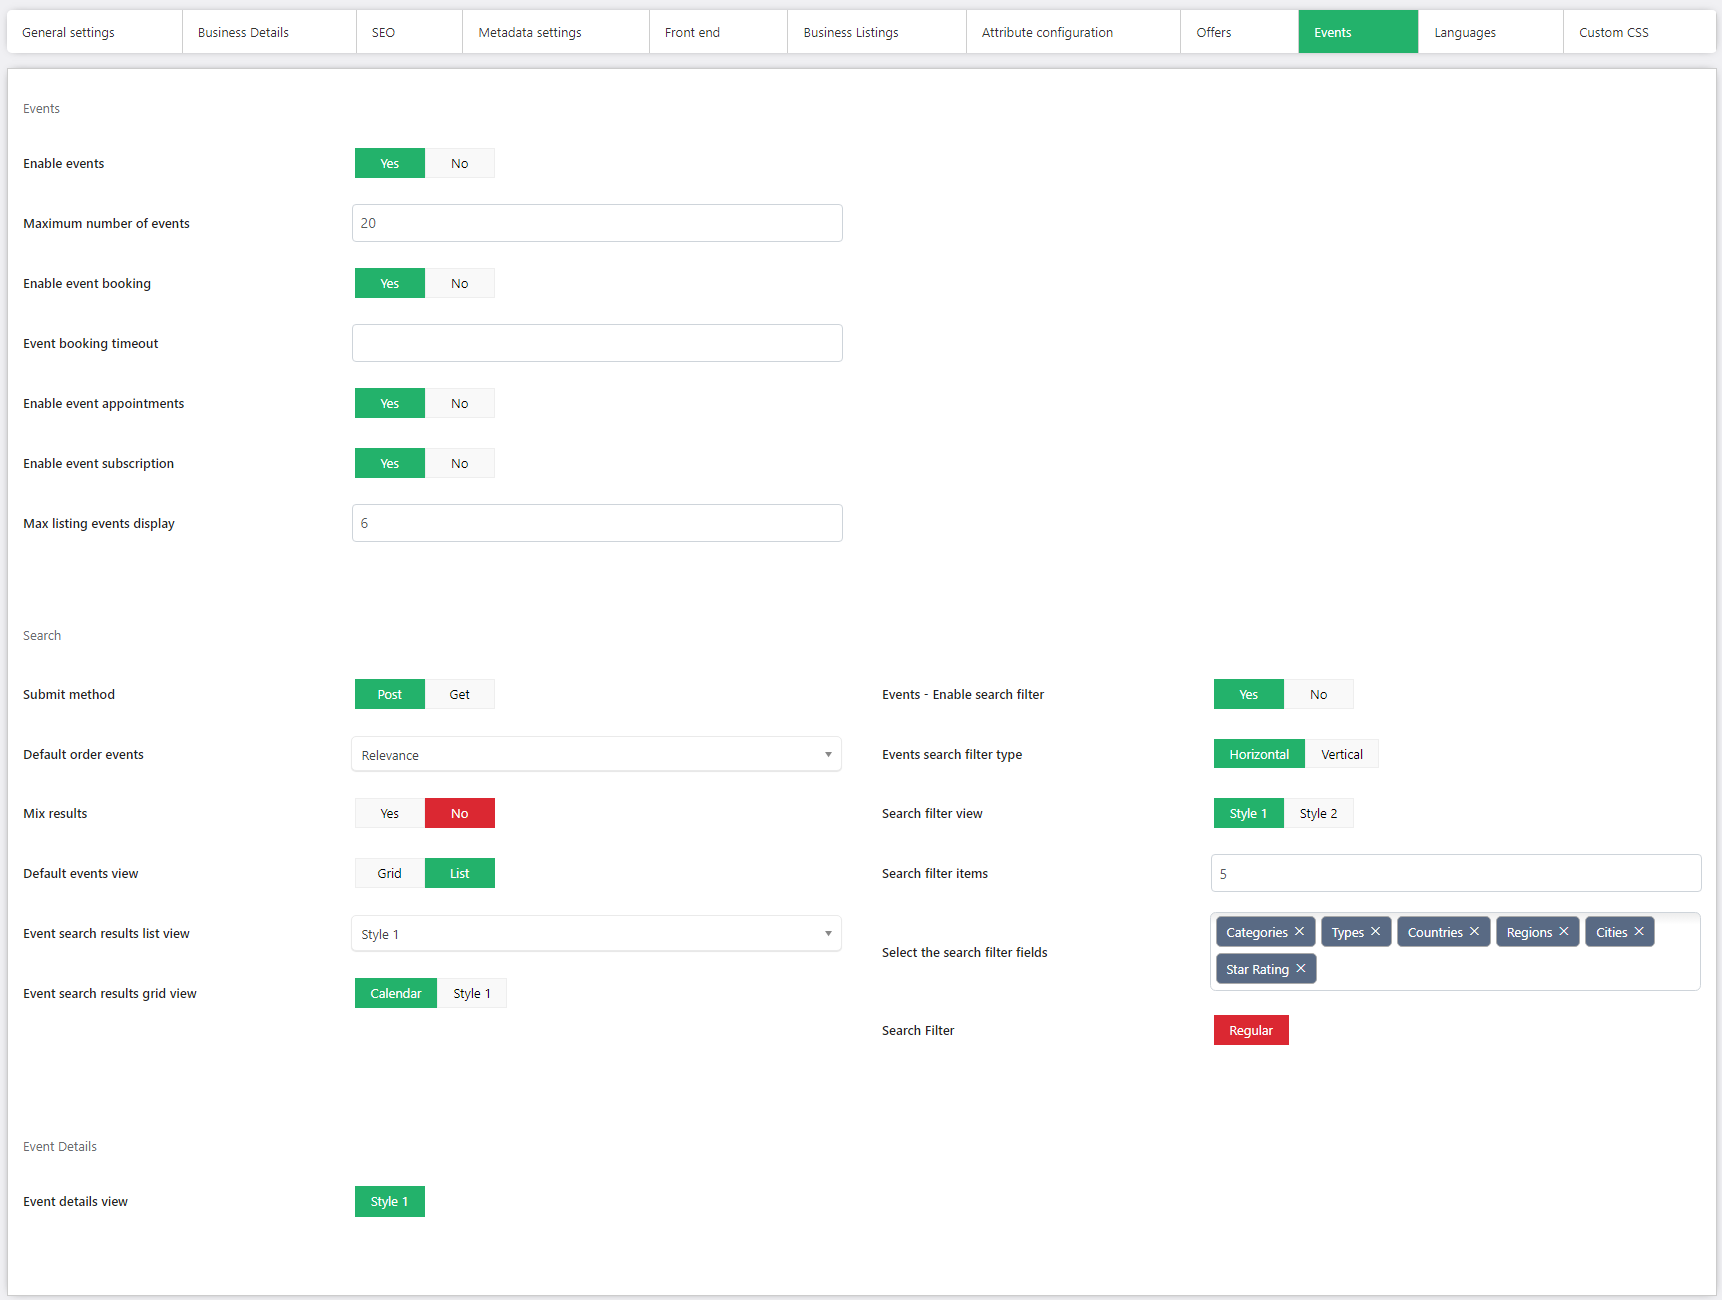
Enable Events: You can set whether you want to activate events or not. More details on the Events can be found in the events section.
Maximum number of events: You can set the maximum number of events that can be created.
Enable recurring events - after installing the application, you can set whether you want to activate recurring events or not.
Enable event booking: this option will be visible only if the jbd-event-ticket-reservation is purchased and installed. When set to yes, the event tickets and event reservation menu items will be active under the Events menu item.
Event booking timeout: set the payment timeout for the event booking (in minutes)
Enable event appointments: this option will be visible only if the jbd-event-appointments is purchased and installed. When set to yes, the event booking menu item will be active under the Events menu item.
Enable event subscription: When set to yes, on the event edit view will display the option to enable event joining that will enable the Join option for the actual event.
Max listing events display: Maximum number of events that will be shown on the listing details page
Search
Submit method: You can set the submit method that you need (GET or POST)
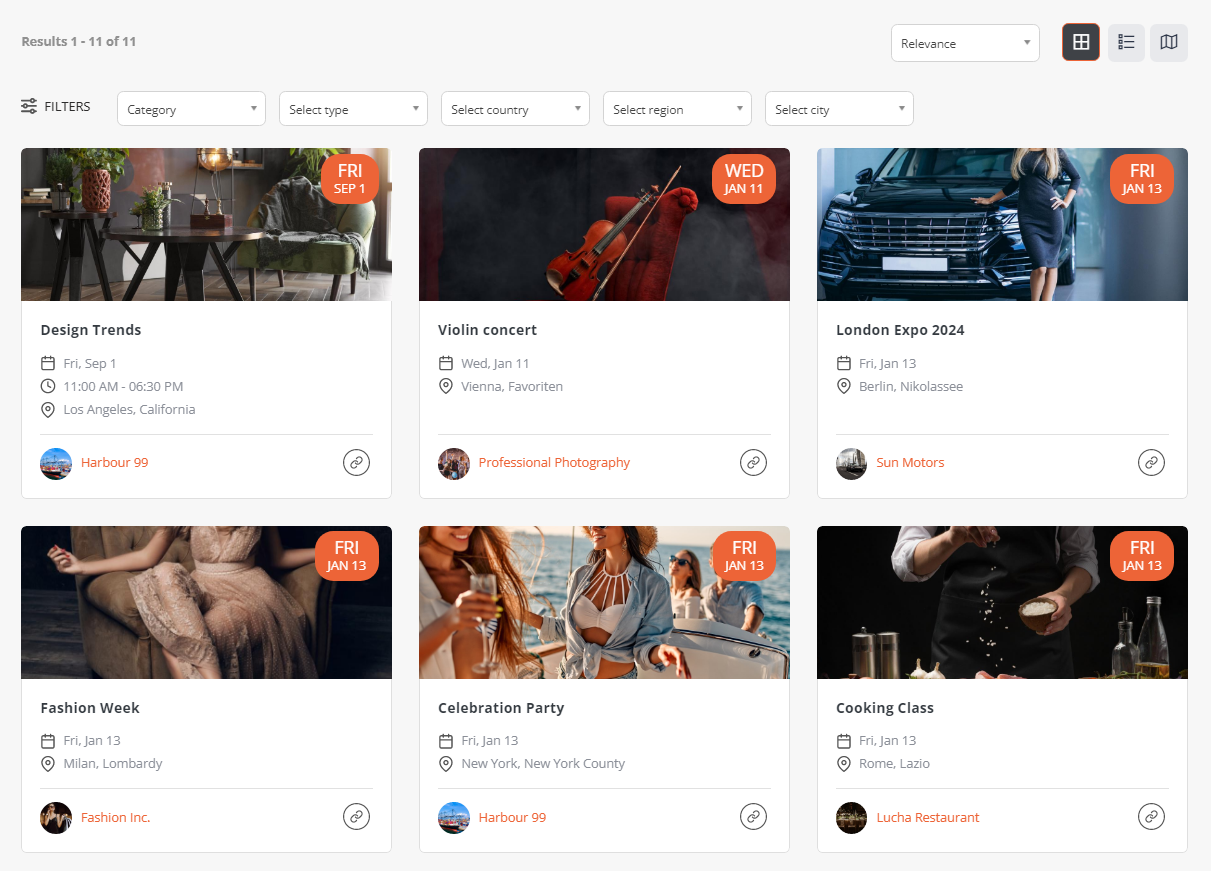
Default order events: You can set the default order that the events will display on frontend
Mix results: when set to yes, mixes the search results within their level, only when the default order is set to relevance
Default events view: Possibility to choose between grid or list layout
Event search results list view: Possibility to choose between 2 list layouts
List view - Style 1

List view - Style 2

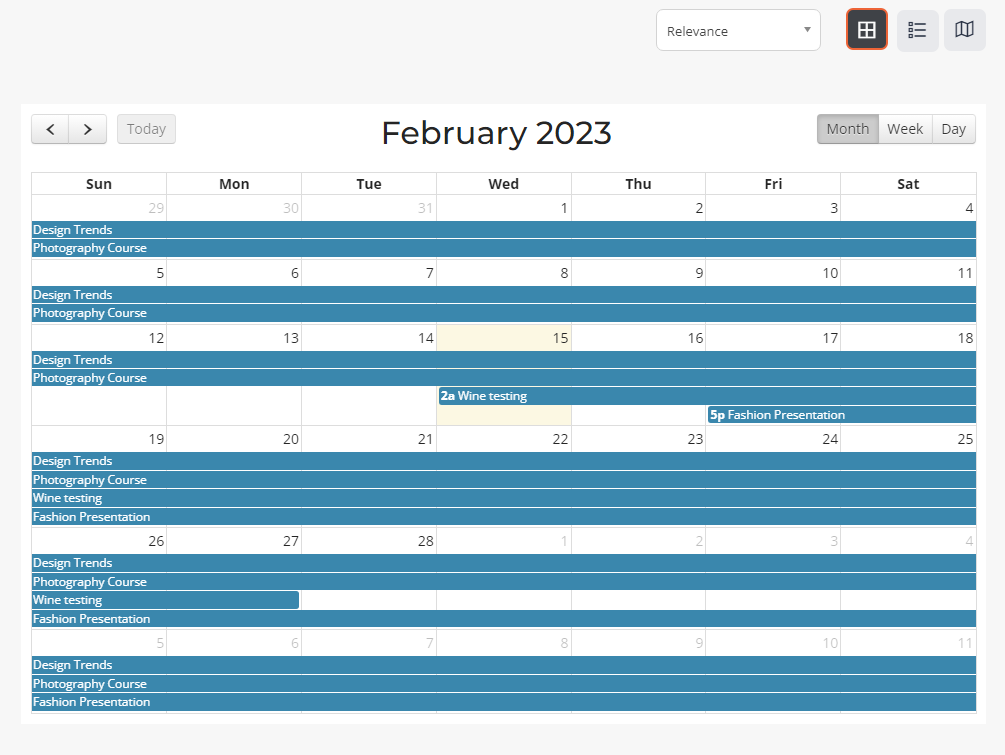
Event search results grid view: Set the grid view style/calendar for the events
Grid view - Style 1
Calendar
Events - Enable search filter: Enable/Disable search filter on events page
Events search filter type - set the position of search filter to be shown as vertical or horizontal.
Search filter view: set one of the two search filter styles
Search filter items: Set the number of search items
Select the search filter fields: select what types of the search filter fields you want to use
Search Filter: You can set the type of search filter to regular or faceted. The faceted view allows you to select multiple items within the search filter, while the regular view performs a drill down of the categories
Event Details
Event details view: You can determine the style of the event details view

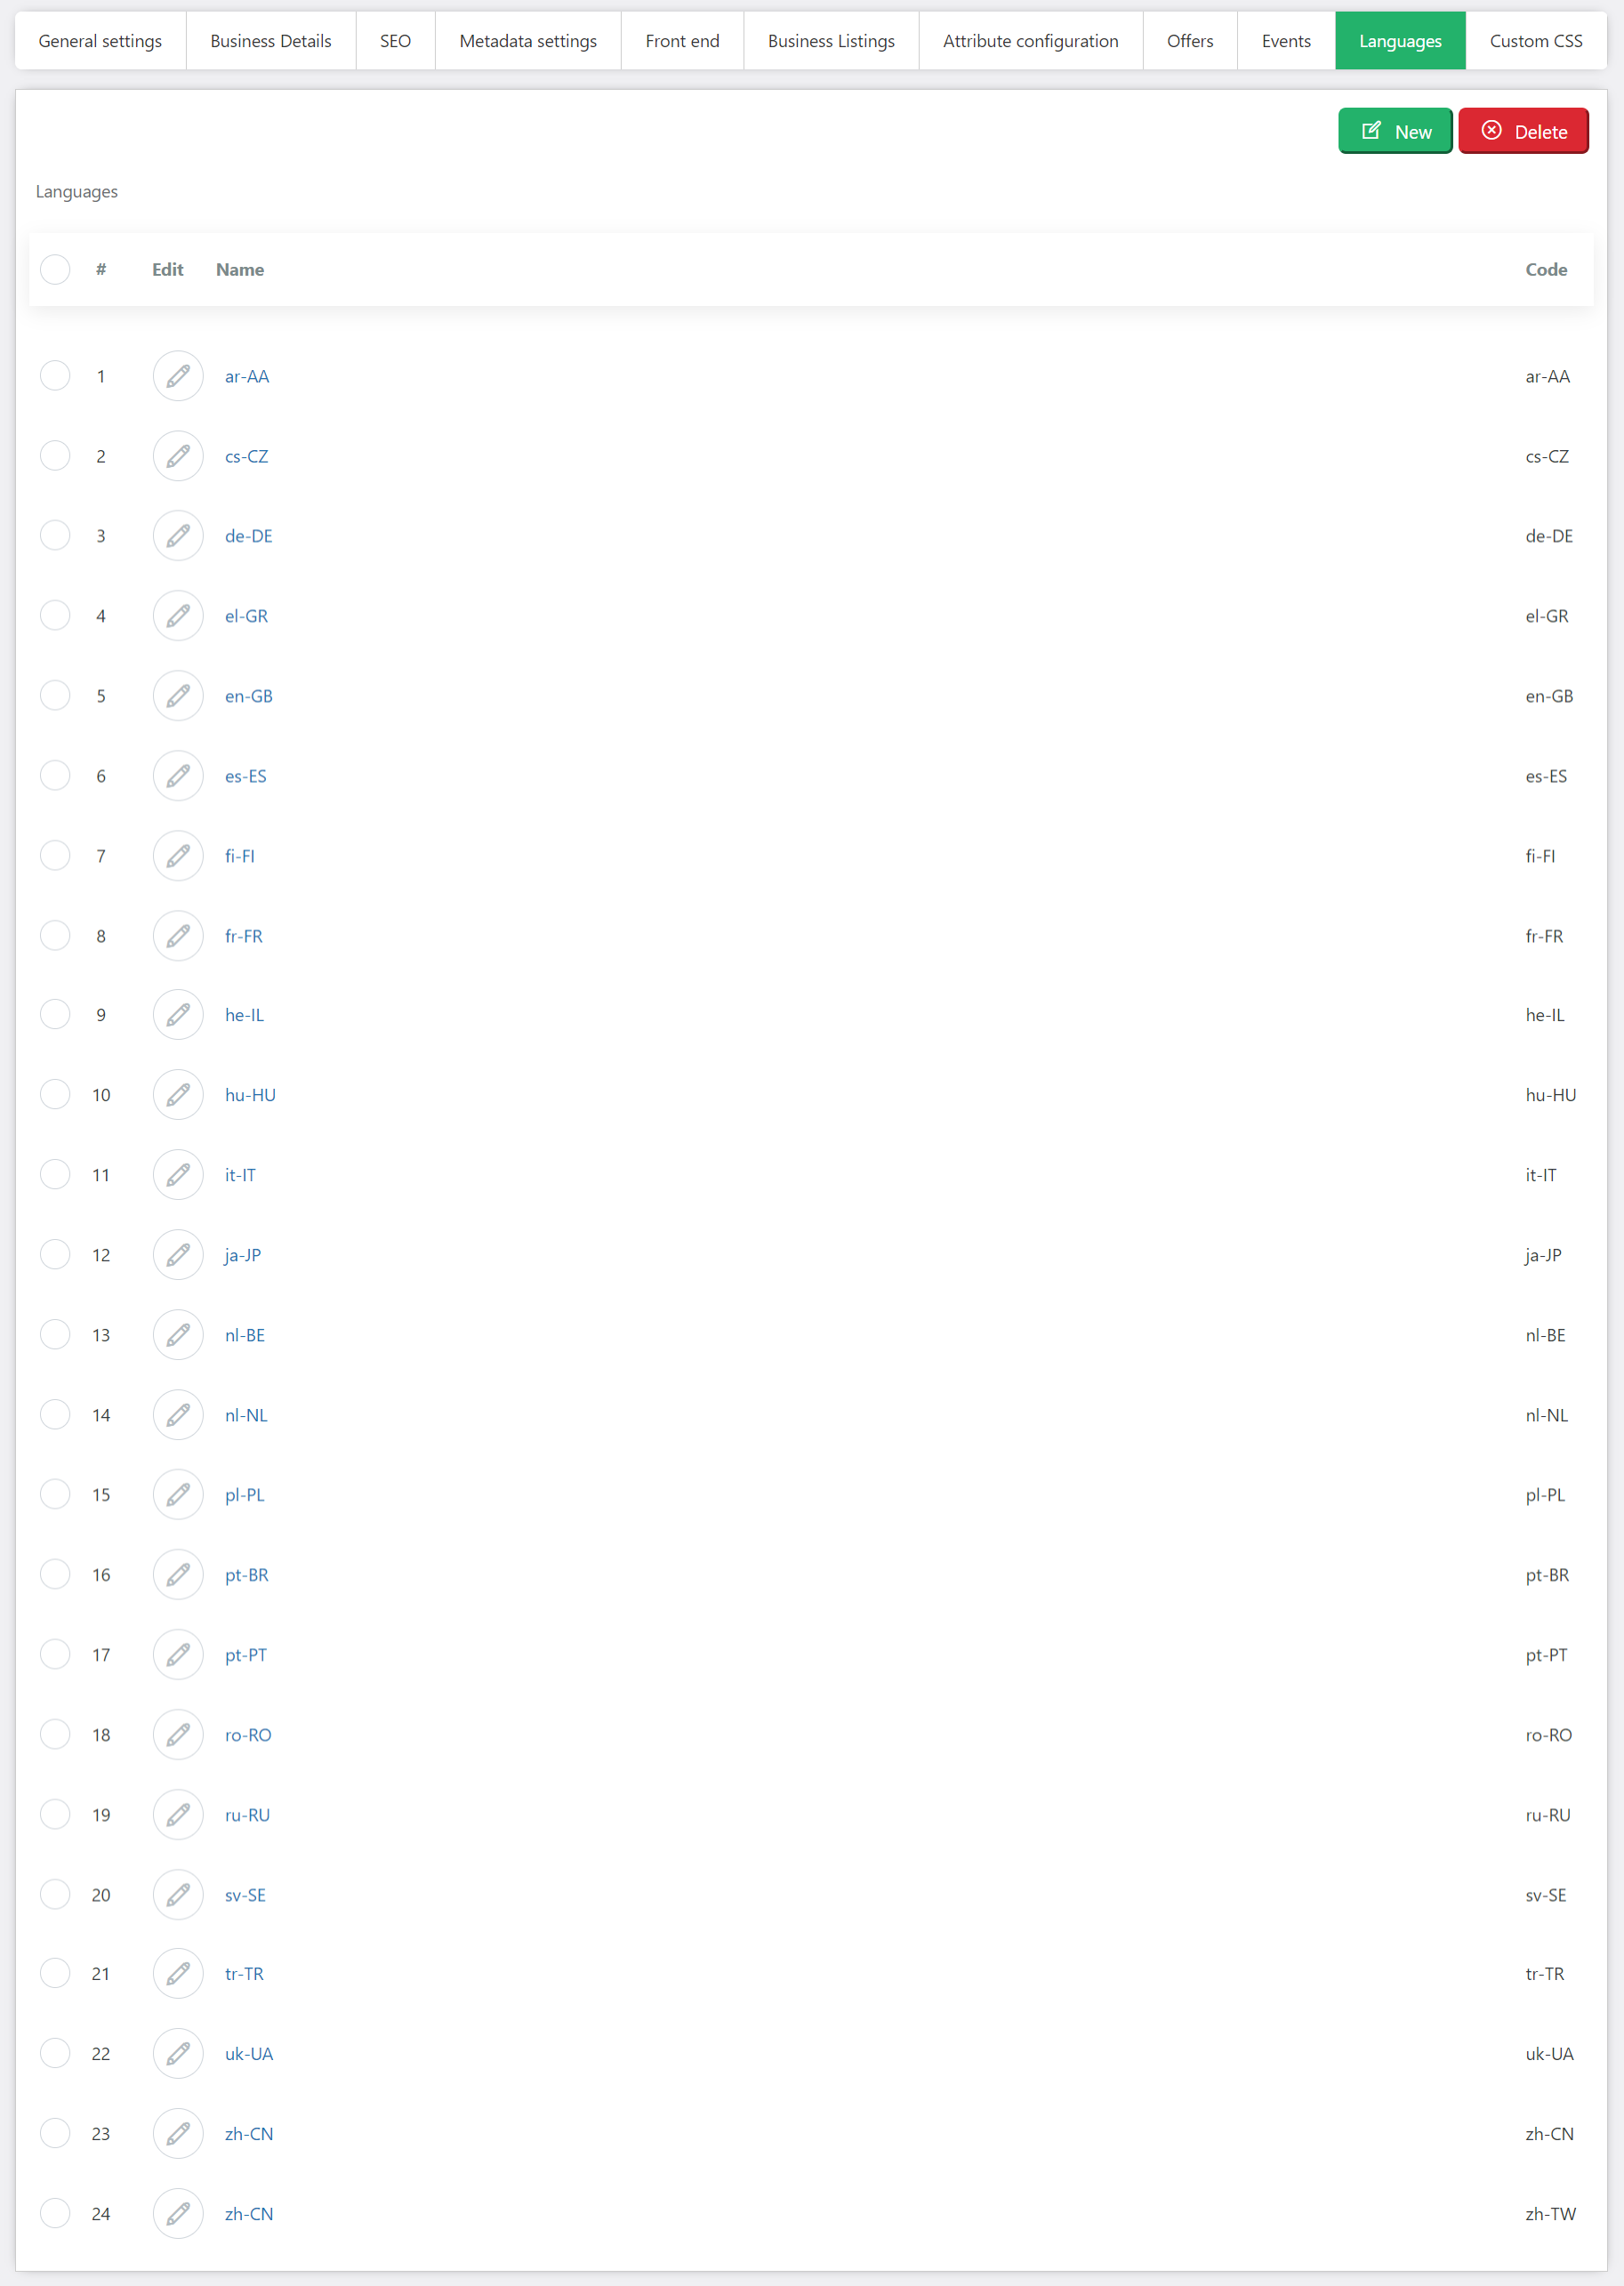
Languages
You can create and modify from this section the desired languages. Each language has a custom area section where you can enter your language overrides. Please notice that after each update you will have to edit the language and save it again in order for the overrides to be added to the main language file.
Conferences
Conferences view mode: you can determine the style of the conferences details view.
List view
Grid view
Sessions
Sessions view: You can determine the style of the sessions details view.
Style 1
Style 2
Style 3

Sessions Details
Session: select the session style which will be shown on front-end.
Style 1
Style 2

Speakers
Speakers view: you can determine the style of the speakers details view.
Style 1
Style 2
Speaker image width: set the width for speaker images
Speaker image height: set the height for speaker images
Custom CSS
Adds the possibility to set your own custom CSS code that will not be over-written when an update is being performed.
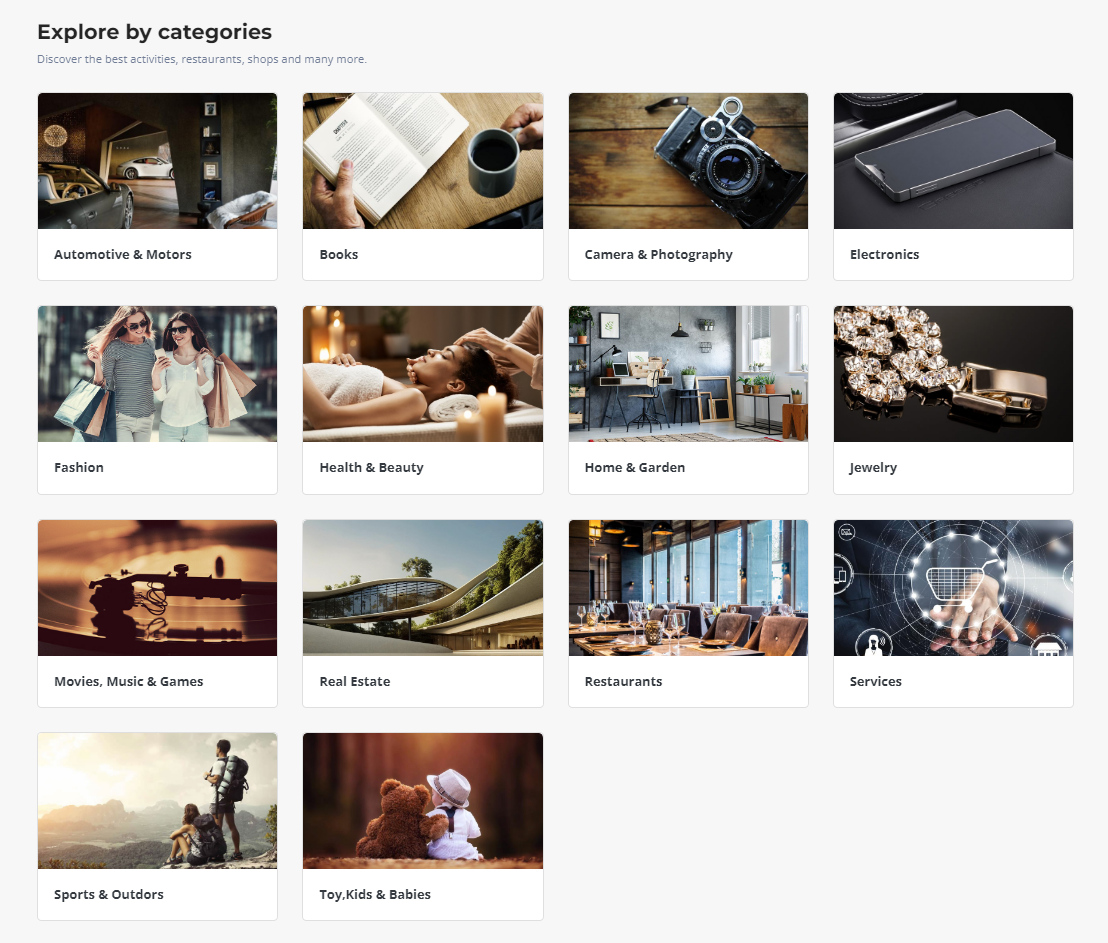
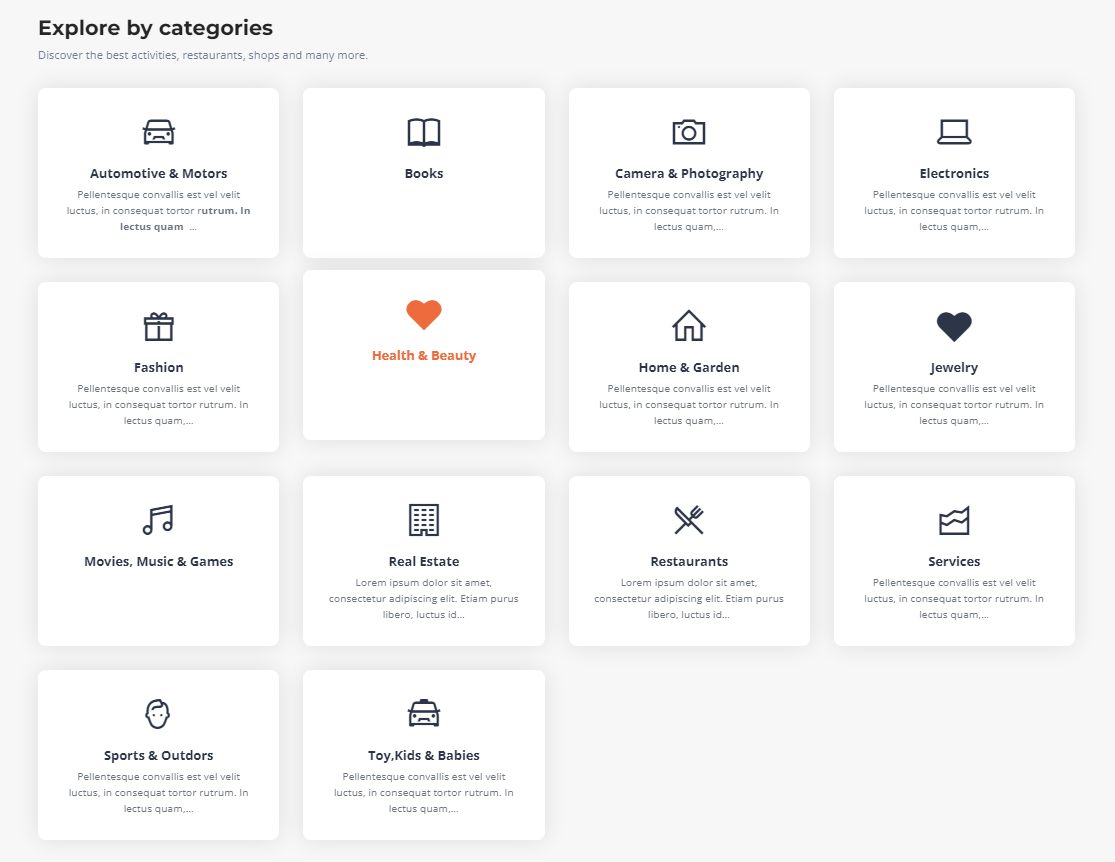
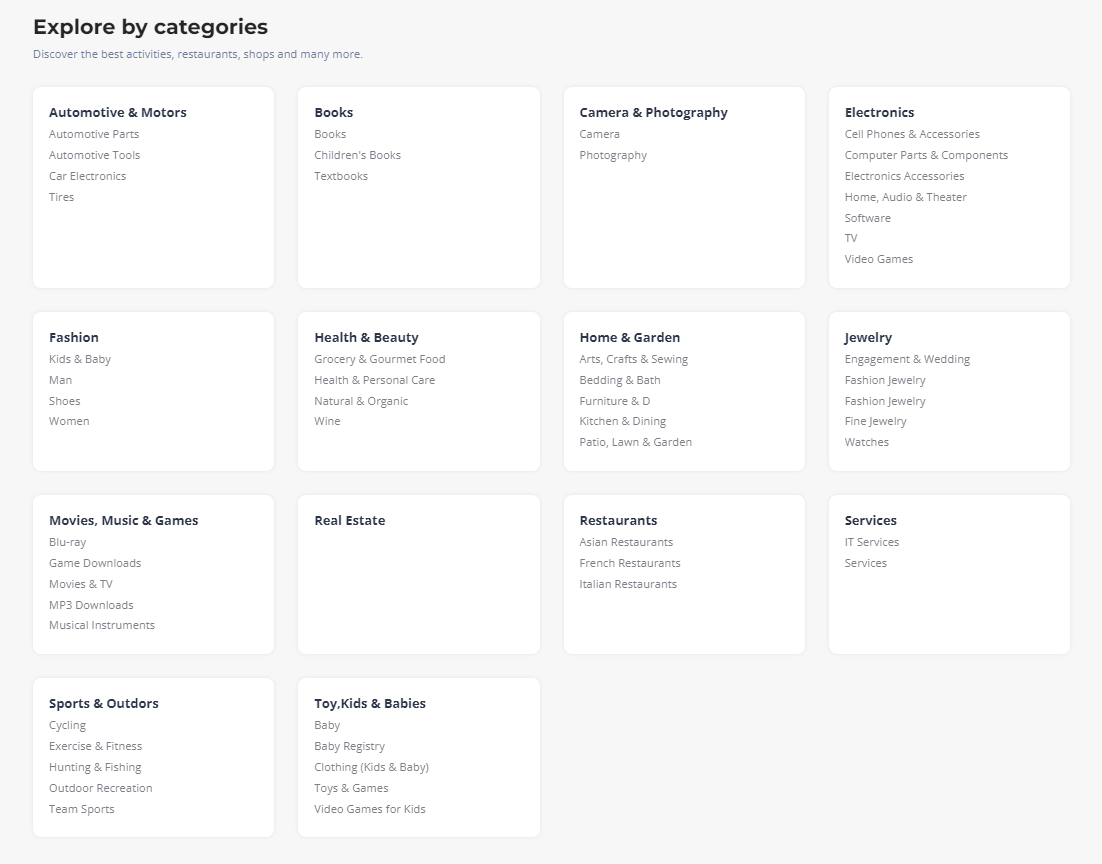
Categories
You can define a list of categories/subcategories that will be available for owners to classify their companies, offers and events. You can filter the categories by selecting the filter type (Business, Offers and Events).
You can add, edit, delete, publish/unpublish or add a new subcategory by using the buttons available on the interface. Also, you have the option to duplicate a selected category or subcategory from the listings categories to the offers and events categories, or vice-versa. If you duplicate the root category with its subcategories, they will be duplicated just like they are. But when duplicating only a subcategory without its root category, it will be duplicated as a root category.
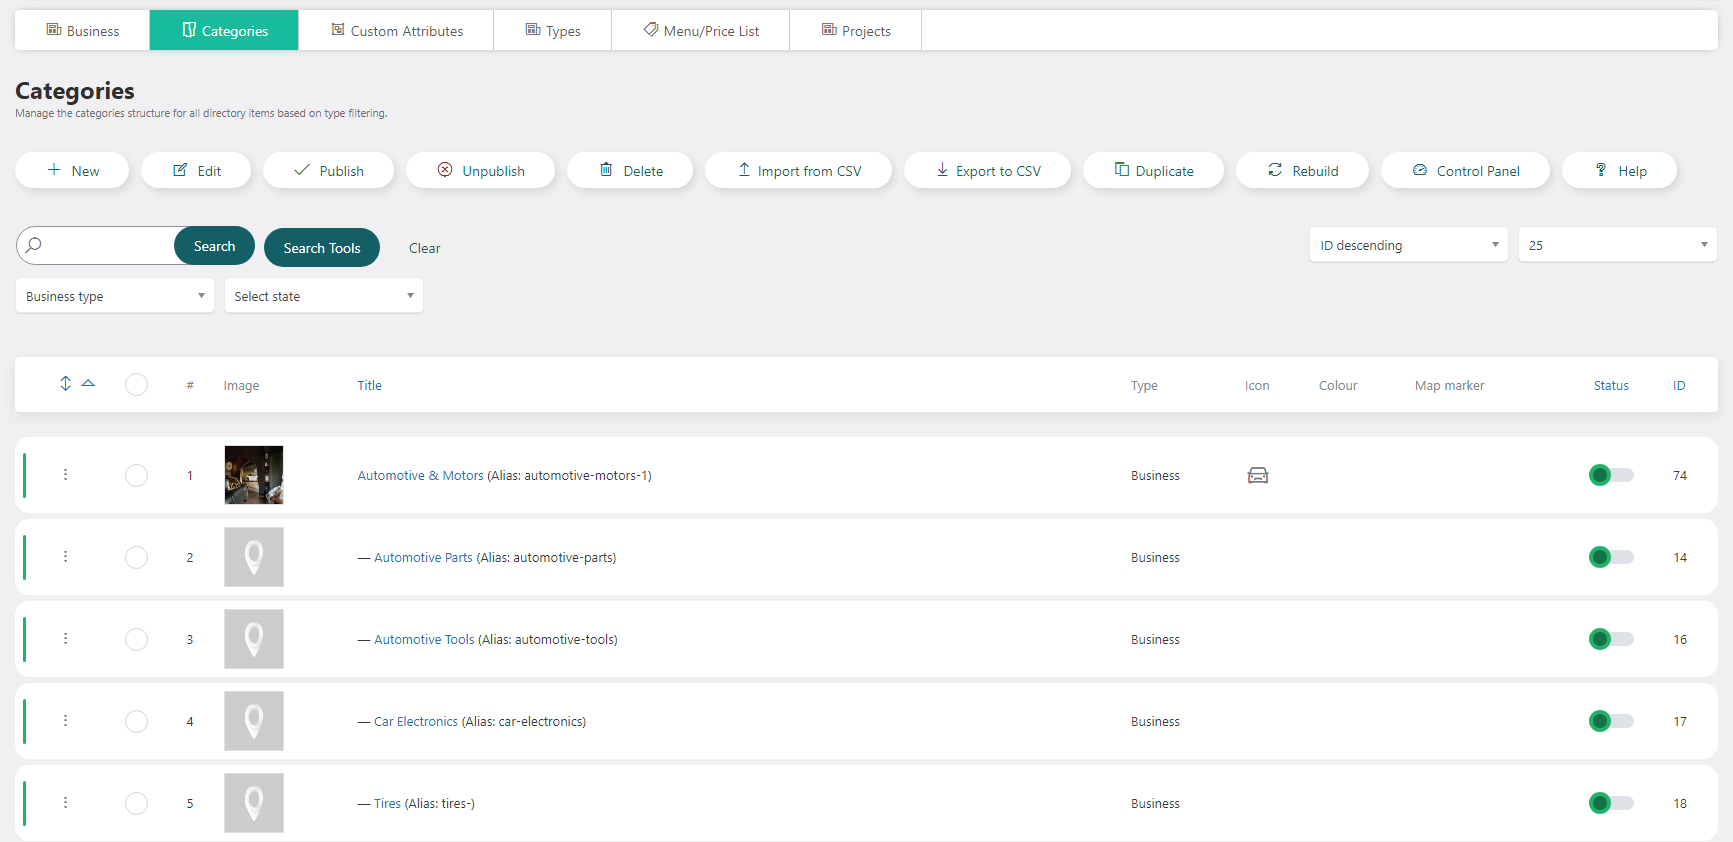
Import from CSV
In order to add categories from an existing source, the extension provides a tool to import from a CSV (comma separated values) file.
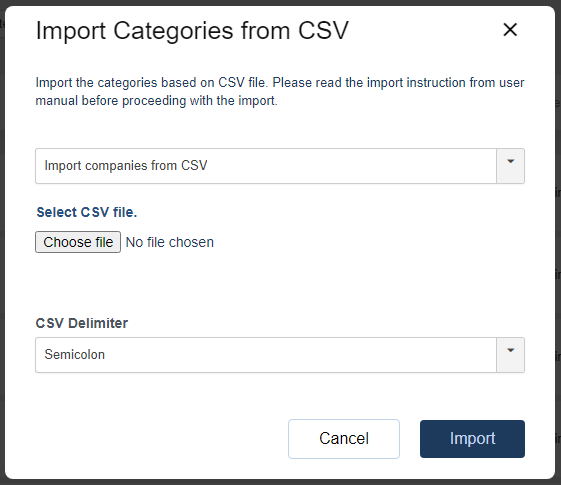
Before you start the import process you have to make sure that your file is correctly formatted. You can check if your file respects the rules below:
CSV file values can be separated by a comma (,) or semicolon (;). They are called delimiters.
Headers must be specified on the first line. Headers are case sensitive. Not all fields are mandatory.
All records must be entered on one line.
All lines should contain the same number of comma-separated fields. If the fields are empty you can leave it empty but add the delimiter. Each line has to have the same number of commas or semicolons.
Any field may be quoted (with double quotes).
Fields containing a line-break, and/or commas should be quoted. (If they are not, the file will likely be impossible to process correctly).
Double quote character in a field is not allowed. You can replace double quote with single quote.
Here are the header fields:
name
subcategories
type - it represents the type of category. This type can be 1,2 or 3
Business listing category
Offer category
Event category
If type is not specified the default type will be applied which is 1 (Business listings)
E.g of CSV file
category;subcategories;type “Automotive & Motors”;”Automotive Tools,Tires ,Automotive Parts,Car Electronics”,1 “Books”;”Textbooks,Children’s Books”,”1” “Camera & Photography”;”Photography,Camera”;”1”
Export to CSV
Export current categories to a CSV file.
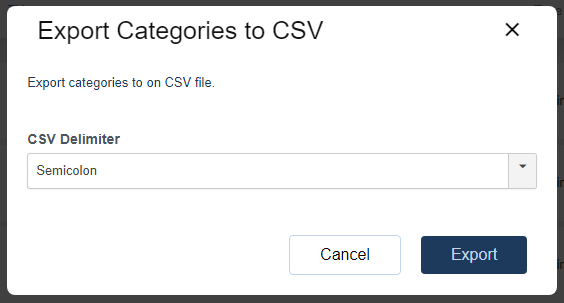
This will export a CVS file with all the Categories currently present in the directory.
Business Listings
A business listing can be created by any owner (by creating an account in frontend) or it can be added by an administrator using the functionality in the backend.
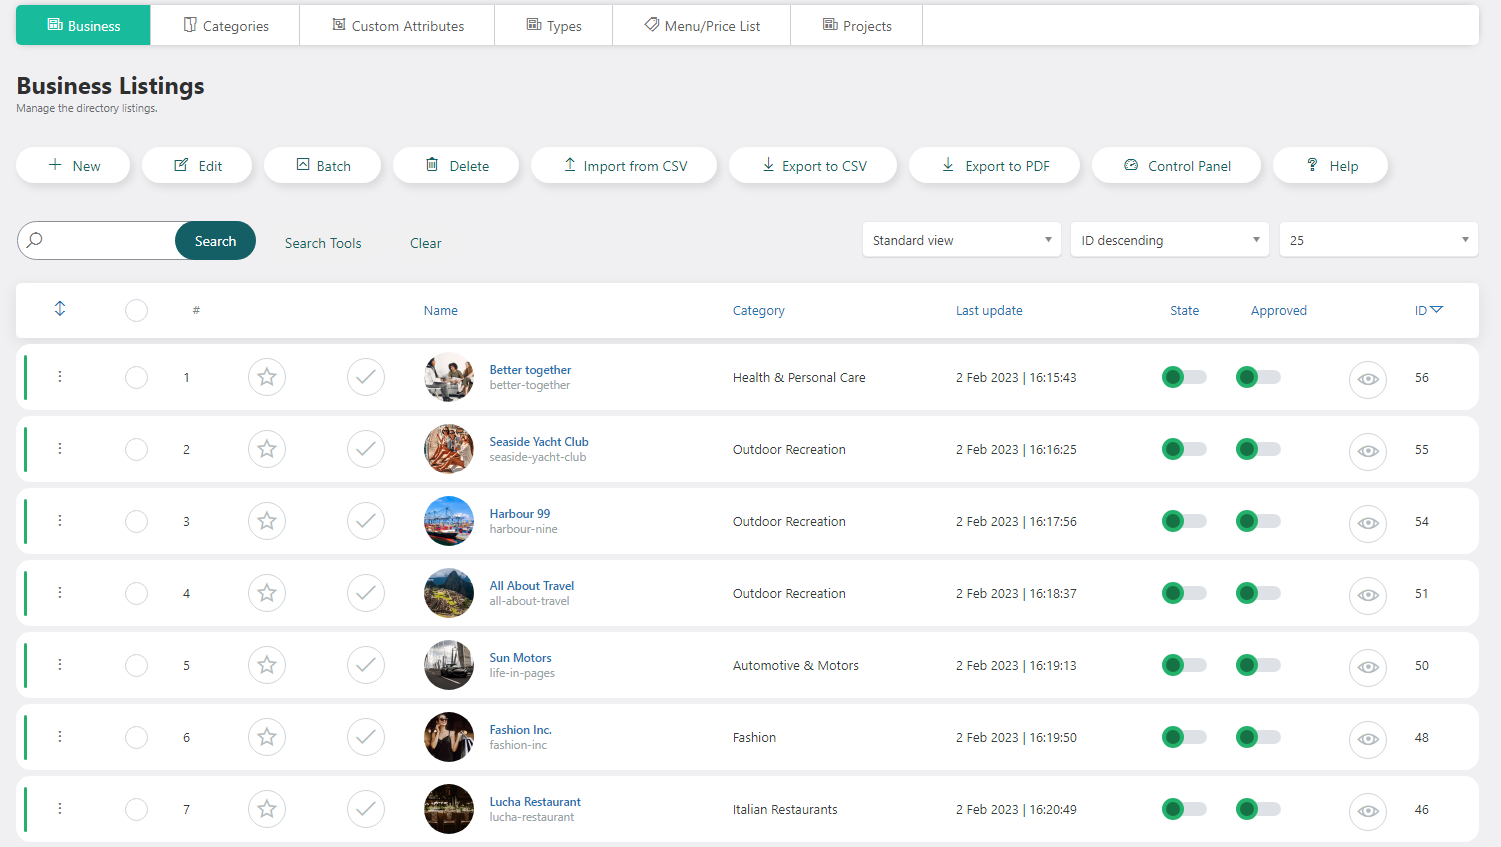
As an administrator, you can search for companies by type, state and status. For an easier management the business listing information has been grouped into several sections.
Import from CSV
In order to add business listings from an existing source, the extension provides a tool to import business listing from a CSV (comma separated values) file.
Important
Please setup or import category structure first.
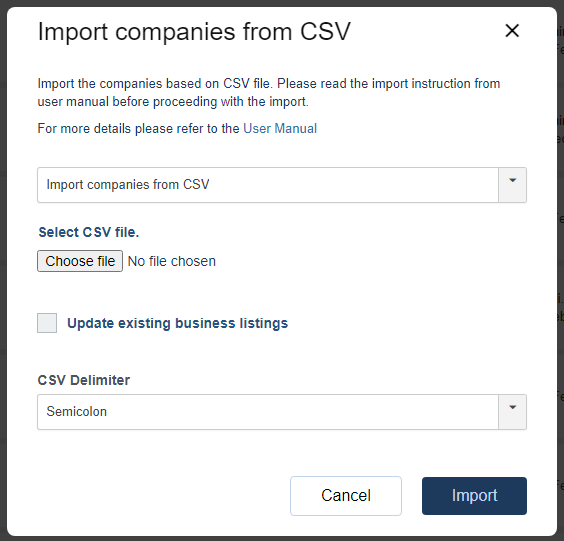
Before you start the import process you have to make sure that your file is correctly formatted.
You can check if your file respects the rules below:
CSV file values can be separated by a comma (,) or semicolon (;). They are called delimiters.
Headers must be specified on the first line. Headers are case sensitive. Not all fields are mandatory.
All records must be entered on one line.
All lines should contain the same number of comma-separated fields. If the fields are empty you can leave it empty but add the delimiter. Each line has to have the same number of commas or semicolons.
Any field may be quoted (with double quotes).
Fields containing a line-break, and/or commas should be quoted. (If they are not, the file will likely be impossible to process correctly).
Double quote character in a field is not allowed. You can replace double quote with a single quote.
If you want to update the existing listings and not create new ones you have to check “Update existing business listings” checkbox. Please make sure the listing names are the same, otherwise they will not be updated and a new listing will be created.
Here are the header fields (please notice that headers changed starting with version 4.5.0):
name
alias
categories
main_subcategory
commercial_name
registration_code
tax_code
type
slogan
description
short_description
street_number
address
city
region
country
province
website
keywords
phone
mobile
fax
latitude
longitude
user
average_rating
views
website_count
contact_count
package
googlep
skype
youtube
business_hours
custom_tab_name
custom_tab_content
publish_only_city
postal_code
state
approved
contact_name
contact_email
contact_phone
contact_fax
logo_location
business_cover
pictures
E.g of CSV file
id,name, name,name_de-DE,name_en-GB,name_fr-FR,name_nl-NL,name_pt-BR,alias,commercial_name, tax_code,registration_code,establishment_year,employees,website,website_count,type,keywords, slogan,slogan_de-DE,slogan_en-GB,slogan_fr-FR,slogan_nl-NL,slogan_pt-BR,short_description, short_description_de-DE,short_description_en-GB,short_description_fr-FR,short_description_nl-NL, short_description_pt-BR,description,description_de-DE,description_en-GB,description_fr-FR, description_nl-NL,description_pt-BR,categories,main_subcategory,work_status,work_start_hour, work_end_hour,break_start_hour,break_end_hour,break_ids,breaks_count,work_ids,street_number, address,area,country,city,province,region,postal_code,publish_only_city,latitude,longitude, activity_radius,recommended,location_name_1,location_street_number_1,location_address_1, location_city_1,location_region_1,location_postalCode_1,location_countryId_1,location_latitude_1, location_longitude_1,location_phone_1,location_province_1,location_area_1,contact_department_1, contact_name_1,contact_email_1,contact_phone_1,contact_fax_1,phone,mobile,email,fax,facebook, twitter,googlep,skype,linkedin,youtube,instagram,pinterest,whatsapp,logo_location,business_cover, business_ad,pictures,user,review_score,views,contact_count,package,custom_tab_name, custom_tab_content,state,approved,modified,publish_start_date,publish_end_date,created, featured,meta_title,meta_title_de-DE,meta_title_en-GB,meta_title_fr-FR,meta_title_nl-NL, meta_title_pt-BR,meta_description,meta_description_de-DE,meta_description_en-GB, meta_description_fr-FR,meta_description_nl-NL,meta_description_pt-BR,zipcodes,attribute_test1
“Vintage Photography”,””,””,””,””,””,”vintage-photography”,”Contruction Company”,”12312”, “JBD-343412”,””,”0”,”http://google.com”,”0”,”Activity Outfitter,Agent/Representative”, “vintage, camera”,”Good old day are coming back.”,””,””,””,””,””, “Quisque cursus nunc ut diam pulvinar luctus. Nulla facilisi.Donec porta lorem id diam malesuada nec pretium enim euismod. Donec massa augue, lobortis eu cursus in,tincidunt ut nunc. “,””,””,””,””,””,”<p> The personal and collective histories of our clients enrich ourideas on every project. Our methodology allows us to research thoroughly the particularity of any design brief without falling back upon generic response.</p>”,””,””,””,””,””,”Camera & Photography,Photography”, “Photography”,”############”,”############”,”############”,””,””,””,”0##0##0##0##0##0##0”, “############”,”22”,”Lawrance”,””,”Canada”,”Toronto”,””,”Ontario”,”23123123”,”0”,”43.65110725968039”, “-79.3748313188553”,”0”,”1”,,,,,,,,,,,,,,,,,,”0727321321”,””,”office@site.com”,”0269/220123”, “http://www.facebook.com/cmsjunkie”,”http://www.twitter.com/cmsjunkie”, “http://www.google.com/cmsjunkie”,””,””,””,”https://www.instagram.com/theartcenterhp/”, “”,”0040727345895”,”/companies/8/image7-1469608618.jpg”,”/companies/8/cropped-1609406954.jpeg”, “”,”/companies/8/hero_1.jpg##,/companies/8/hero_2.jpg##,/companies/8/hero_3.jpg##, /companies/8/main.jpg##”,”0”,”3.3”,”1197”,”0”,”Silver Package”,””,””,”1”,”2”, “2021-08-16 13:07:36”,”0000-00-00”,”0000-00-00”,”2011-11-23 21:32:07”,”1”,”Vintage meta title”, “”,””,””,””,””,”Vintage meta description”,””,””,””,””,””,””,”val1”,”222222222”,”33333333333”, “33444444444444”,”123123”
Important notice: If new listings are imported into the system you should remove the id column (first column – it is present when you do an export) and make sure that the “Update existing business listings” checkbox is unchecked, otherwise the listings will not be imported.
Import with update
The import mechanism can be used also to update the current listings. The update can be done by item name or by item id.
If you want to update by name you can check “Update existing business listings” checkbox.
If you want to update a listing by id, you have to specify that listing id in the CSV file. The easiest way is to export the listings with the id and then perform the changes on the export file.
Import with images
It is also possible to import logos and pictures for the business listings. You will have to place the images on {joomla}/media/com_jbusinessdirectory/pictures folder and set the relative path on images on CSV file.
E.g for pictures
“/companies/8/image7-1469608618.jpg”,”/companies/8/cropped-1609406954. jpeg”,””,”/companies/8/hero_1.jpg##,/companies/8/hero_2.jpg##, /companies/8/hero_3.jpg##,/companies/8/main. jpg##”– the images will be retrieved from {joomla}/media/com_jbusinessdirectory/pictures/companies/8/ folder.
E.g. for logo
“/companies/8/image7-1469608618.jpg” – the logo will be retrieved from {joomla}/media/com_jbusinessdirectory/pictures/companies/8/ folder.
Email sent on listing import
When listings are imported in the J-BusinessDirectory extension there is an email sent to the business owner to let them know that their listing is now part of your directory. If you do not want to send any email you can disable it in the admin email section. The notification email sent to the customer is “Listing Creation Notification” email.
If business listings are not showing up on front-end please check the followings:
Make sure that state fields in CSV file are set to 1
Make sure that approved field is set to 2
Make sure that category is not empty
If packages are enabled and the package is not specified in the import list, a default value (0) will be associated. This will prevent companies to be listed in front-end. To set a default package for companies you have to go to Application settings/ General tab and set packages to no and then to yes. A select box will appear that allows you to set the default package. Set the default package and save. This will change the package only for companies that do not have a package set.
Export to CSV
Export current companies to a CSV file.
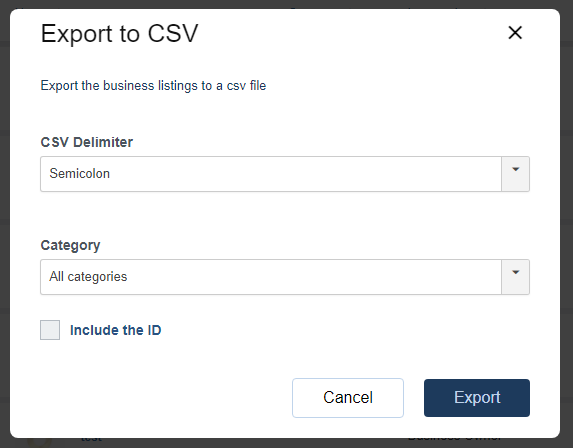
You can choose to export all listings or only the listings that are associated with one category. When exporting the id column will be export as well. Please delete the id column if you want to import new listings, otherwise an update will be performed and the listings will not be imported.
Business Categories
You can add/edit, delete and publish/unpublished a business category from the Manage Categories screen.
Custom Attributes
Custom attributes provide the possibility to extend the current information that is added on business listings, offers & events. You can create & add your fields according to your needs. The custom attributes will appear in the additional information section for completion. Based on the custom attribute settings, it will be showed or not in the front-end on item details.
You can create and manage the custom attributes from the Custom Attributes screen. You can switch at any time between the custom attributes for different sections.
When a user creates a business listing on front-end and it has not been approved yet, attributes can still be edited in CP. In the moment it has been approved by the admin, the user cannot edit them anymore on front-end.
If packages are enabled, custom fields will appear on business listing edit view only if they are associated with the selected package. On front-end, the custom attributes will be shown only if the order associated with the package will be paid.
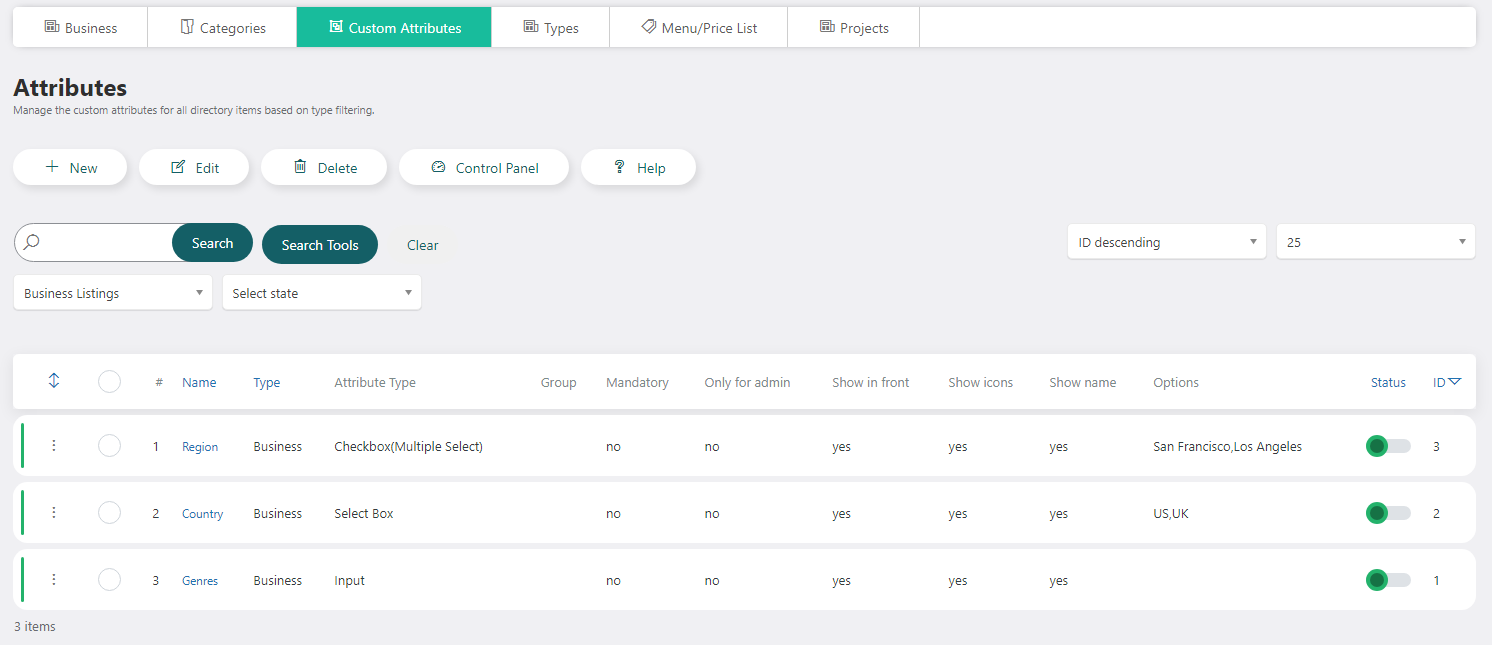
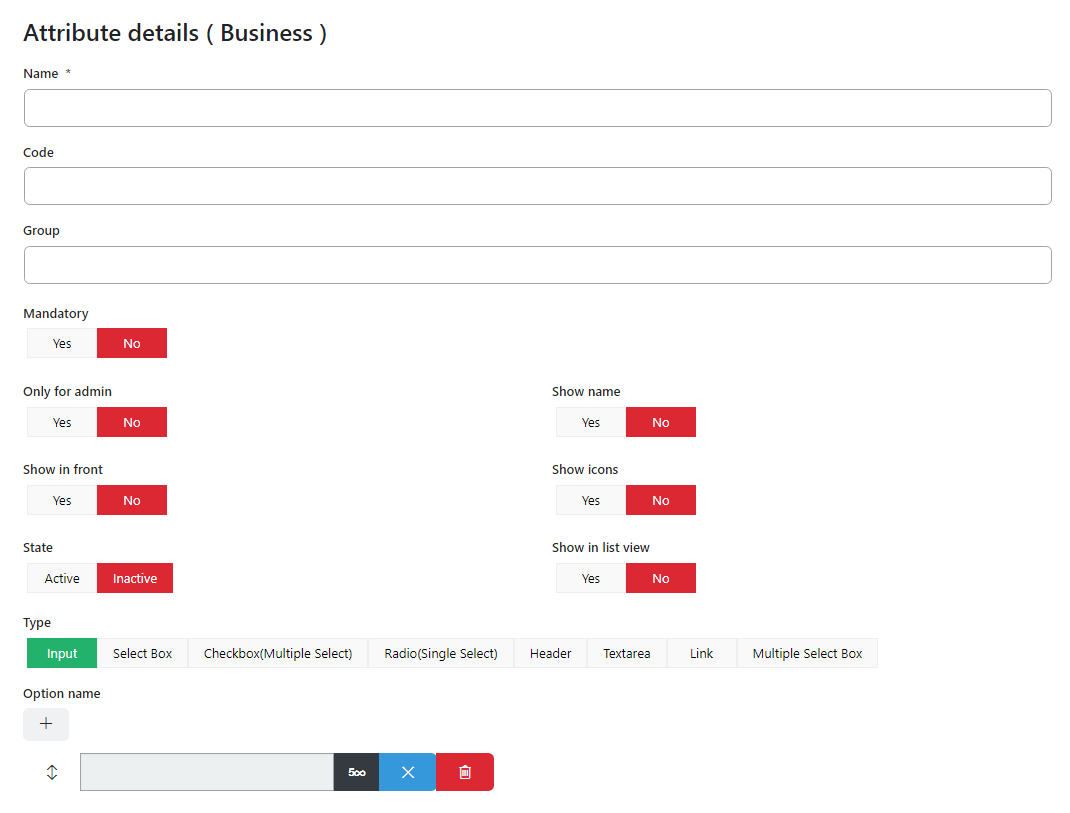
The available options for custom attributes are:
Name – the name of the custom attribute
Code – the alias of the attribute
Group – possibility to set a group for the attribute. Attributes of the same group will display in the same box.
Mandatory – possibility to make the attribute mandatory or not
Only for admin - if set to yes, the custom attribute won’t be displayed in a front - end edit view
Show name - show or not the attribute name alongside with its value
Show in front – possibility to display the custom attribute in the front
Show icons – possibility to set icons to the custom attributes and if set to yes, the icons will display.
State – possibility to activate or deactivate the attribute
Show in list view - decide if the custom attribute will be displayed or not also in the search results list view
Category - When ‘Enable attribute categories’ is set to yes in front end general settings, you can assign categories for custom attributes.
Type – possibility to determine the type of the field (and the “Option name” is related to this field to insert the options)
Option name – is related to “type” to insert the options
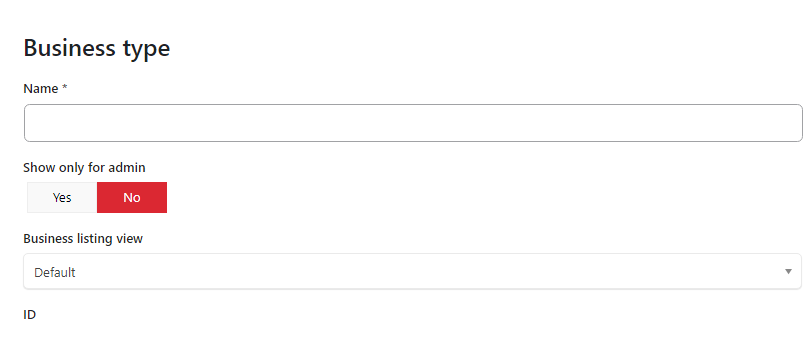
Business types
In this section, you can define the types of business that are allowed/available on your website. The type of business will also be displayed when an owner is creating the business listing.
When accessing this option, you will be presented with a list of all the available business listing types. You can edit, delete or add a business type.
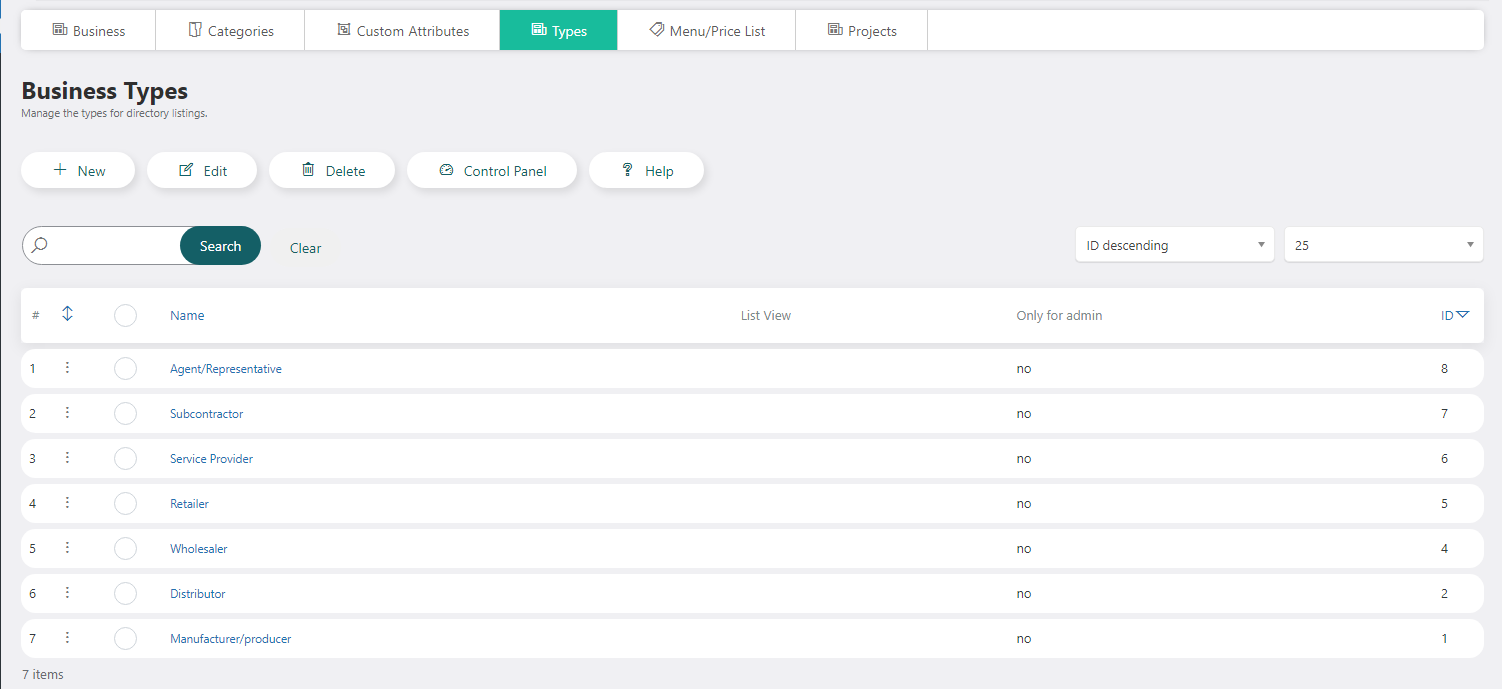
For the business types, the user can fill in the name and decide whether to display this business type for a front-end user on the business listings edit view or not. If the option Show only for admin is set to yes, then this business type will be available only on a backend edit view.
Business listing view: if a listing has a type added, it will be displayed with the detail view set in the type; if it doesn’t have a type set, then it will be displayed with the view style set in the general settings.
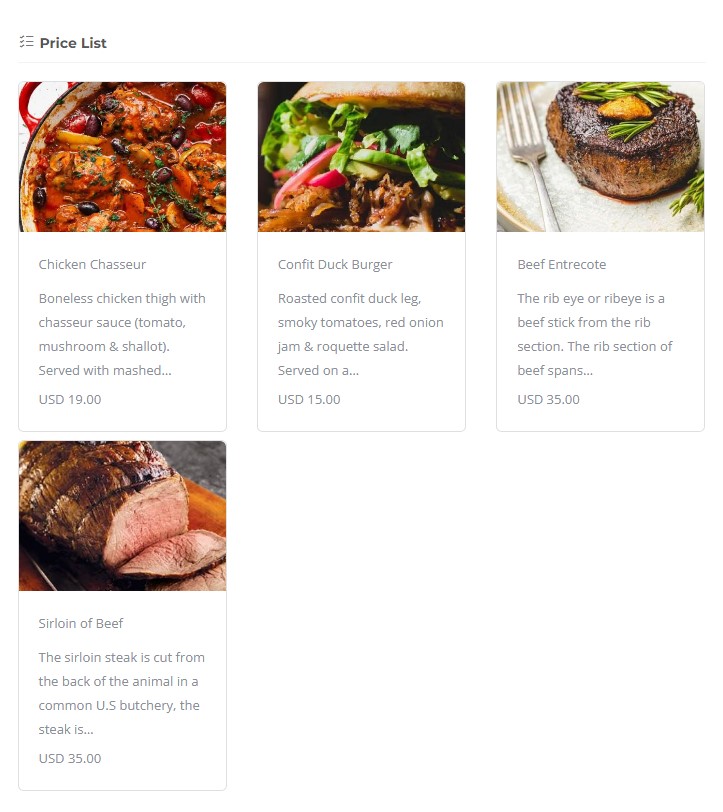
Menu / Price List
Service price list can be added by using the menu / price list menu item, on both, admin section and front-end. It is important to enable the price list menu on the directory’s general settings, for the menu item to appear.
In the case when the packages are enabled, it is important to make sure that the price list is added as a package feature in order for the actual listing to be shown in the price list selection. Once the menu item is set to active, the user has the possibility to add services for each listing. The service price lists are grouped by listings.
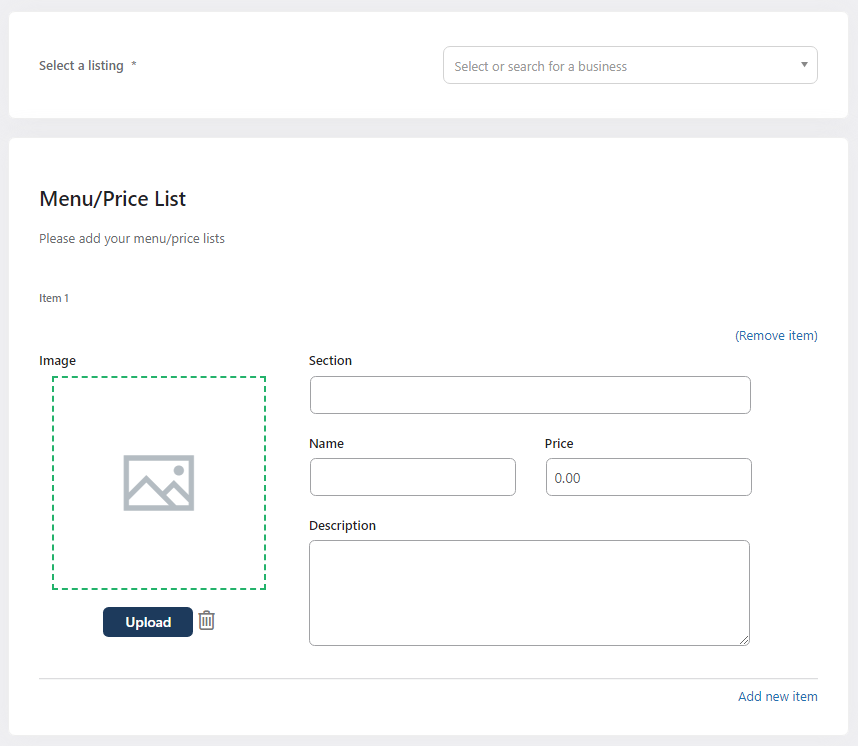
Select a listing: select the listing to which the service will belong
Section: the name of the section, services with the same section name will display grouped together.
Name: the name of the service
Price: the price of the service, if left empty, it will display as 0.00.
Description: a small paragraph can be entered to describe the added service
Image: an image can be added to associate all the information.
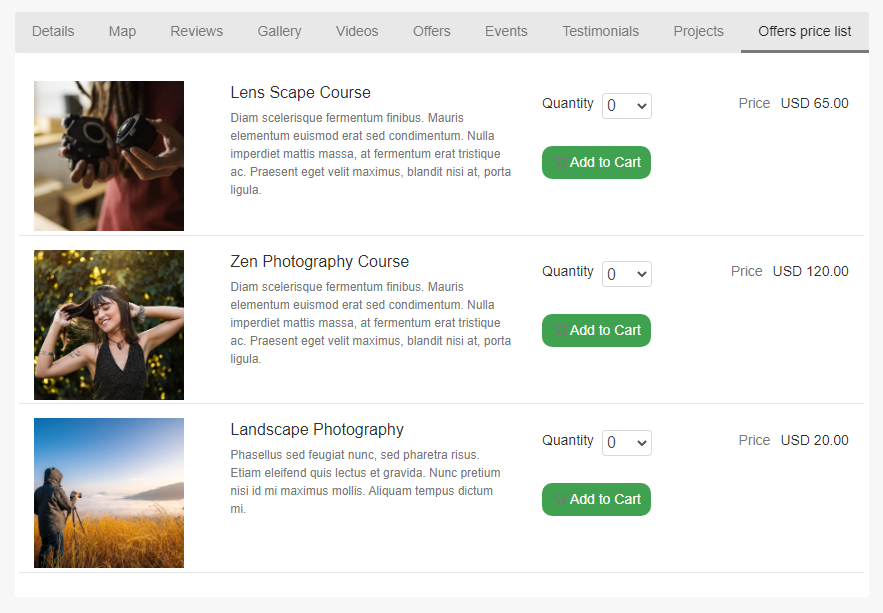
After the price list details are completed, they are displayed on the business listing details view, like any other feature. The service price list can be shown in a list view or in a grid view, based on how it is set on the general settings.
List view

Grid view
Business Projects
In order to improve the business marketing and exposure to the end users, the site administrator can add business projects. Each business owner will be able to load his business projects in order to give an idea to the end users about their work. For each project, the business owners can add a description and a photo gallery.
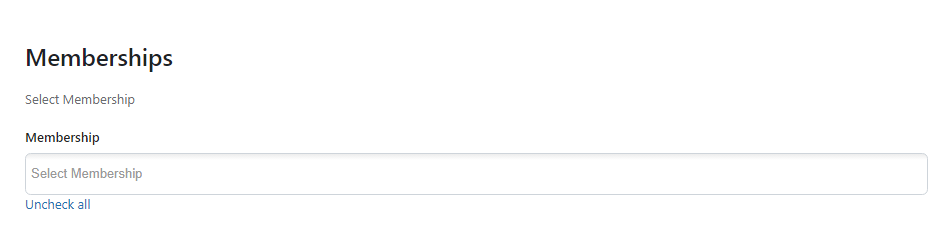
Memberships
In this section, the site administrator can add memberships/certification for business listings.
Memberships can contain:
Name: the membership name
Type: the admin can choose between 3 different types: product certification, professional accreditation and memberships
URL: the membership URL
Description: the membership description
Show in front: decide whether the actual membership will be displayed or not in front
Status: decide whether the memberships will be published or not
Image: add an image related with the membership
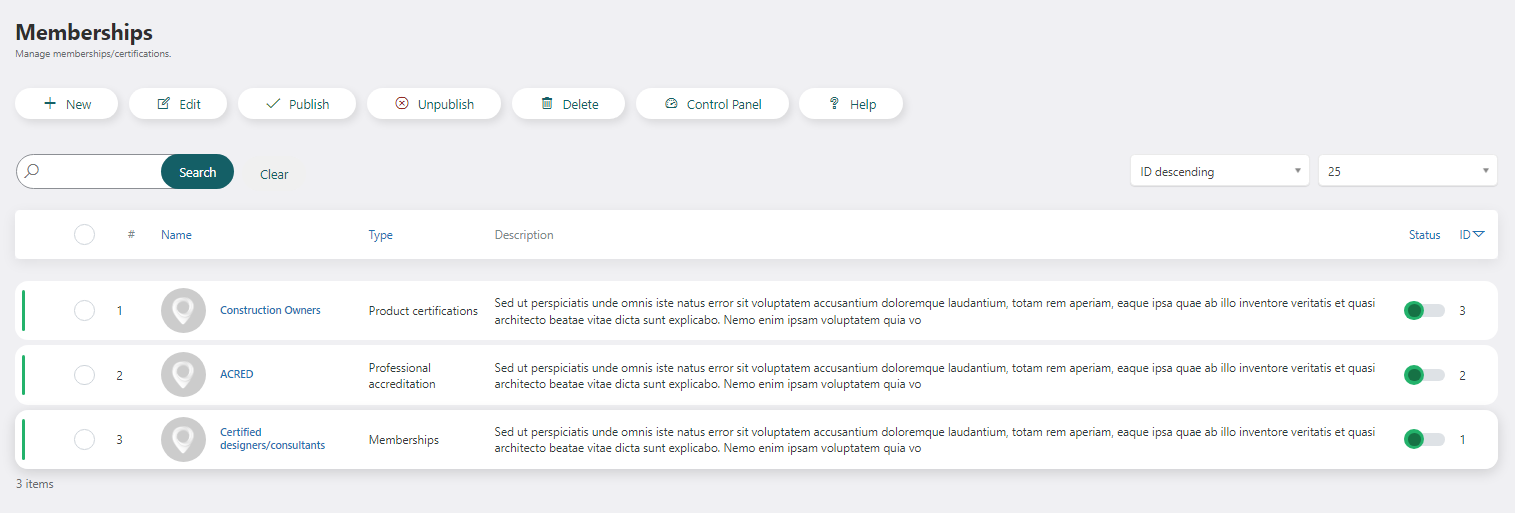
After all the details are completed and saved, the memberships will be listed in the “Memberships” menu item.
In the business listings edit view will be displayed a multi – select, from which different memberships can be selected for each listing, in order to be displayed in the front – end detail views.
Memberships are part of the package features, so if packages are enabled, it has to be made sure that they are contained in the listings package and that the package is paid.
Otherwise, in the case when packages are inactive, the memberships will be displayed by default in the detail views, if chosen in the actual listing.

Announcements
Both, business owners and front-end users, can create announcements for a certain listing. They can be added on both, admin section and front-end Control Panel.
It is important to enable the announcements menu on the directory’s general settings, for the menu item to appear.
In the case when the packages are enabled, it is important to also make sure that the announcements are added as a package feature in order for the actual listing to be shown in the listing selection. Once the menu item is set to active, the user has the possibility to add announcements for each listing.
An announcement contains the below information:
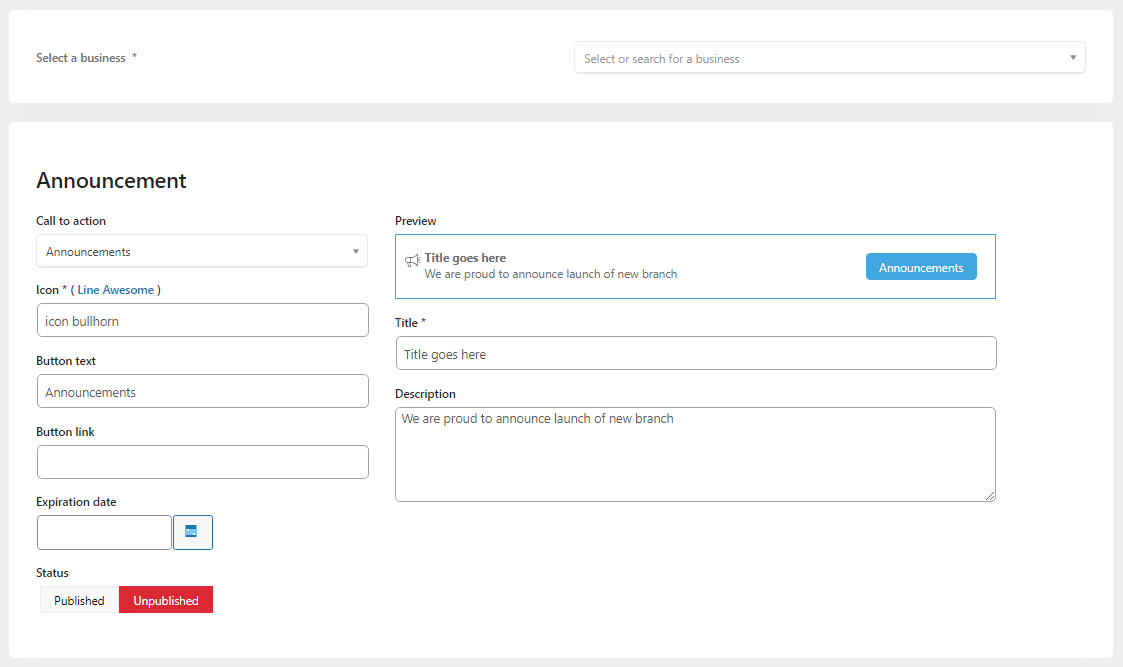
Select a business - select the listing for which the news will be available
Call to action - the user can choose what kind of action wants to display:
Announcements
Contact Us
Book Now
Buy Tickets
Get Offer
Get Quote
Join Now
Schedule Now
Icon – the icons can be changed based on what the user desires, by clicking on the Line Awesome link and copying the name of the icon from the site
Button text – choose the name of the button
Button link – choose the link in which the user will be redirected after selecting the button
Expiration date - the announcement will be available until the set date
Status – set the announcement to published / unpublished
Title – the title of the announcement
Description – the description of the announcement
After the announcement details are completed, they are displayed on the business listing details view, like any other feature.
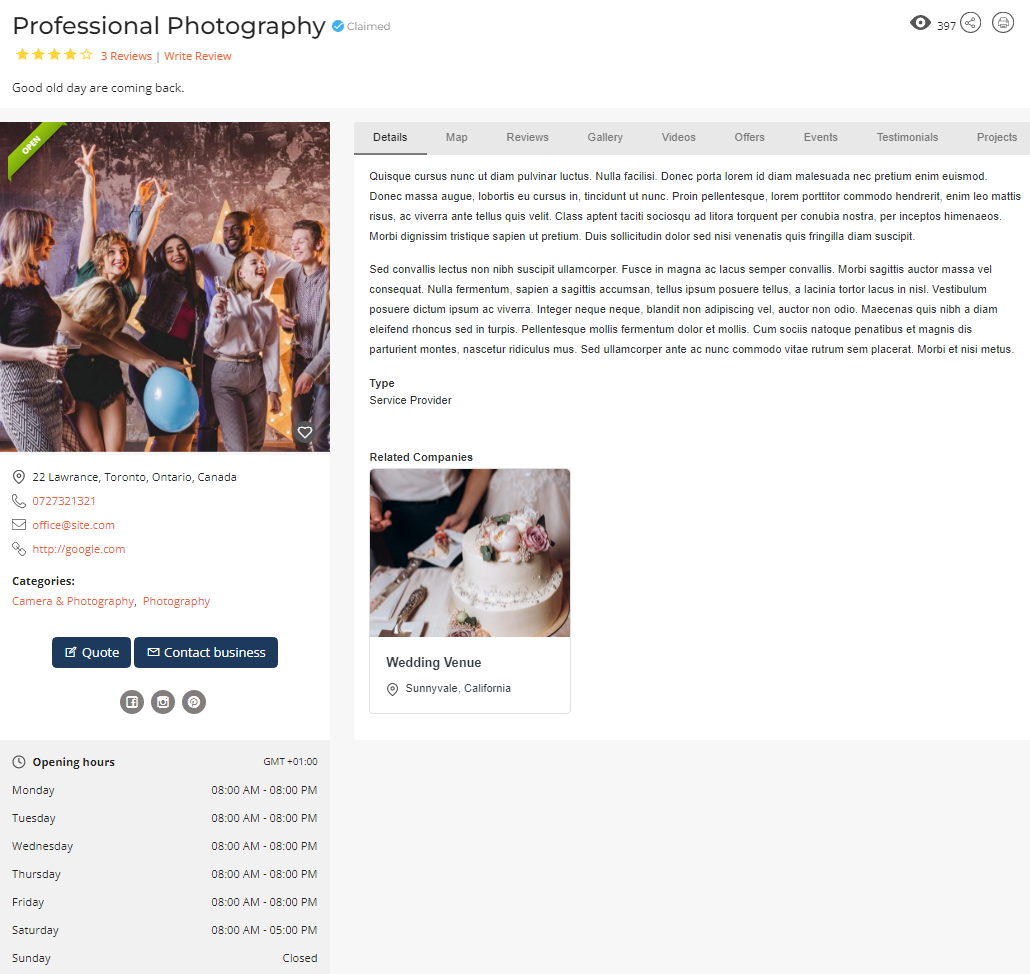
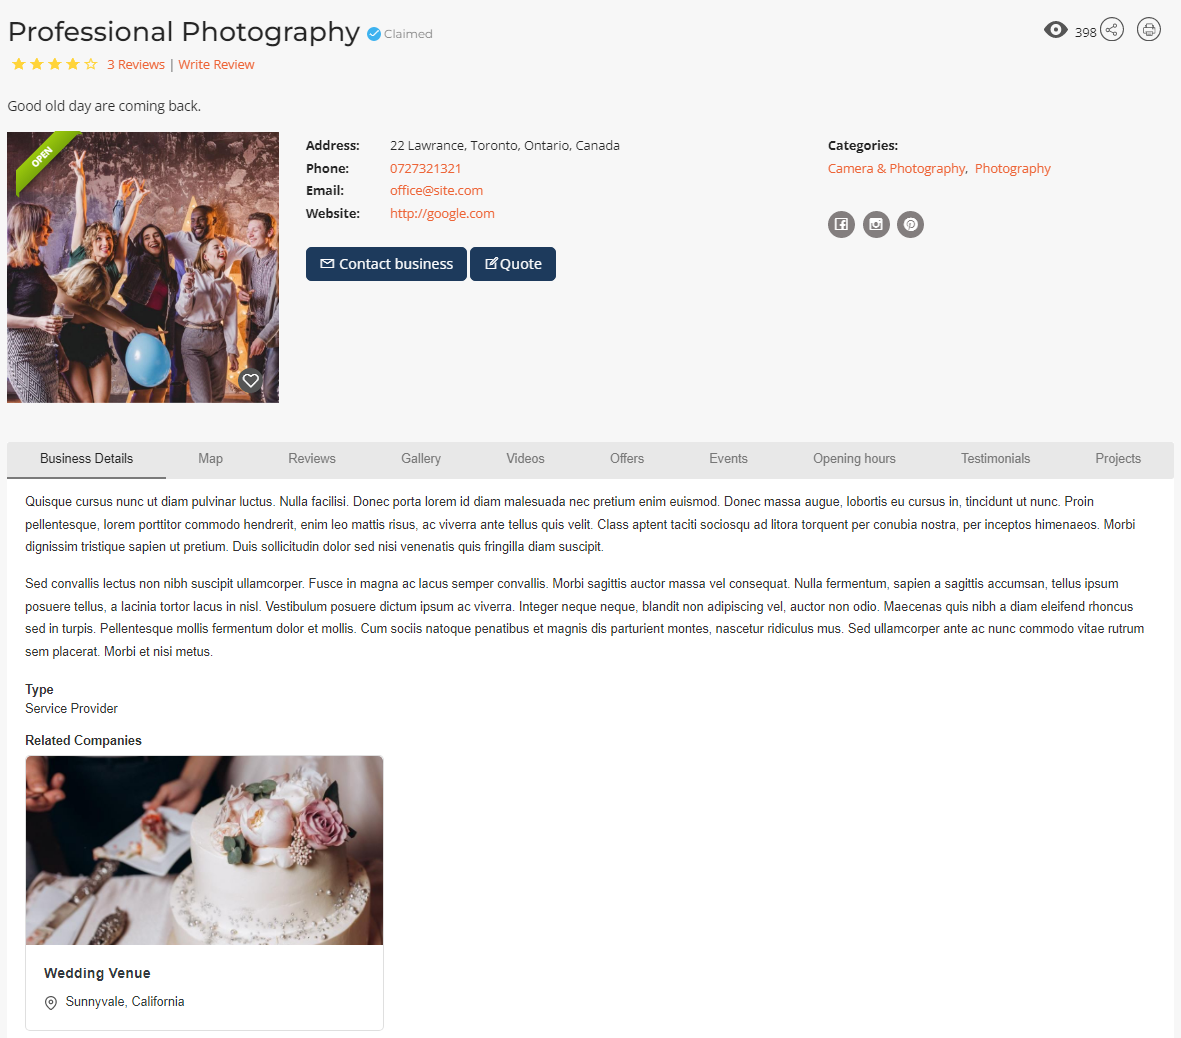
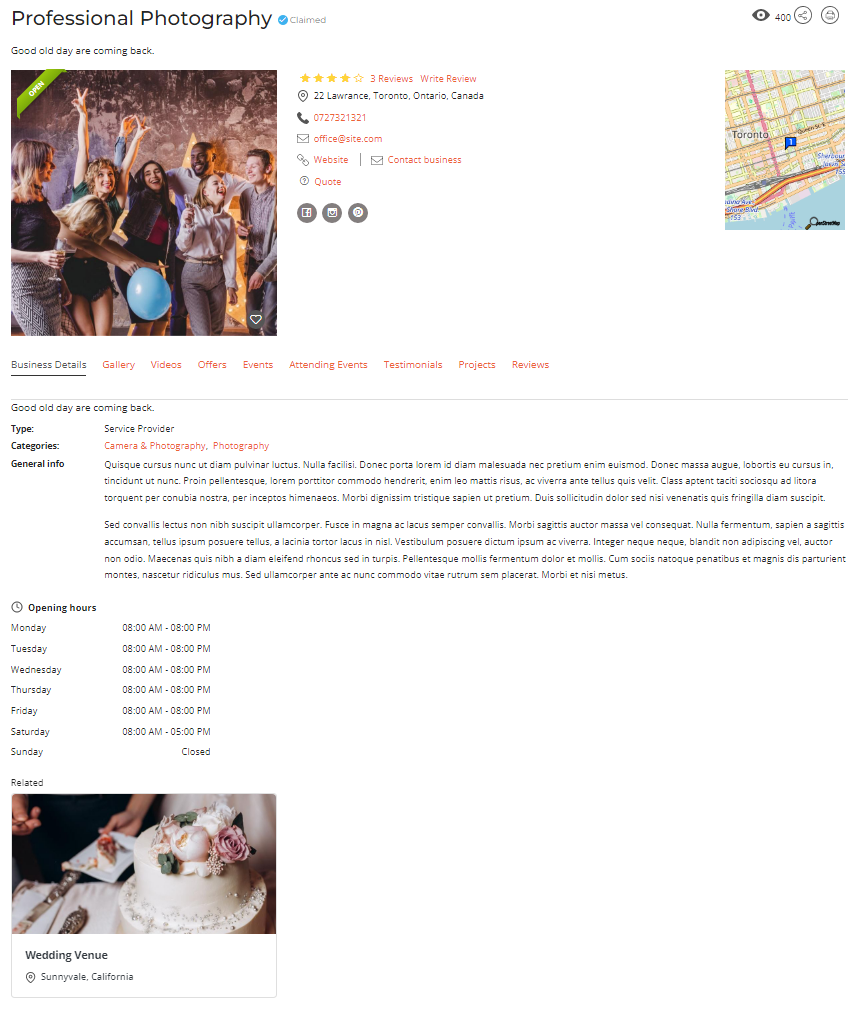
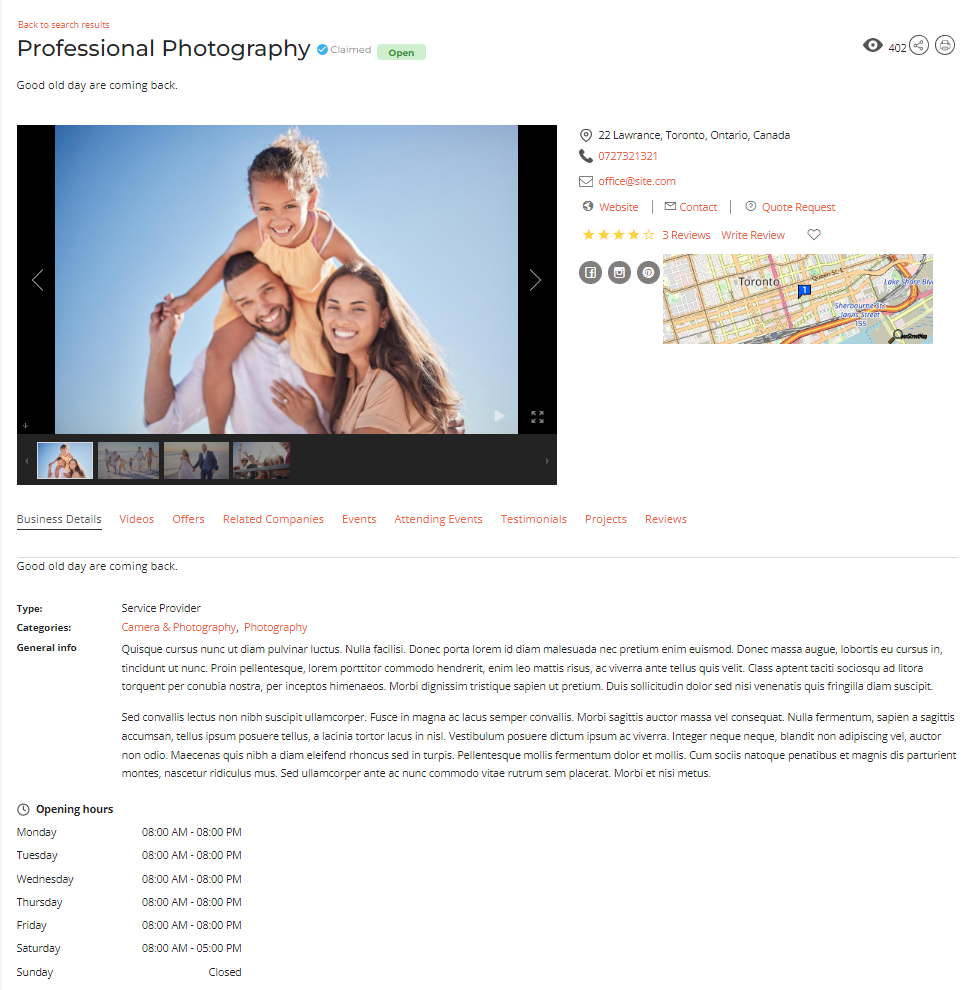
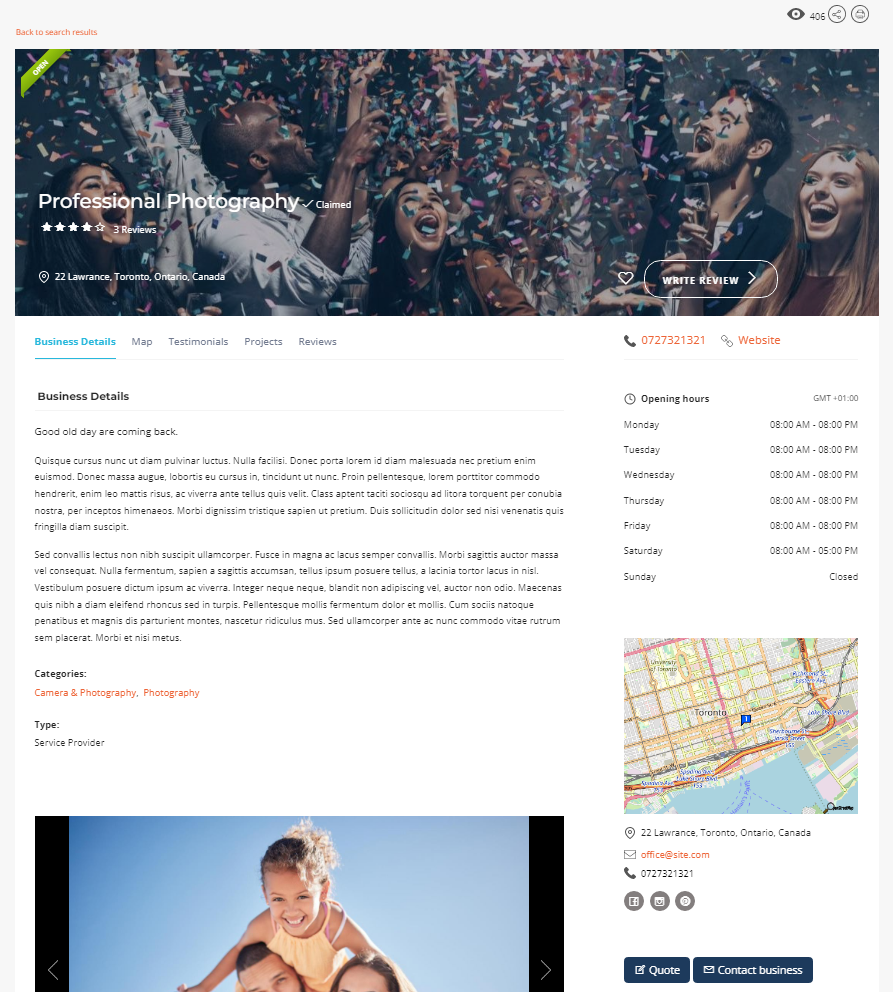
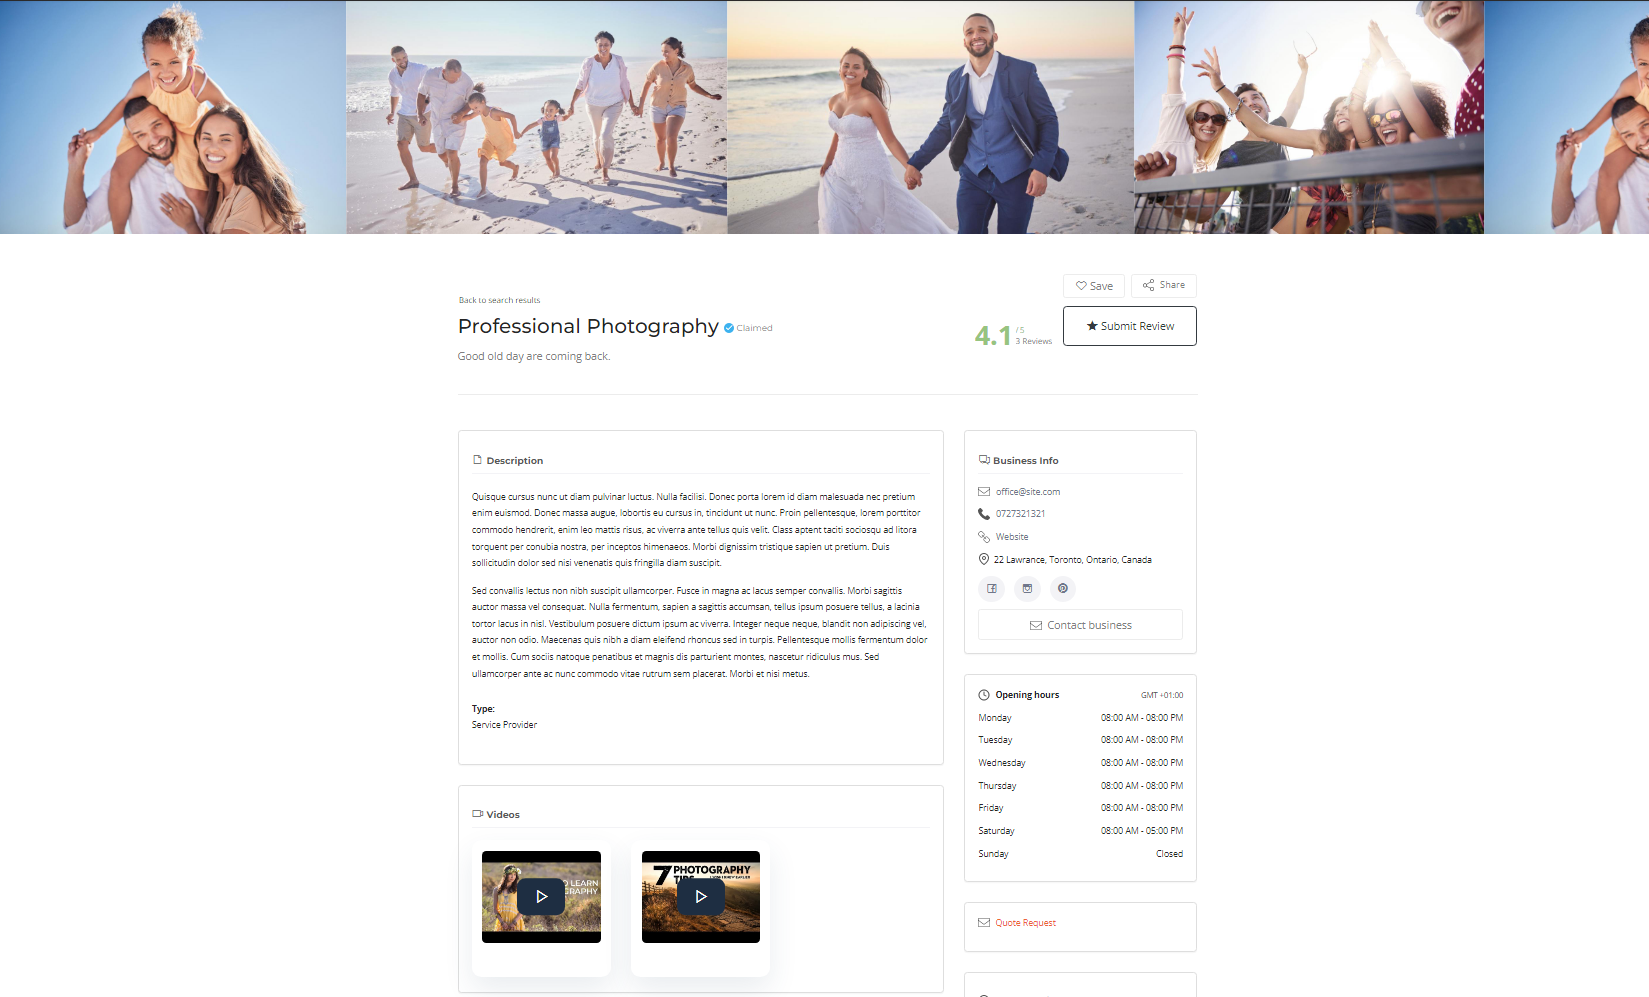
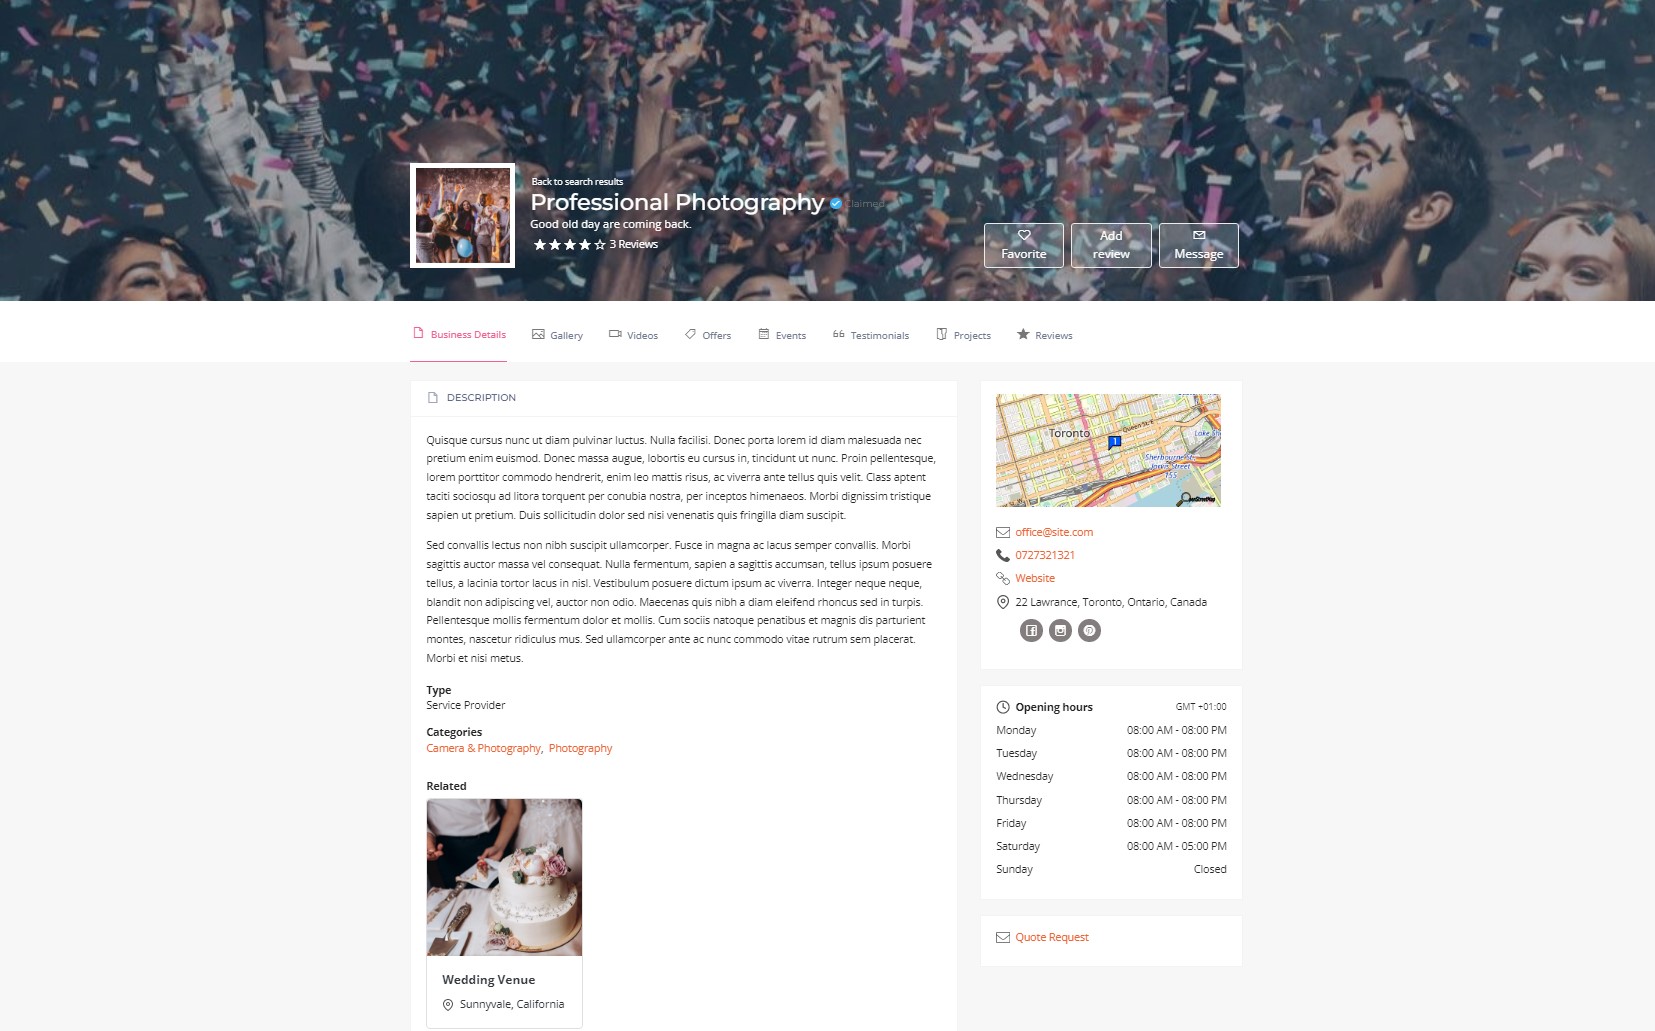
Business Listing Details
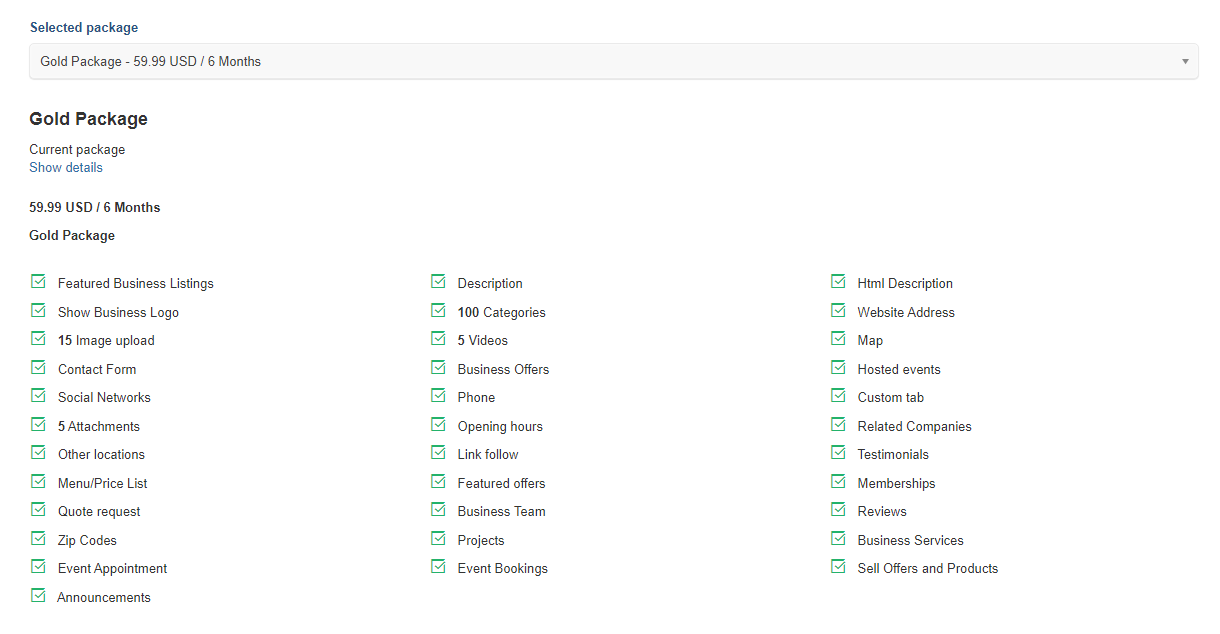
Selected Package
This option appears only when packages are active and provides the status of selected package.
Business Details
It contains the general information about the business:
Business name – the name of the company
Alias – it is used for building the business listing URL. It cannot contain special characters.
Commercial name: company commercial name
Tax code: business tax code (if applicable)
Registration ID – the company’s registration id. This naming differs from country to country
Website – the company website (if any)
Business Type – the company type. Types are managed in the Companies Types and the user can select multiple types for one listing.
Establishment year: the year when the business was created
Employess: number of employees
Min project size Minimum project value
Hourly rate select between different hourly rate on the drop-down menu
Keywords –phrase or keyword that is strictly related to business activity. These keywords will be used to identify a company.
Business listing view: listing details page view type is ‘Allow owner to change view style’ is enabled on the ‘General Settings’ section.
Business Slogan – slogan of the business listing
Short Description – short description of the business listing – will be displayed in search results for certain views.
Business Description – the company description
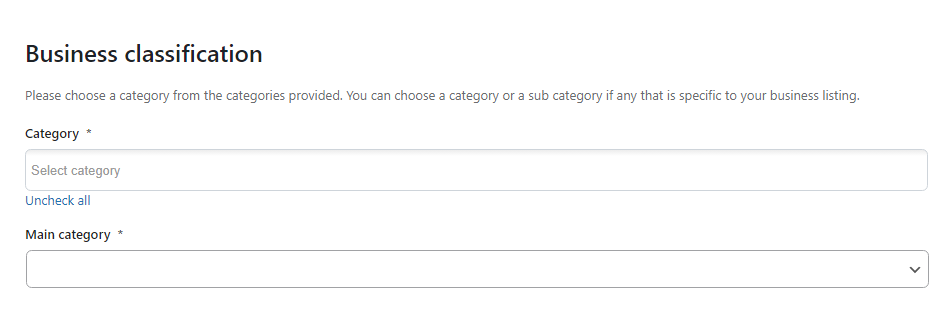
Business Classification
Each company can have one or more subcategories and one main category associated with it.
Additional Info
In this section, the custom fields that are defined on custom attributes section are shown, only if they are associated with the chosen package for the business.
Note: This section is available only when packages, on general settings menu, are disabled.
Memberships
Opening hours
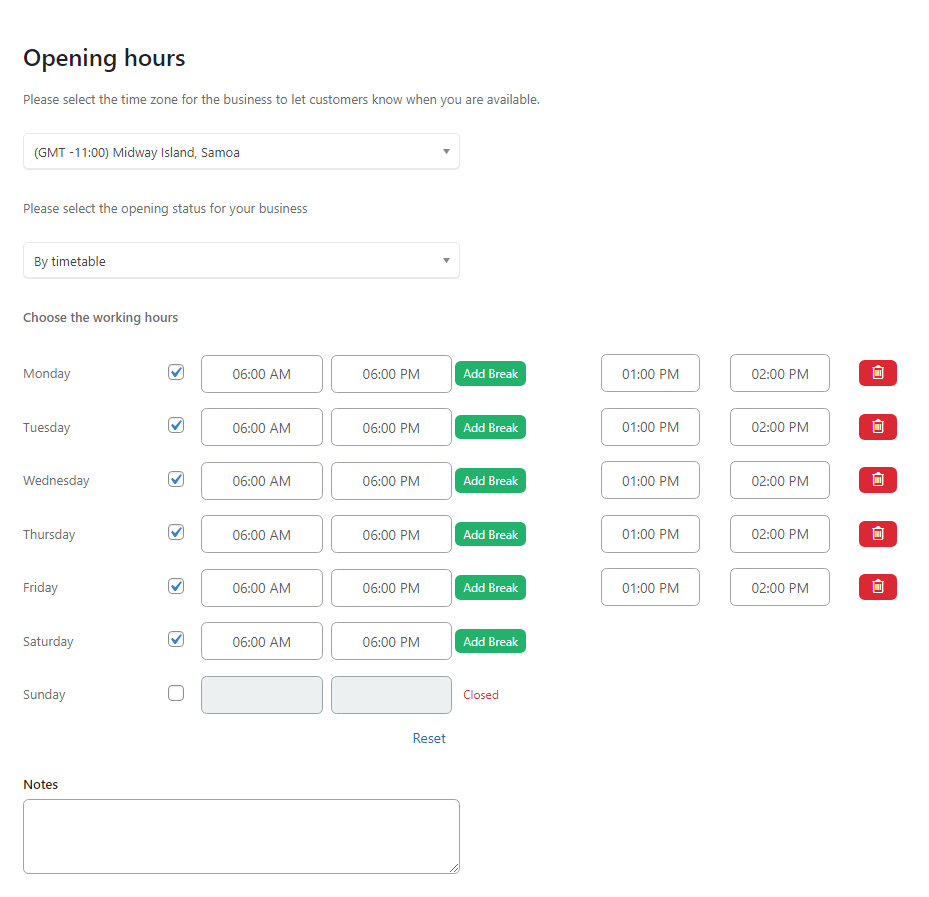
Provides the possibility of adding the working schedule for businesses and the time zone. Any values can be entered in the text fields.
E.g 12 a.m, 14:30, closed.
If none of the days is checked when creating the listing at first, on front-end nothing will display. But if only one day is checked and work hours are set, it means that the user has made changes and the unchecked days will display as Closed. If the day is checked, the Add break button will be activated to add a working hour break. And for the days that are not checked, the button will show only as Closed.
Except the timetible option, there are also some other statuses (Always open, Temporarily closed, Open by appointment, Closed for the season, Permanently closed) that can be set for the business listings.
Business Location
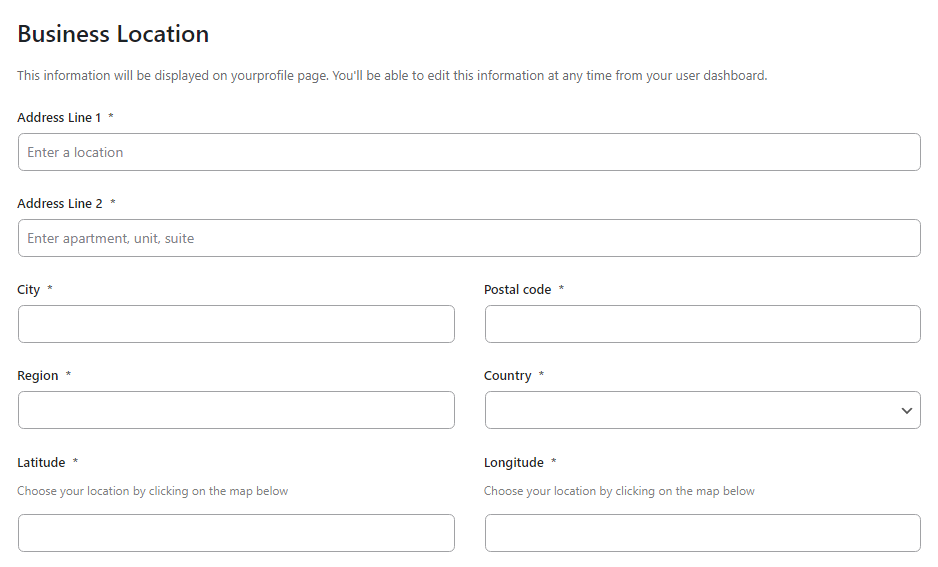
In order to have a better user experience, we have added an autocomplete address feature. You can enter the address in the autocomplete field and all address fields are completed automatically and also the map location is set. You can also set latitude and longitude automatically by clicking on the map.
Only publish my City and Region: if it is set to yes, only the city and region are published as address
Activity radius: Set the activity radius of the business listing and it is used in the radius search
Business Listing Secondary Locations
Allow the possibility to add multiple business locations. The business locations will appear on the separate section on front-end, in business listings details view.

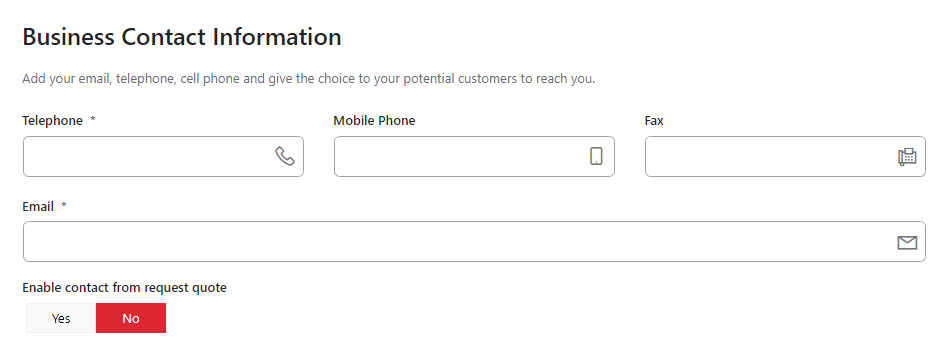
Business Contact Information
The section contains the company contact information. This information will be displayed in the frontend, when the company is displayed to visitors and the Contact Business button will show.
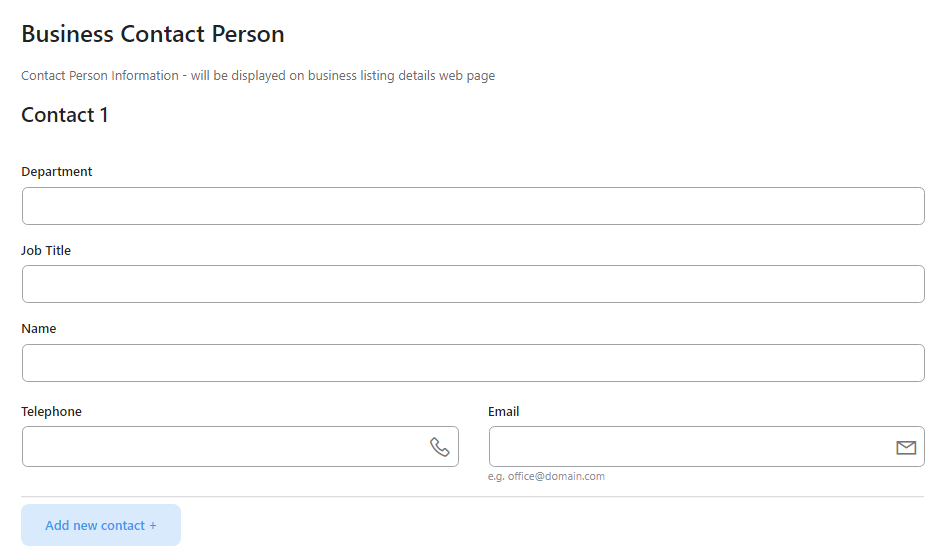
Business Contact Person
The section contains the company contact person. This information will be displayed in the frontend when the company is displayed to visitors.The business owner has the possibility to add multiple contact persons from multiple departments.
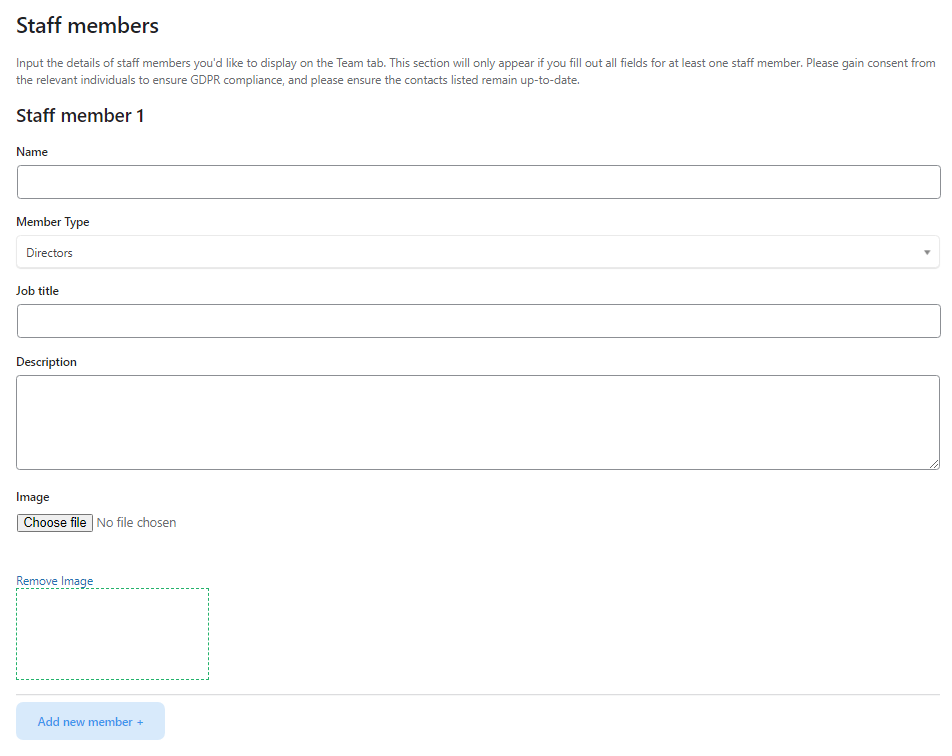
Staff Members
Each company can add details for the staff members which will display on the Team tab. This section will only appear if you fill out all fields for at least one staff member. Please gain consent from the relevant individuals to ensure GDPR compliance, and please ensure the contacts listed remain up-to-date.
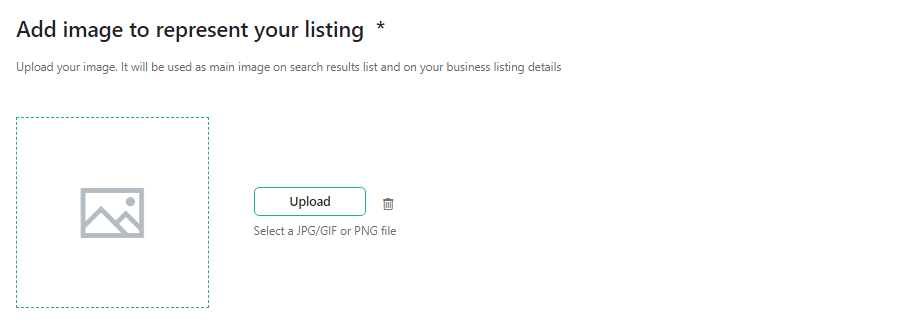
Add image to represent your listing
Provides the possibility to enter a representative image for the business, usually a logo. For companies that do not have a logo, a default image will be displayed.
The cover image is used on the business listing details page, style 5,6 and 8. It gives the possibility to the user to change the cover image of the business listings. If cover image is not used it can be deactivated from business listings attributes on general settings.
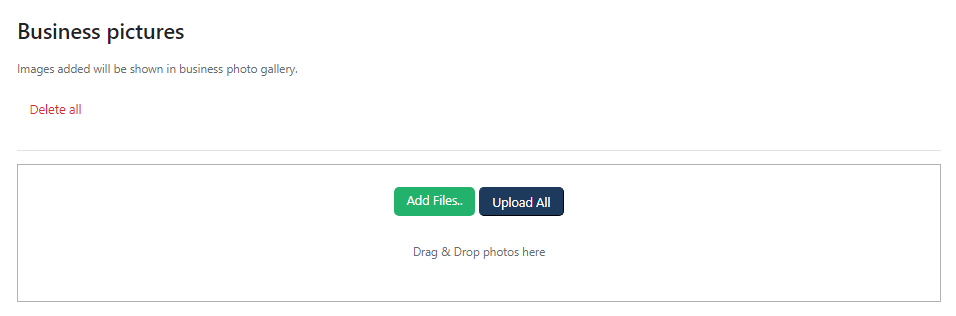
Business Pictures
You can upload pictures and set a description for them in this section. To upload a picture simply click the Browse button and choose the desired picture by navigating through your content. The upload process is automatic, which means that once the user selects the pictures from the folder, they are automatically uploaded. You can change their order by dragging & dropping the pictures.
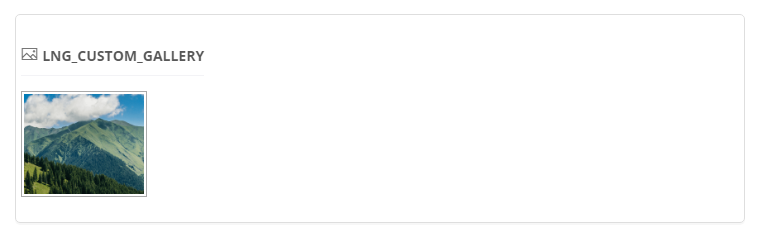
Custom Image Gallery
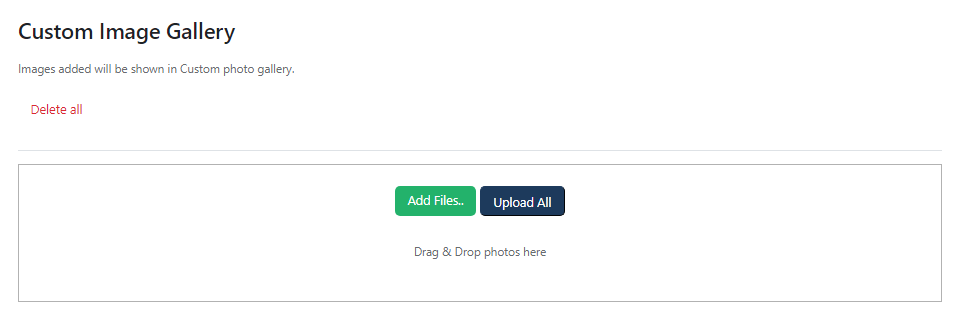
The custom image Gallery is a customizable gallery , that is visible on the Frontend on Listing details View Style 7. You can name the gallery according to your preferences, by modifying the language file and adding LNG_CUSTOM_GALLERY = “Your Gallery Name”.
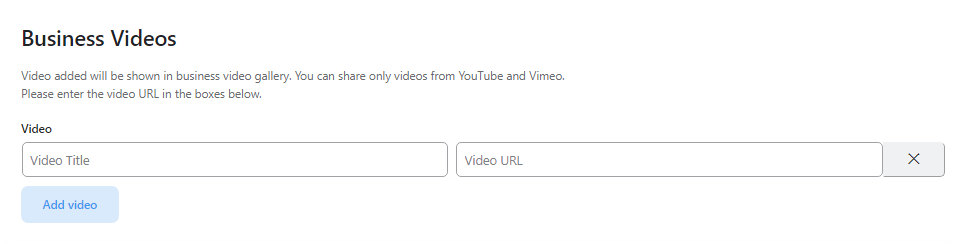
Business Videos
You can use set the company videos in this section. You can share any video URL from Youtube and Vimeo. You can also set the title for each video.
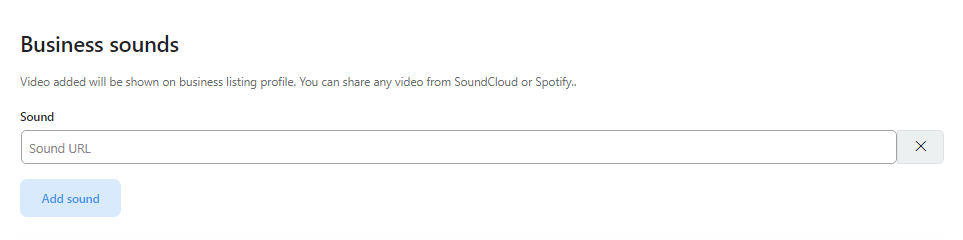
Business Sounds
Video added will be shown on business listing profile. You can share any video from SoundCloud or Spotify.
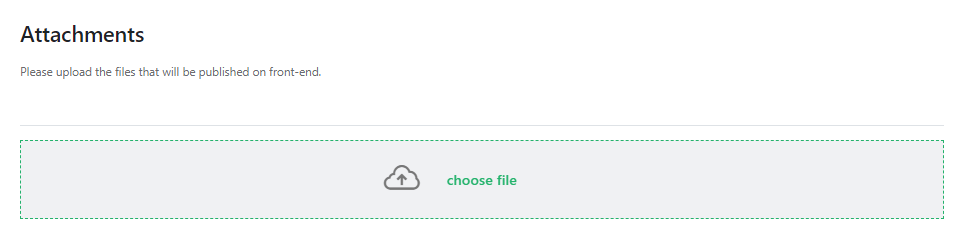
Attachments
The business owner has the possibility to upload any files and they will be visible on business listing details page. Usually, pdf files are uploaded.
Business Testimonials
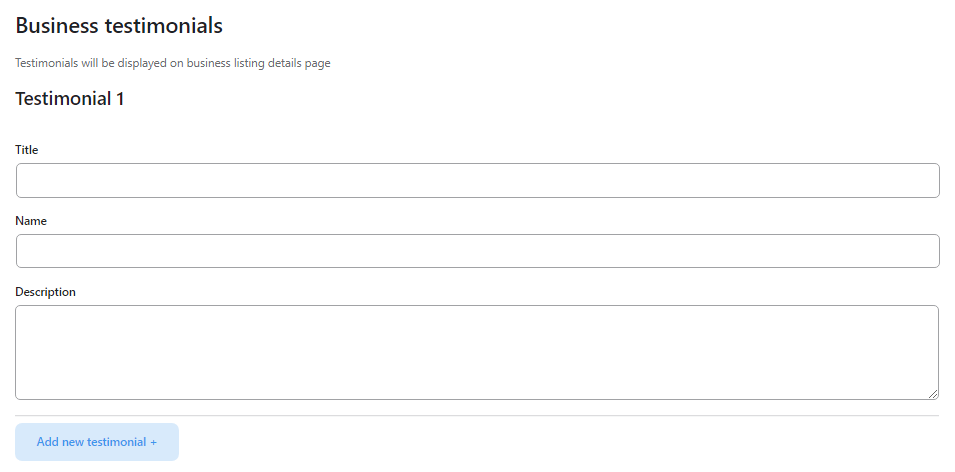
You have the possibility to add business testimonials. You can set the title of the person, name and a simple description. The testimonials will display in the business details view, in a slider view mode.
Related Companies
Provides the possibility for the site admin to add some related business to the actual one. The business listings will be shown on business details page on front-end.

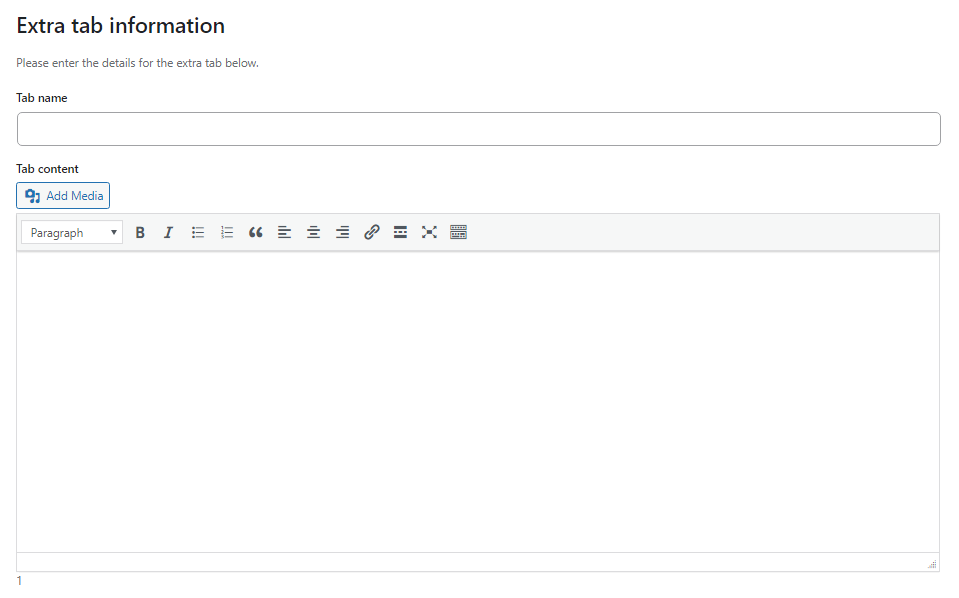
Extra tab information
The business owner has the possibility to define an extra tab on his listing profile. He can set the tab name and the tab content.
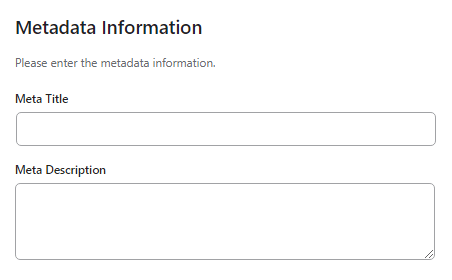
Metadata Information
The business owner has the possibility to enter the metadata information for his listing profile.
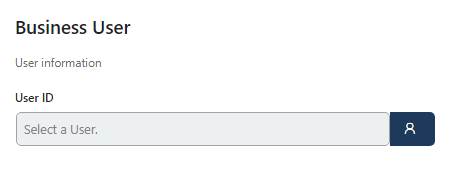
Business User
Each company must have a user assigned for the company to be owned, so a user’s name must be entered in the field. If the company is created by the administrator, it should have the name of the administrator.
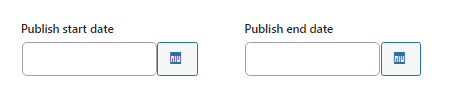
Publish Dates
Each company can set the publish start date and publish end date.
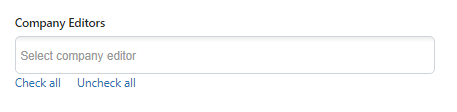
Company Editors
The site administrator has the possibility to select multiple registered users to allow the editing of the same listing. Despite which user is the actual listing owner, this listing will be shown on the front-end Control Panel of all the selected users by the administrator and can be edited by them.
Offers
Import from CSV
In order to add offers from an existing source, the extension provides a tool to import offers from a CSV (comma separated values) file.
Important
Please setup or import category structure first.
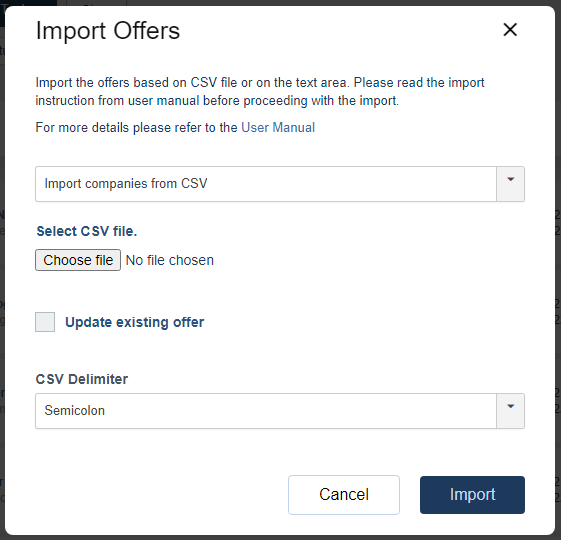
Before you start the import process you have to make sure that your file is correctly formatted.
You can check if your file respects the rules below:
CSV file values can be separated by a comma (,) or semicolon (;). They are called delimiters.
Headers must be specified on the first line. Headers are case sensitive. Not all fields are mandatory.
All records must be entered on one line.
All lines should contain the same number of comma-separated fields. If the fields are empty you can leave it empty but add the delimiter. Each line has to have the same number of commas or semicolons.
Any field may be quoted (with double quotes).
Fields containing a line-break, and/or commas should be quoted. (If they are not, the file will likely be impossible to process correctly).
Double quote character in a field is not allowed. You can replace double quote with a single quote.
If you want to update the existing offers and not create new ones you have to check “Update existing offer” checkbox. Please make sure the offer names are the same, otherwise they will not be updated and a new offer will be created.
E.g. of CSV file
id,subject,subject_en-GB,alias,short_description,short_description_en-GB, description,description_en-GB,start_date,end_date,publish_start_date,publish_end_date, publish_start_time,publish_end_time,show_time,price,price_base,price_base_unit,special_price, special_price_base,special_price_base_unit,total_coupons,currency_id,company_id,state,categories, main_subcategory,street_number,address,area,country,city,province,county,postal_code,latitude, longitude,picture,offer_of_the_day,view_type,article_id,approved,view_count,item_type,featured, expiration_email_date,enable_offer_selling,min_purchase,max_purchase,quantity,meta_title, meta_title_en-GB,meta_description,meta_description_en-GB,meta_keywords,meta_keywords_en-GB
“23”,”Photography Basics Course”,””,”photography-basics-course”,”Diam scelerisque fermentum finibus. Mauris elementum euismod erat sed condimentum. Nulla imperdiet mattis massa, at fermentum erat tristique ac. Praesent eget velit maximus, blandit nisi at, porta ligula.”,””,”<p>Duis Praesent pharetra eget metus vitae vestibulum. Mauris gravida turpis lorem, aliquam semper justo auc.</p>”,””,”2018-02-23”,”2022-02-24”, “2018-02-23”,”2022-02-24”,06:00:00,”17:00:00”,”0”,”180.00”,”0.00”,”0”,”120.00”,”0.00”,”0”,”20”,”143”,”7”,”1”, “Photography”,”Photography”,”30”,”Rue Galande”,””,”France”,”Paris”,”Toronto Division”,”Ile-de-France”,”75005”, “43.7112087”,”-79.46759759999998”,”/offers/23/blogimage7.jpg##,/offers/23/stockphoto102338735. jpg##,/offers/23/womensbanner.jpg##”,”0”,”1”,”0”,”1”,”28”,”1”,”0”,””,”2”,”0”,”0”,”0”,””,””,””,””,””,””
Important notice: If new offers are imported into the system you should remove the id column (first column – it is present when you do an export) and make sure that the “Update existing offer” checkbox is unchecked, otherwise the offers will not be imported.
Import with update
The import mechanism can be used also to update the current offers. The update can be done by item name or by item id. If you want to update by name you can check “Update existing offer” checkbox. If you want to update an offer by id, you have to specify that offer id in the CSV file. The easiest way is to export the offers with the id and then perform the changes on the export file.
Import with images
It is also possible to import logos and pictures for the offers. You will have to place the images on {joomla}/media/com_jbusinessdirectory/pictures folder and set the relative path on images on CSV file.
E.g for pictures “,”/offers/23/blogimage7.jpg##,/offers/23/stockphoto102338735.jpg##,/offers/23/womensbanner. jpg##” – the images will be retrieved from {joomla}/media/com_jbusinessdirectory/pictures/offers/23/ folder.
Email sent on offers import
When offers are imported in the J-BusinessDirectory extension there is an email sent to the business owner to let them know that their offer is now part of your directory. If you do not want to send any email you can disable it in the admin email section. The notification email sent to the customer is “Offer Creation ” email.
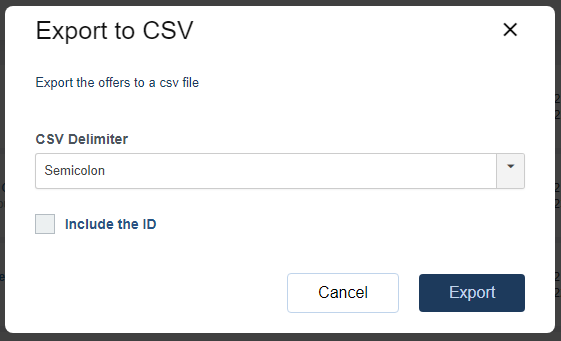
Export to CSV
Export current offers to a CSV file.
Offers
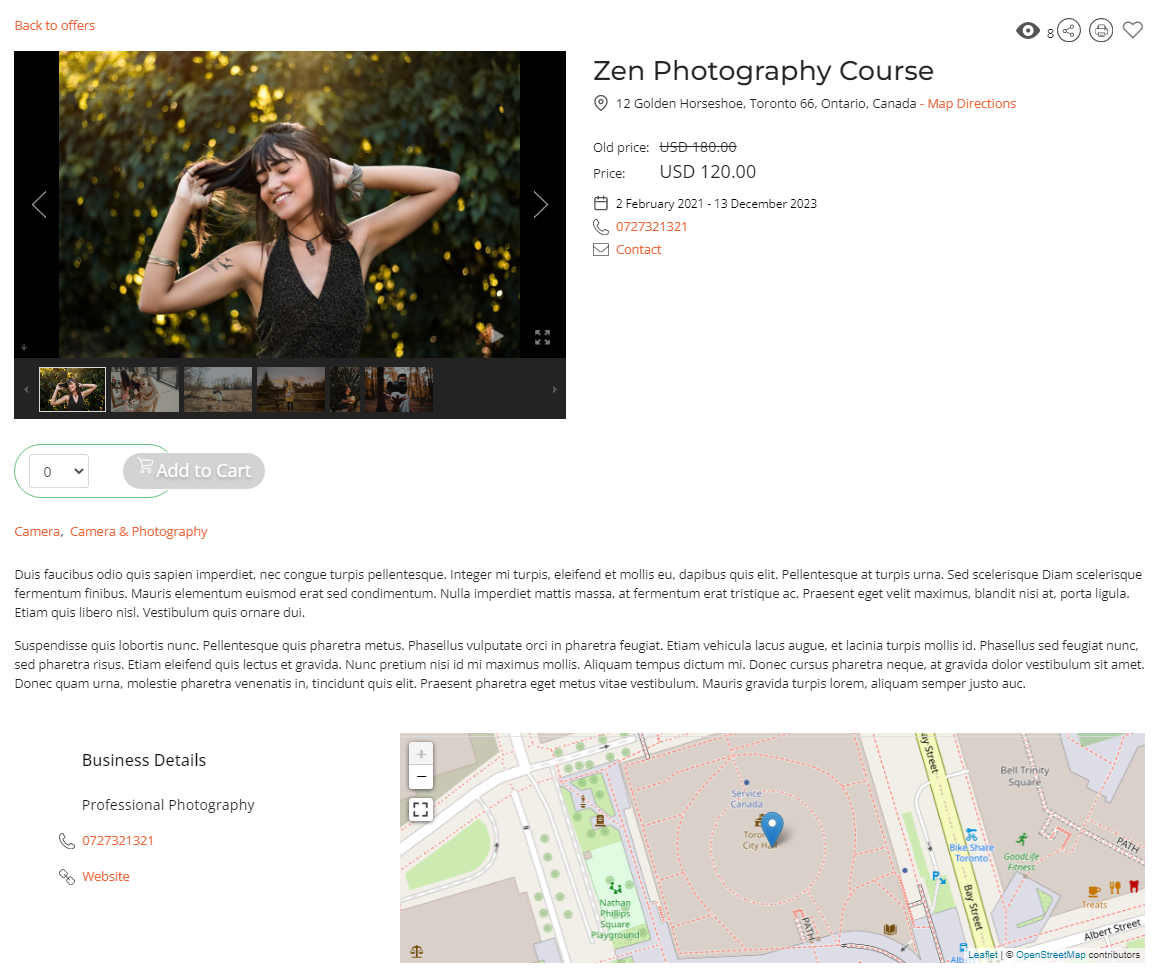
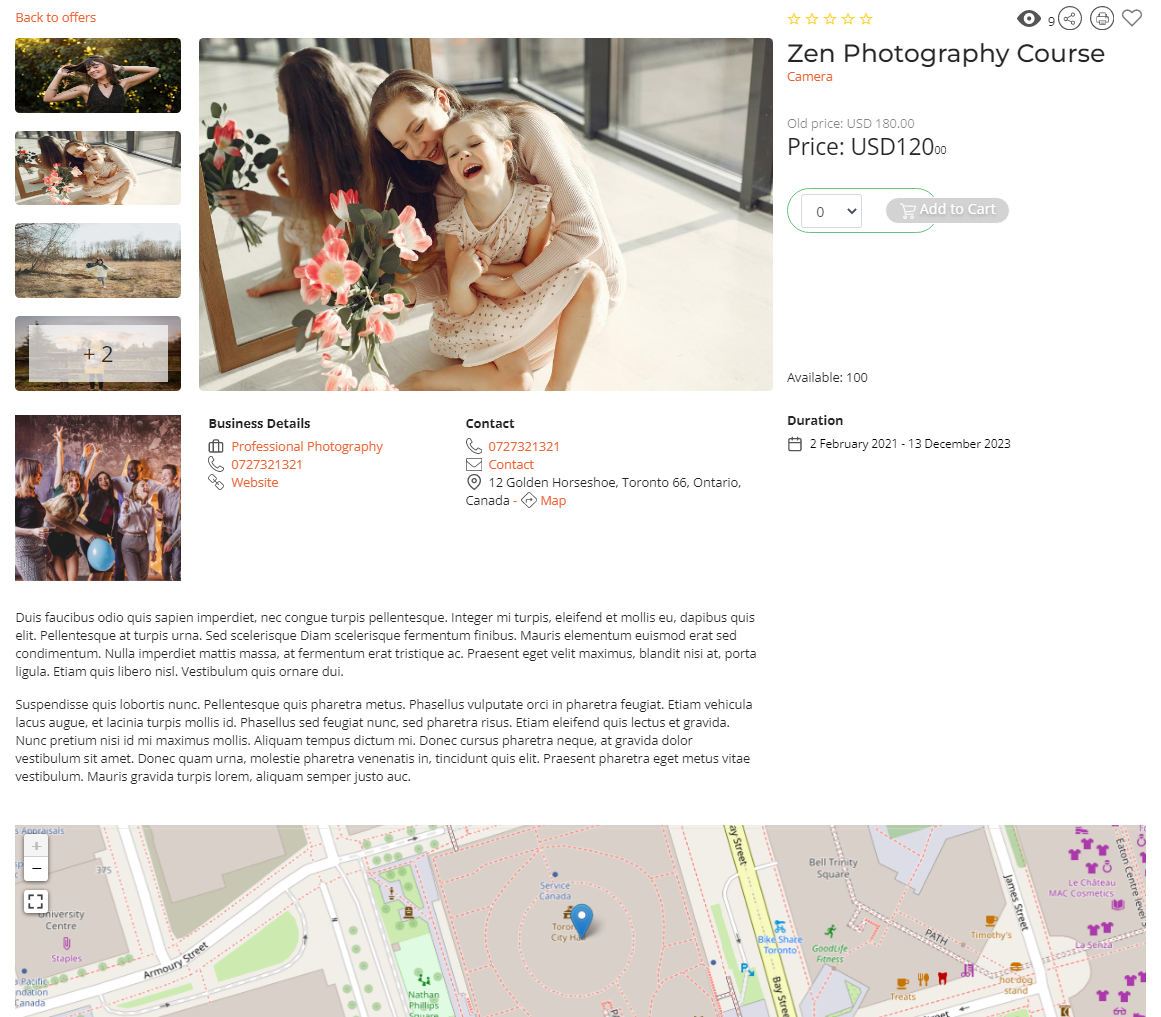
Each business owner has the possibility to define offers in order to promote the services or products they are offering. Offers will be available for customer via a menu item or through business listing details page. How to create the menu is explained in detail in the frontend setup section below.
Notice: If packages are active, the offers will be visible only if the business listing has a package that contains offer feature and the order is paid.
You can add/edit, delete and publish/unpublished an offer from the Manage Offers screen. Featured offer can be set as the offer of the day. It will be displayed through J-BusinessOffer Module.
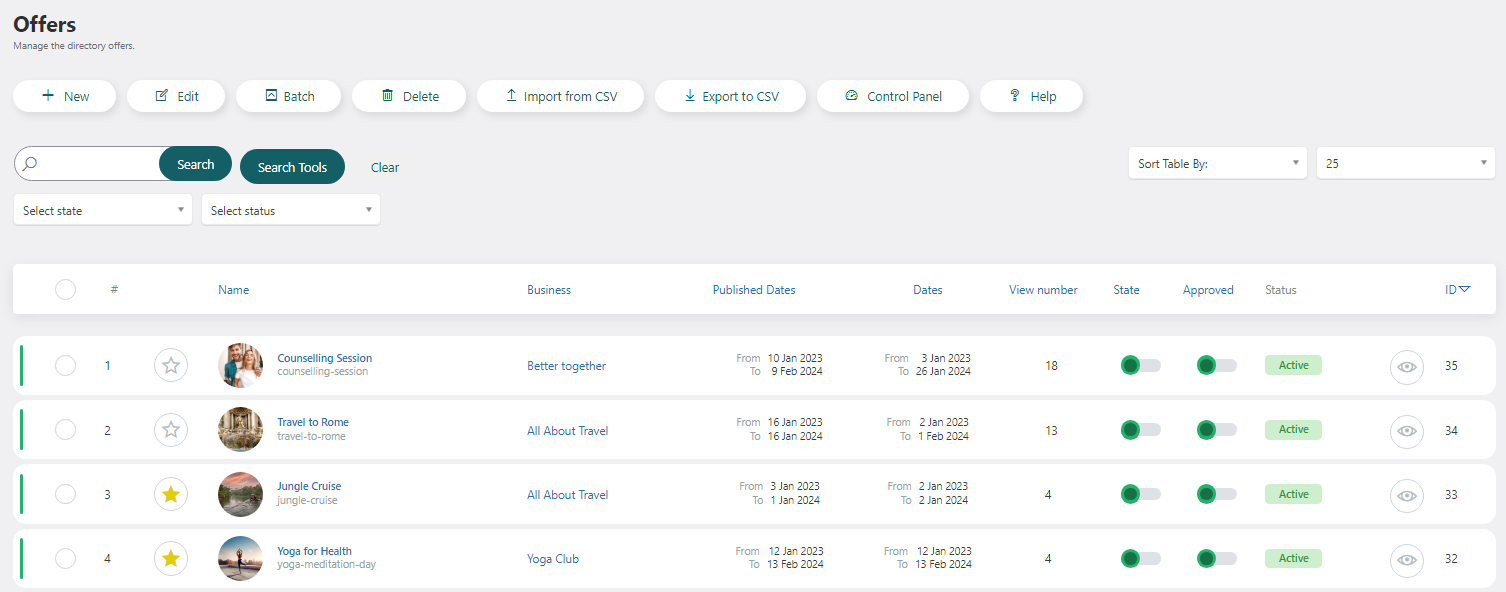
When editing/adding an offer you’ll be presented with the following
Select a business:
Select the desired business listing that you want to attach the offer.
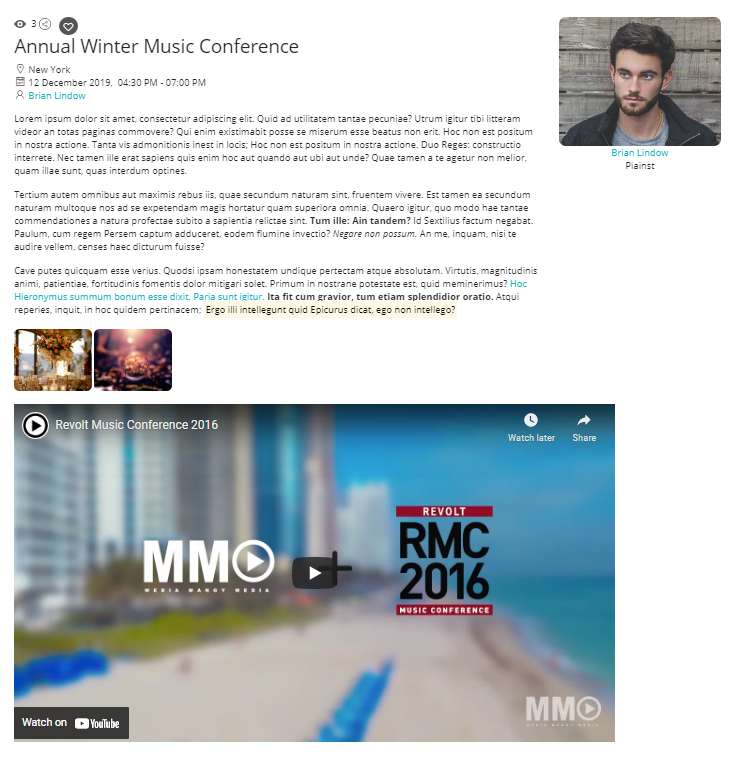
Offer Details:
Subject – the name of the offer
Alias – the alias of the offer
Short description – will be shown on search results
Description – the description of the offer
Start date – offer start date
End date – offer end date
Publish start date – the date when the offer will be available on site
Publish end date – the date until when the offer will be visible on site
Publish start time – time when the offer will be available, (associated with start date)
Publish end time– time when the offer will not be visible (associated with end date)
Show remaining time – display the remaining time of the offer
Price – the price of the offer
Special price – the special price of the offer
Currency – select the desired currency
Price base – the base price for the unit mentioned (E.g. 100g for 1$)
Special price base- the base price for the unit mentioned (E.g. 100g for 1$)
Price base unit- unit for price base
Special price base unit- unit for special price base
Price text – the text that will be entered in this field, will display on offers search results view, offers details view and also on the latest offers’ module.
Email - email of the offer owner that will be used for contact offer
Type - an offer type can be chosen here
Coupons number – the max number of coupons that will be generated – after the maximum number is reached the “Get this deal” button will be hidden on front-end.
Categories
Category – categories of the offer
Main category – this category will be used for showing the marker on the map
Additional Info
In this section are shown the offers custom attributes, if the attribute is set to active.
Item Selling
Disabled- item selling is disabled
Offer- offer will be sold as a product
Coupon- offer will be sold as a coupon
Location
It allows you to set the location of an offer, and there’s also the possibility to load the listings’ address by selecting the Load address button on top of the offer location section.
Pictures
You can upload multiple pictures for your offer. You can upload pictures and set a description for them in this section. To upload a picture simply click the Browse button and choose the desired picture by navigating through your content.
Videos
You can add multiple videos for your offer by clicking on the plus icon.
Attachments
You can upload multiple attachments for your offer. You can upload attachments and set a description for them in this section. To upload an attachment simply click the Browse button and choose the desired attachment by navigating through your content.
Metadata information
Possibility to enter the meta title, meta description and meta keywords.
User
A user id is automatically assigned to an offer when it is created. The administrator can change the user on the admin area.
Offer Categories
You can add/edit, delete and publish/unpublished an offer category from the Manage Categories screen.
Custom Attributes
Please check chapter 3.3.4 Custom attributes for further details
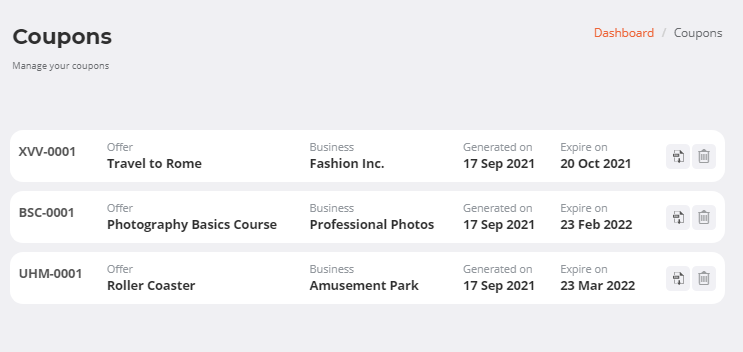
Coupons
The coupons give you the possibility to provide some discounts only for a limited number of clients. Each time a customer requests a coupon on the offer details view on front-end, a coupon is generated with a coupon code. The coupon code will have the first three letters generated randomly, which will be the same letters for coupons that belong to the same offer, and then the index will auto increment every time a new user generates a new coupon.
For each offer the business owner has the possibility to activate coupons by setting a number of coupons higher than 0.
As an administrator you can activate the offer coupons from the General Settings.
Also, the generated coupons will be displayed in the Control Panel section:
Offer Types
You can add/edit and delete an offer type from the Manage Offer Types screen.
Events
Import from CSV
In order to add events from an existing source, the extension provides a tool to import events from a CSV (comma separated values) file.
Important
Please setup or import category structure first.
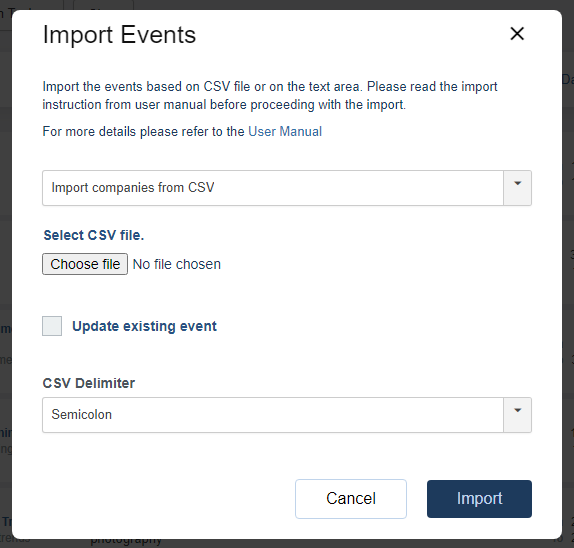
Before you start the import process you have to make sure that your file is correctly formatted.
You can check if your file respects the rules below:
CSV file values can be separated by a comma (,) or semicolon (;). They are called delimiters.
Headers must be specified on the first line. Headers are case sensitive. Not all fields are mandatory.
All records must be entered on one line.
All lines should contain the same number of comma-separated fields. If the fields are empty you can leave it empty but add the delimiter. Each line has to have the same number of commas or semicolons.
Any field may be quoted (with double quotes).
Fields containing a line-break, and/or commas should be quoted. (If they are not, the file will likely be impossible to process correctly).
Double quote character in a field is not allowed. You can replace double quote with a single quote.
If you want to update the existing events and not create new ones you have to check “Update existing event” checkbox. Please make sure the event names are the same, otherwise they will not be updated and a new event will be created.
E.g. of CSV file
id,name,name_en-GB,alias,short_description,short_description_en-GB,description,description_en-GB, eventType,type_id,company,company_id,state,currency_id,price,approved,view_count,categories, main_subcategory,start_date,end_date,start_time,end_time,doors_open_time,booking_open_date, booking_close_date,booking_open_time,booking_close_time,show_start_time,show_end_time, show_end_date,show_doors_open_time,street_number,address,area,country,city,province, county,postal_code,latitude,longitude,recurring_id,contact_phone,contact_email,pictures, meta_title,meta_title_en-GB,meta_description,meta_description_en-GB,meta_keywords,meta_keywords_en-GB, expiration_email_date,user_id,featured,created,attendance_mode,attendance_url
“9”,”Celebration Party”,””,”celebration-party”,”Lorem ipsum dolor sit amet, consectetur adipiscing elit. Nulla accumsan enim dignissim consectetur viverra. Vestibulum a erat vitae quam pellentesque varius vel at ipsum. Pellentesque ultricies.”,””,”<p>Lorem ipsum dolor sit amet, consectetur adipiscing elit. Aliquam justo ligula, fringilla vel orci in, imperdiet aliquam elit. Vivamus ac lorem blandit, tempor felis eget, placerat lectus.</p>”,””,”Party”,”4”,”Amusement Park”,”33”,”1”,”2”,”30”,”1”,”2”, “Services”,”Services”,”2017-08-14”,”2022-11-22”,”07:00:00”,”19:00:00”,”00:00:00”,””,””,”00:00:00”, “00:00:00”,”0”,”0”,”0”,”0”,”36”,”Scarborough Heights Boulevard”,””,”Canada”,”Toronto”,””,”Ontario”, “69”,”43.72347870000001”,”-79.22839210000001”,”0”,”+1 698412998”,”office@site.com”,”/events/9/image3.jpg##, /events/9/image4.jpg##,/events/9/image5.jpg##”,””,””,””,””,””,””,””,”0”,”0”,”2021-08-03 08:22:52”,”Mixed”,””
Important notice: If new offers are imported into the system you should remove the id column (first column – it is present when you do an export) and make sure that the “Update existing event” checkbox is unchecked, otherwise the offers will not be imported.
Import with update
The import mechanism can be used also to update the current events. The update can be done by item name or by item id. If you want to update by name you can check “Update existing event” checkbox. If you want to update an event by id, you have to specify that event id in the CSV file. The easiest way is to export the events with the id and then perform the changes on the export file.
Import with images
It is also possible to import logos and pictures for the events . You will have to place the images on {joomla}/media/com_jbusinessdirectory/pictures folder and set the relative path on images on CSV file.
E.g for pictures
“,”/events/9/image3.jpg##,/events/9/image4.jpg##,/events/9/image5.jpg##” – the images will be retrieved from {joomla}/media/com_jbusinessdirectory/pictures/events/9/ folder.
Email sent on events import
When events are imported in the J-BusinessDirectory extension there is an email sent to the business owner to let them know that their event is now part of your directory. If you do not want to send any email you can disable it in the admin email section. The notification email sent to the customer is “Event Creation Notification” email.
Export to CSV
Export current events to a CSV file.
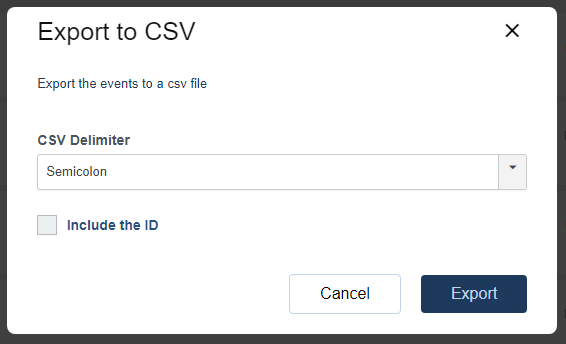
Events
Each business owner has the possibility to define events in order to promote their event. Events can be shown on the front-end with the help of the Events menu item or with the help of the events modules.
You can add/edit, delete, and publish/unpublished an event from the Manage Events screen.
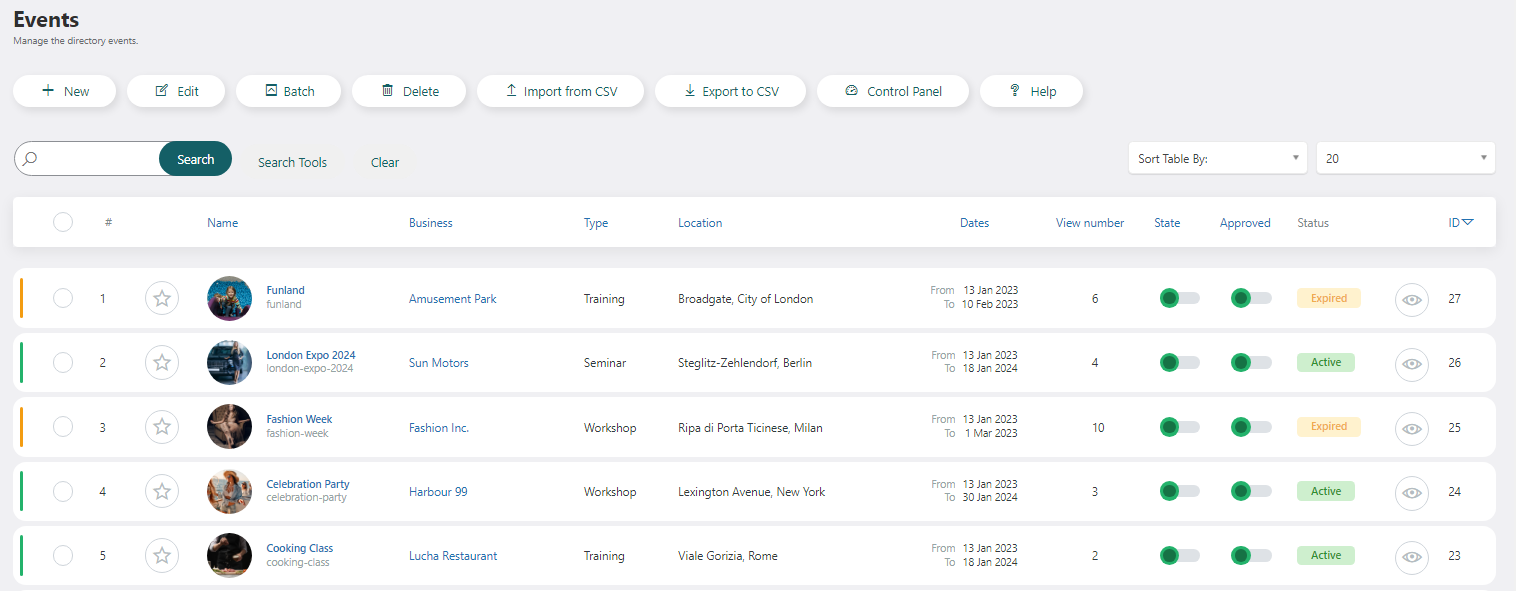
When editing/adding an event you’ll be presented with the following
Hosted by: the business who organize the event
Event Details:
Name - the name or the title of the event
Alias - the alias of the event
Short description - will be shown on search results
Description - the description of the event
Attendance mode - choose the attendance mode for this event: live, virtual or mixed
Attendance URL - set the url if the event is online
Type - type of the event; can be managed on manage event types
Price – the price of the event
Currency – set the currency of the event
Minimum age (years) - the minimum age at which a person is permitted to attend an event
Maximum age (years) - the maximum age at which a person is permitted to attend an event
Total Tickets - the total amount of tickets for the event
Categories
Category - categories of the event
Main category - will be used to show the marker on the map
Event Dates
Start date – Event start date
End date – Event end date
Show end date – Show/hide end date on event details
Start time – Event start time
Show start time– Show/hide start time on event details
End time – Event end time
Show end time– Show/hide end time on event details
Doors Open time– Set the door opening time
Show doors open time - Show/hide door opening time on event details
Booking open date - start date for booking the event
Booking open time - start time for booking the event
Booking close date - end date for booking the event
Booking close time - end time for booking the event
Additional Info
In this section show the events custom attributes, if the attribute is set to active when created.
Participating Companies
On this section are shown the companies that participate on the actual event.
Location
Allows you to set the location of an event, and there’s also the possibility to load the listings’ address by selecting the Load address button on top of the event location section.
Repeat
You can find the details on the recurring events.
Event Contact Information
Allows you to add a contact information for the event
Pictures
You can upload multiple pictures for your event. You can upload pictures and set a description for them in this section. To upload a picture simply click the Browse button and choose the desired picture by navigating through your content.
Event videos
You can add multiple videos for your event.
Attachments
You can upload multiple attachments for your event. You can upload attachments and set a description for them in this section. To upload an attachment simply click the Browse button and choose the desired attachment by navigating through your content.
Metadata information
Possibility to enter the meta title, meta description and meta keywords.
User
A user id is automatically assigned to an event when it is created. The administrator can change the user on the admin area.
Event Categories
You can add/edit, delete and publish/unpublished an event category from the Manage Categories screen.
Event type
You can add/edit and delete an event type from the Manage Event Types screen.
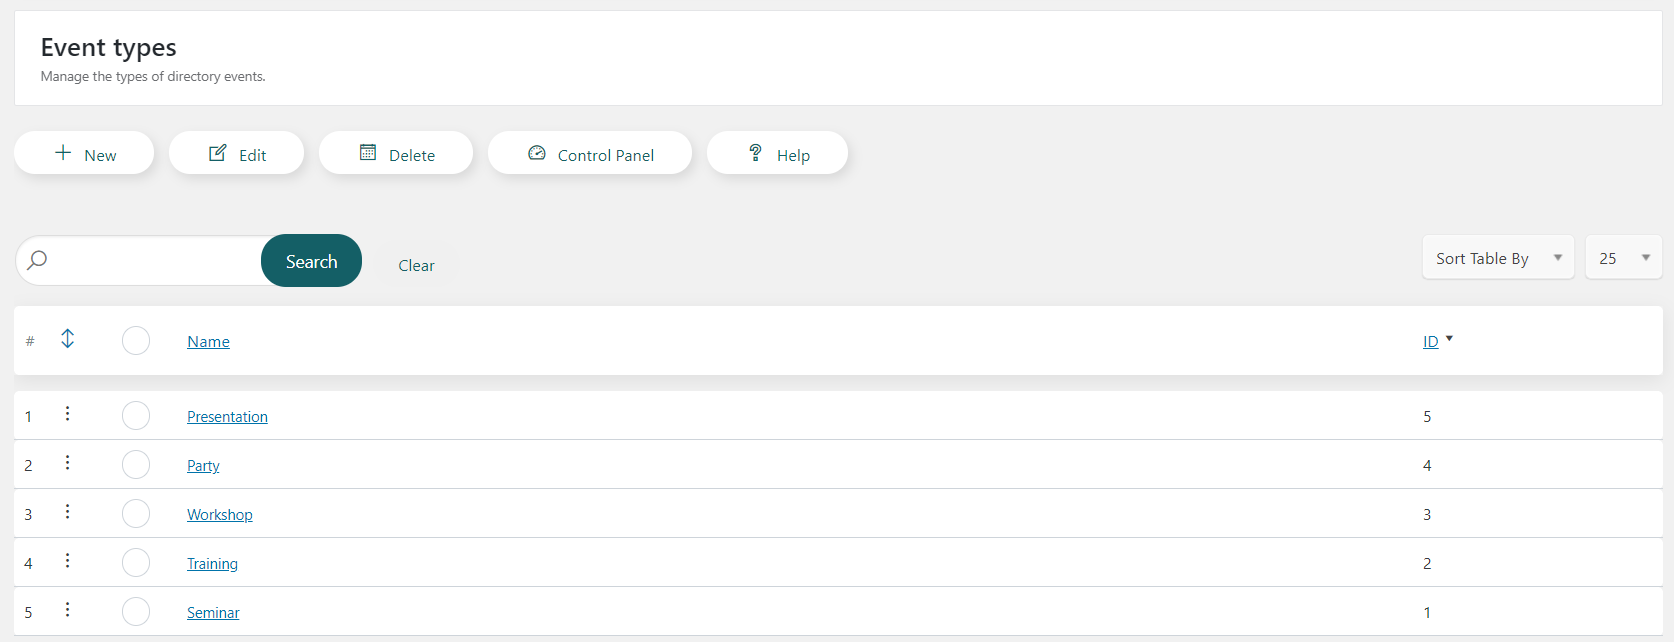
Messages
The business, offers and events messages can be managed in the Messages menu item on both, admin and front-end Control panel.
The user can open the messages to read them, or mark them directly as read or unread.
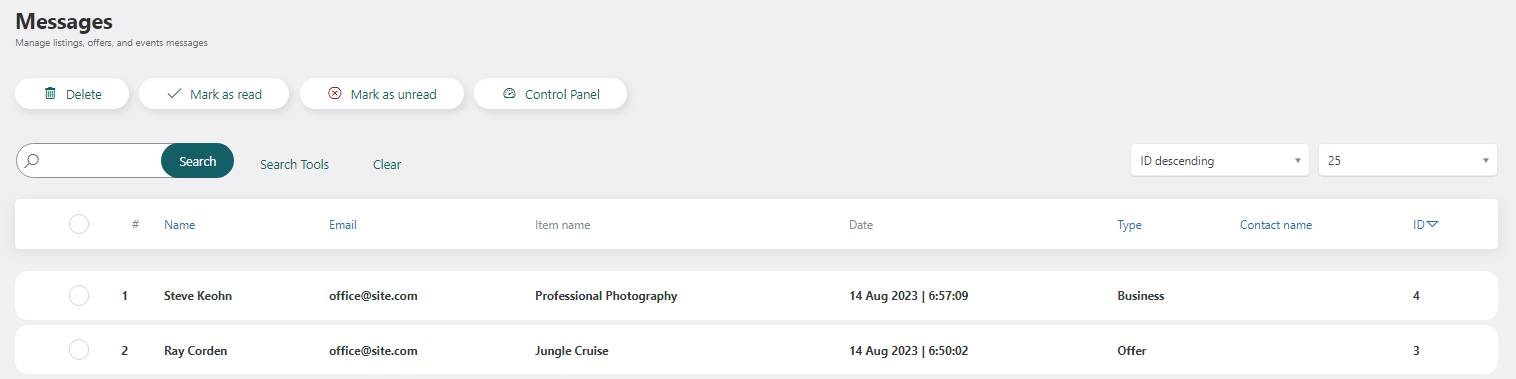
Also, the messages of the corresponding business, offer and event will be displayed in the Control Panel section like below:
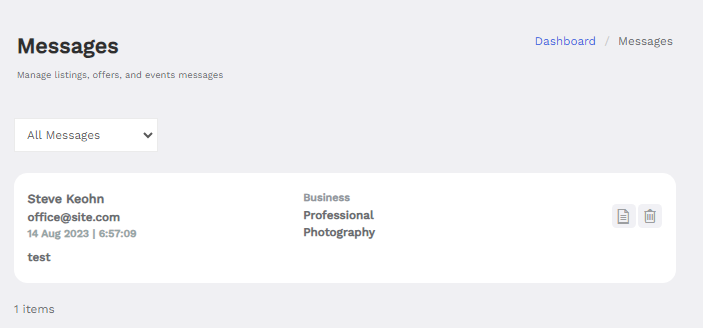
In this section, the messages can also be filtered by business, offers or events.
Packages
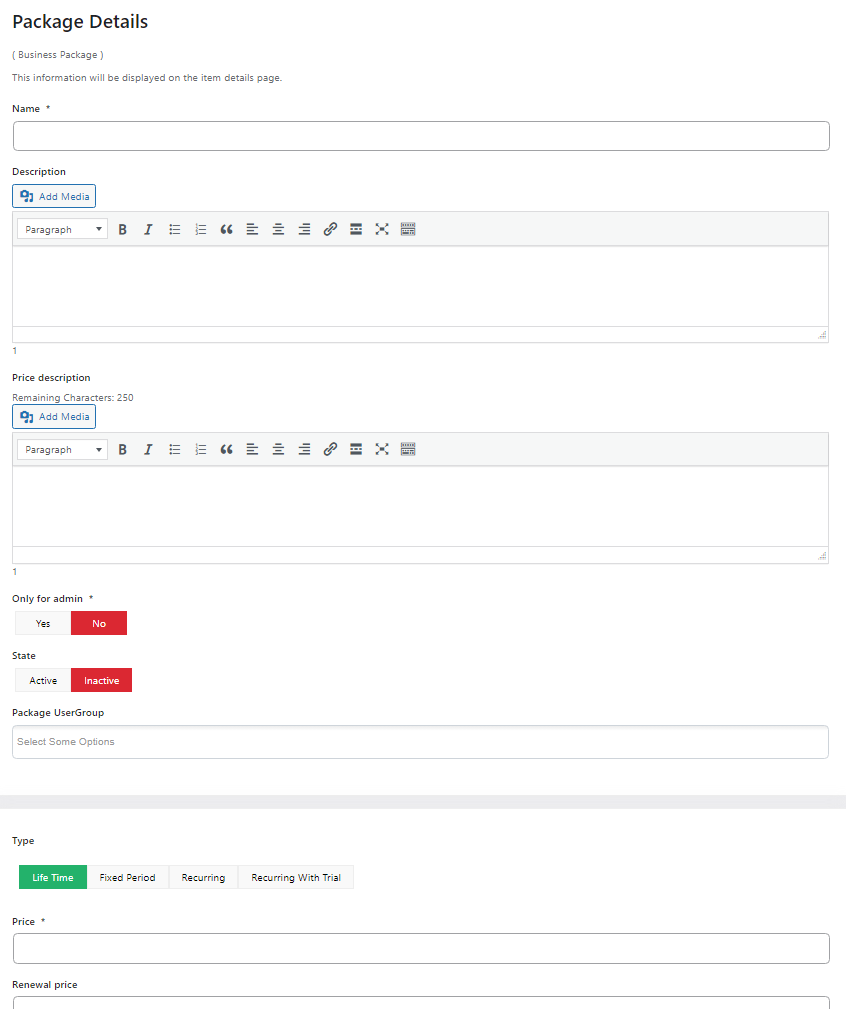
Packages represents one of the key features of the directory and allows you to define different levels of memberships with different availability based on package type.
If packages are enabled on directory general settings, all features from the free package of type lifetime are associated with all business listings. The features from a paid package are associated with the business listing, on the front-end, only when the generated order is set to paid. You can set an order to paid on the Orders section in admin area.
The order of packages is also very important. You need to order the packages based on the priority. The packages can be ordered by clicking on the order icon and then drag & drop the items based on the priority. The order can be verified on the front-end in the packages page.
If the order is not set correctly, some of the features may be missing from the business listing details pages.
When the ordering criteria is set to Relevance, the listings on the search results page are ordered based on the package order.
A package contains the following
Name - the name of the package. This will be displayed in the frontend
Description - the description of the package. This will be displayed in the frontend
Price description - text that will be shown under the price
Only for admin – when set to yes, the package will not display on business plans menu item, front-end.
State - you can set whether want to activate the package or not
Package UserGroup – you can decide the usergroup you want to assign this package.
Type – you can choose between the following types:
Lifetime – the package is available for lifetime period.
Fixed period – the package is available for a fixed period of time.
Recurring – the package is available for a fixed period of time with the possibility of automatically renewing the package. The package is activated each time a recurring payment is performed. (works only with recurring payment methods)
Recurring with trial – similar with recurring time packages, but it provides also a trial period where the user can determine its duration and price.After the trial period is finished a new order is created for the recurring package with the full price and duration.Otherwise if you don’t want to continue using this package you can cancel the subscription during the trial period and will be paying only the trial price,if there is any.(works only with recurring payment methods).
Price - the price you are charging for a package. The price will be displayed in the frontend.
Renewal price - a price taken into consideration if the package period is extended
Time period – set the time period of package. It can be set in days, weeks, months or years.
Show price per month - this is effective for one year packages. If the setting is set to yes, the price will be displayed per month not per year.
Max description length - set the maximum number of characters on the business description section
Maximum number of pictures - set the maximum number of pictures that is allowed
Maximum number of videos - set the maximum number of videos that is allowed
Maximum number of offers – set the maximum number of offers that the listing associated with this package can contain
Offer count - take into consideration the active offer or the total offers
Maximum number of events – set the maximum number of events that the listing associated with this package can contain
Maximum number of attachments - set the maximum number of attachments that is allowed
Maximum number of categories - set the maximum number of categories that is allowed
Maximum number of quotes to apply for - set the maximum number of quote replies that is allowed
Maximum number of zip codes - set the maximum number of zip codes that is allowed for a business listing
Maximum locations - set the maximum number of secondary locations
Maxnumber of projects - set the maximum number of projects for a business listing
Max. number of sounds - set the maximum number of sounds for a business listing
Show features - set whether to show or not the features that are included in the package
Show not contained package features – set whether to show or not the features that are not included in the package
Show buttons - set whether want to show buttons or not
Background color – admin can set a background color for the package
Text color – admin can set a text color for the package
Border color – admin can set a border color for the package
Package Features – the features you want to assign to your package.
The features you can create packages on:
Featured business listings - the companies that will have this package associated will be displayed in top of the list
- Description - this allows the business owners to add or remove the description of the listing. If the listing has the description
filled and this feature is removed and then added again on the package, the description text will display again as it was before.
Html Descriptions - this allows business owners to use html tags in their description in order to make it more appealing
Show Business Logo - shows the business logo on front-end
Website address – shows the website on front-end
Image Upload - owners are given the possibility to upload images for their companies
Videos - owners are given the possibility to present videos to their customers
Map - the company will be able to display a map location of their own. This map will be available in the frontend when viewing the company’s details.
Contact Form - this feature is used to provide the business potential customers with a way to contact the business listing
Business Offers - the business owner will be able to create and share offers with their customers
Hosted Events - business events will be shown on front-end.
Social Networks - owners are given the possibility to connect with their customers via social networks. Current available: Facebook, Twitter, Google+, LinkedIn, Skype, YouTube, Instagram, Pinterest and WhatsApp.
Phone - shows the phone on front-end
Custom tab - a section where the user can create extra tabs if the tabs style is selected in General Settings.
Attachments - owners are given the possibility to present attachments to their customers
Opening hours - owners are given the possibility to display business opening hours
Related Companies - owners are given the possibility to display the related companies
Other locations - owners are given the possibility to display other locations
Link follow - owners are given the possibility to make the follow or nofollow for the website links.
Testimonials - owners are given the possibility to add testimonials for the business listing
Menu/Price List - owners are given the possibility to add a menu or price list for the business listing
Featured offers - owners are given the possibility to present the featured offers.
Memberships - add the possibility to associte memberships with the company
Quote request - enable the quote requests for the company
Business team - enable the business team for the company
Reviews - enable/disable the reviews for the company
Zip codes - enable/disable the extra zip codes for the company
Sounds - enable/disable the sounds for the company
Projects - enable/disable projects for the company
Business services - enable/disable the menu price list/services for the company
Event appointment - enable/disable the appointments for the company
Event booking - enable/disable the event booking for all events associated with the company
Event recurring - enable/disable the event recurring for all events associated with the company
Sells offers and products - enable/disable the offer selling for all offers associated with the company
Announcements - enable/disable announcements for the company
Custom features - The custom features are features, that the admin can offer to the customers, supplementary to the current directory features. The custom features have no functionality related to business directory.
Based on the above presented features you can create multiple packages for the business owners to select from.
Discounts
The discounts section gives the possibility to generate/define multiple discounts for end users. When an order is paid in front end a discount section appears where the discount coupons can be entered.
The discount contains the following parameters.
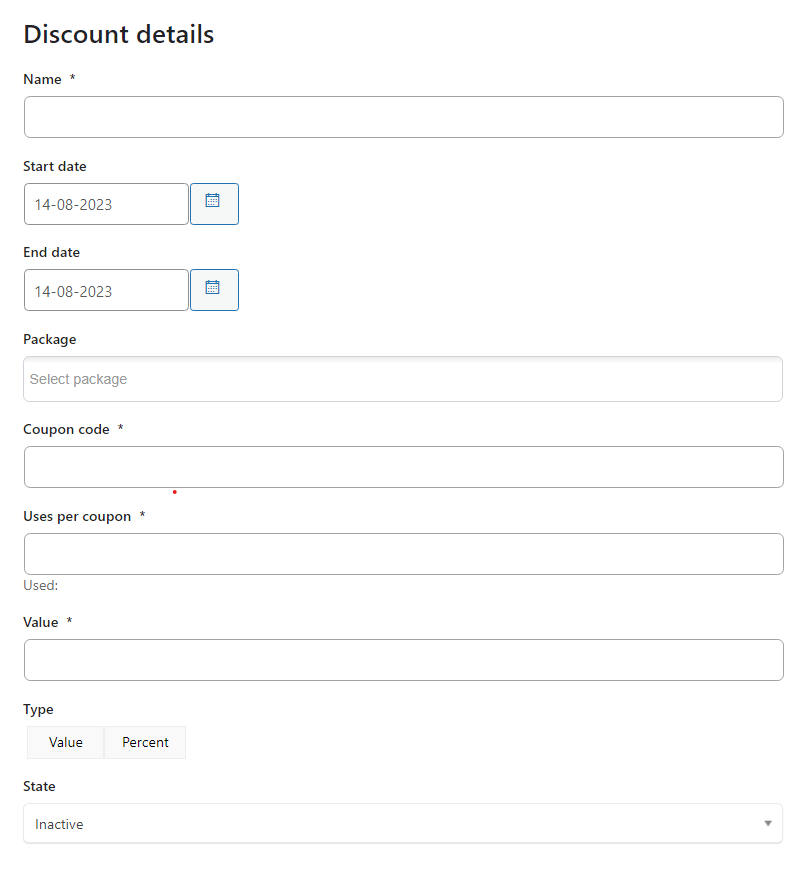
Name – the name of the discount
Start date – starting date of coupon availability
End date – end date of coupon availability
Package – the packages for which the discount is available
Coupon code – the code of the coupon – that will be entered on front-end discount section
Uses per coupon – defines how many coupons per users are available. Once a user gets the coupon, he can use it several times, until the coupon’s expiration date.
Value – the value of the coupon. It can be set to a fixed amount or a percent.
Type - the coupon value can be set in two different types
State – the state of the coupon, active or inactive.
Generate Discounts
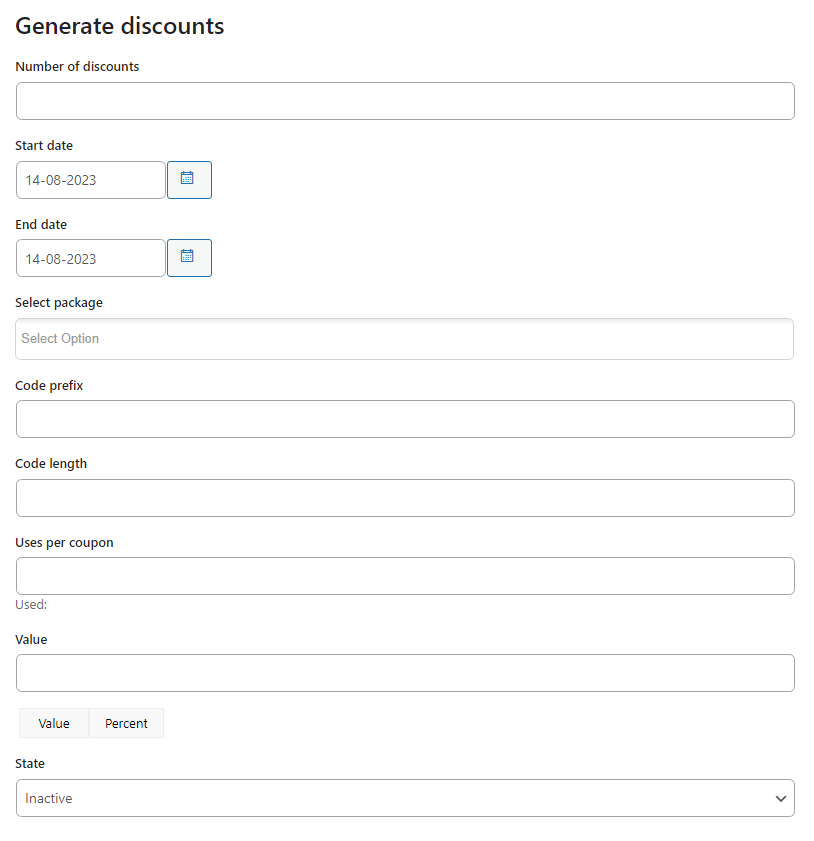
The extension provides also a way to generate coupons though generate coupon button on the discounts section.
The generated coupons can be also exported to a CSV format by clicking the export button.
Number of discounts – set how many discounts you want to be generated.
Start/end date – the start/end date of the discounts generated.
Select package – the packages, for which the discounts will be applied.
Code prefix – you can set the prefix for the discount name/code.
Code length – the code length will set how many characters the discount code will have.The number set will take into consideration how many characters the code prefix will have and then it will complete with random characters the empty places.
Uses per coupon – how many times a coupon will be used.
Value – the value of the discount and also set if the value will be calculated in percentage or not.
State – the state of the discount, active or not.
After completing the data, select the generate button and there will be generated as much discounts as are set in the first field Number of discounts, with the same data.
Orders
This section will give you an overview of all the orders made on your business directory website.
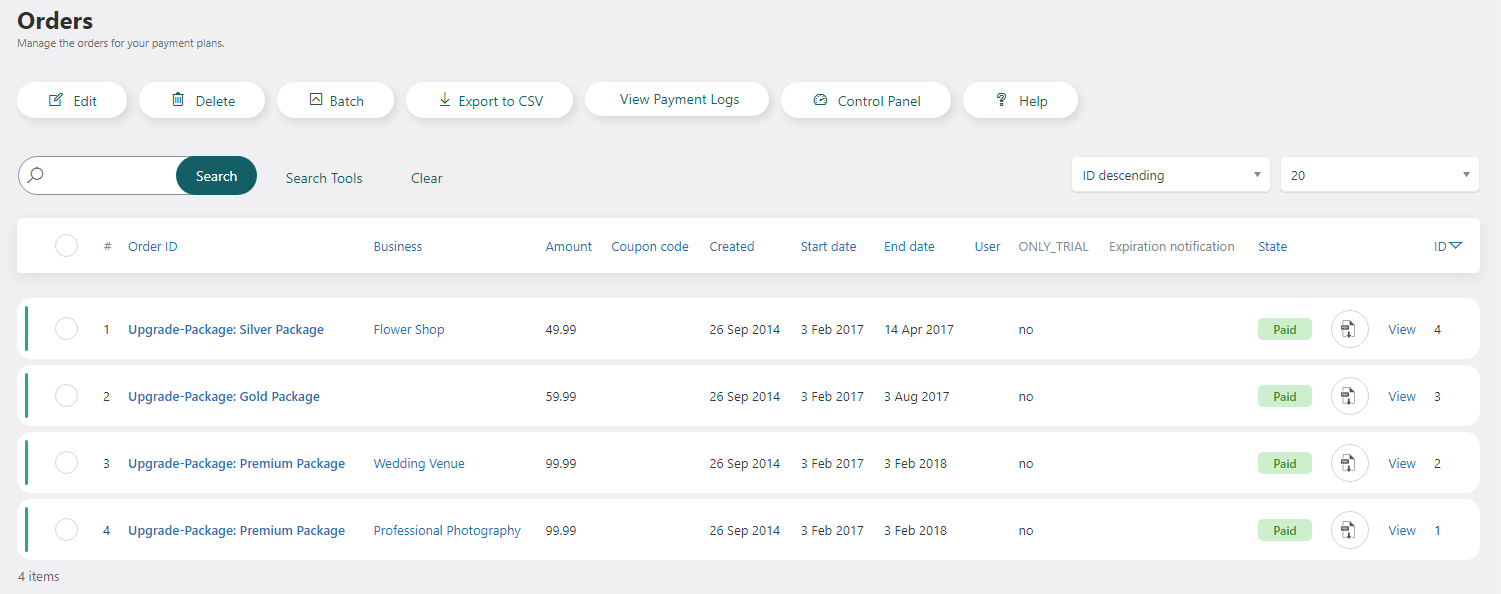
You can edit/delete orders from the orders list.
When editing an order you can change information like:
Amount – the amount of the order
Payment date – the payment date
Transaction Id – the transaction ID
State – The order status, Paid or Unpaid
Start date – the start date of the order
End date - the end date of the order
Start trial date - the start date of the trial period of the package
End trial date - the end date of the trial period of the package
Observations – the site admin can enter observations about the current order
Important notice - Start date represent the date when the package will be active. If one business buys a new package and there is already a paid package active, the start date of the new package will be set to expiration date of the previous package. The end date represents the end date of the ordered package.It can be manually extended. Order ID, Business, Package Created date and ID cannot be modified.
Taxes
The taxes section allows you to create multiple taxes based on value or percent.The taxes can be applied to multiple countries if needed.
You can create multiple taxes based on the services that you provided and based on the countries that are provided.
The taxes will be added to the product/service amount when purchased by a client.
Payment Processors
Payment processors provide the means for you to collect payments from you customers. We provide integration with several payment gateways presented in the next chapters. The admin has to select the list of services that can be paid for a certain payment processor, as: packages and the installed directory apps (WBD Appointments, WBD Event Bookings, WBD Sell Offers). Otherwise, the payment processor won’t be available to complete the payment for the order.
PayPal payment processor
You can collect payments via PayPal. All you need to do is have a PayPal merchant or business account and set the processor as follows.
Name – the name of the processor that will be displayed on front-end
Type – the type of the processor. This is currently used for coding purposes
Timeout – time allocated until a pending payment will expire
Services – select in which service you want to use the payment processor
Mode – the mode the processor is in: Live or Test
Status – set whether the processor is active or disabled
Display Front - set whether want to show on front or not
PayPal email – set the PayPal merchant email associated with your PayPal account. This account is where the payments are collected.
PayPal Subscriptions payment processor
You can collect payments via PayPal Subscriptions mechanism. All you need to do is have a PayPal merchant or business account and set the processor as follows.
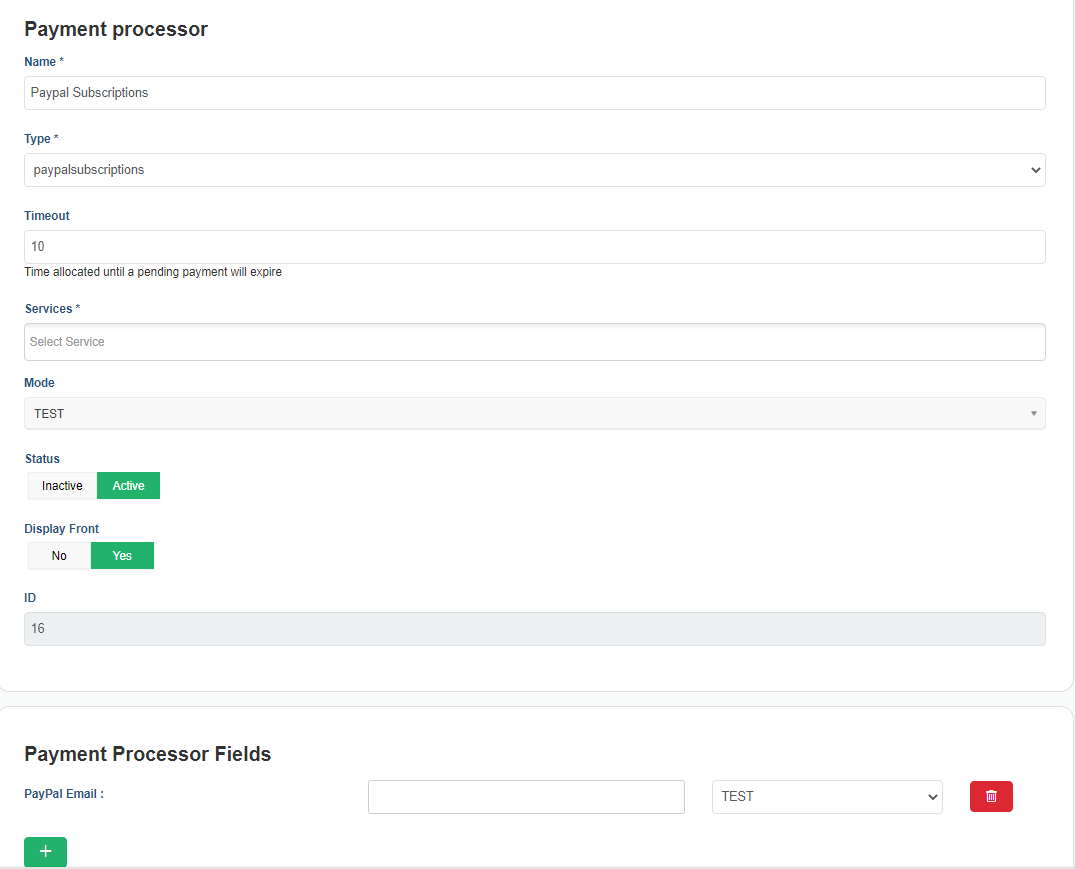
Name – the name of the processor that will be displayed on front-end
Type – the type of the processor. This is currently used for coding purposes
Timeout – time allocated until a pending payment will expire
Services - select in which service you want to use the payment processor
Mode – the mode the processor is in: Live or Test
Status – set whether the processor is active or disabled
Display Front - set whether want to show on front or not
PayPal email – set the PayPal merchant email associated with your PayPal account. This account is where the payments are collected.
Stripe Subscriptions payment processor
The extension will provide the possibility to receive payments using Stripe payment gateway. After you install the extension a new payment option will be enabled on your payment processors section. In order to setup the payment processor you have to complete the following steps
Name – the name of the processor that will be displayed on front-end
Type – the type of the processor. This is currently used for coding purposes
Timeout – time allocated until a pending payment will expire
Business - select or seach for a business
Services - select in which service you want to use the payment processor
Mode – the mode the processor is in: Live or Test
Status – set whether the processor is active or disabled.
Display Front - set whether want to show on front or not
Secret key - provided by Stripe
Transaction key - provided by Stripe (published key)
Important
Please notice that if the webhook is not set the renewal of the package will not be done.
Stripe payment processor
You can collect payments via Stripe.

Name – the name of the processor that will be displayed on front-end
Type – the type of the processor. This is currently used for coding purposes
Timeout – time allocated until a pending payment will expire
Business - select or search for a business
Services - select in which service you want to use the payment processor
Mode – the mode the processor is in: Live or Test
Status – set whether the processor is active or disabled
Display Front - set whether want to show on front or not
Secret key – will be provided by Stripe
Publishable Key – will be provided by Stripe
Mollie payment processor
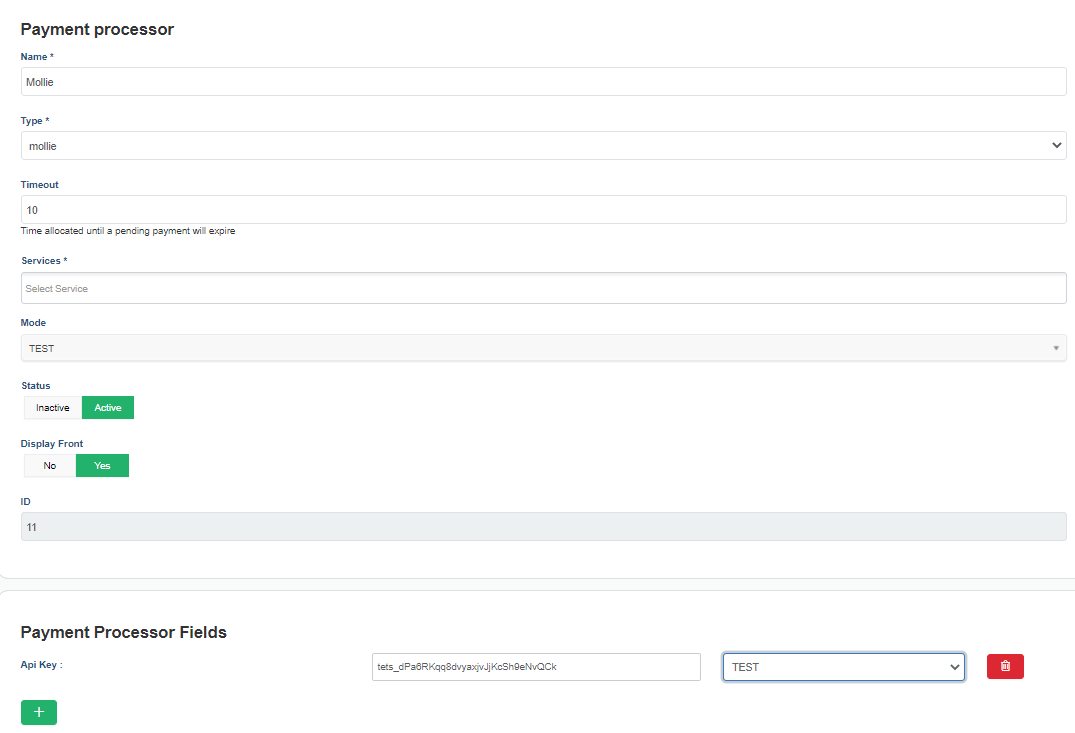
Name – the name of the processor that will be displayed on front-end
Type – the type of the processor. This is currently used for coding purposes
Timeout – time allocated until a pending payment will expire
Services - select in which service you want to use the payment processor
Mode – the mode the processor is in: Live or Test
Status – set whether the processor is active or disabled
Display Front - set whether want to show on front or not
API key – will be provided by Mollie
CardSave payment processor
You can collect payments via CardSave.
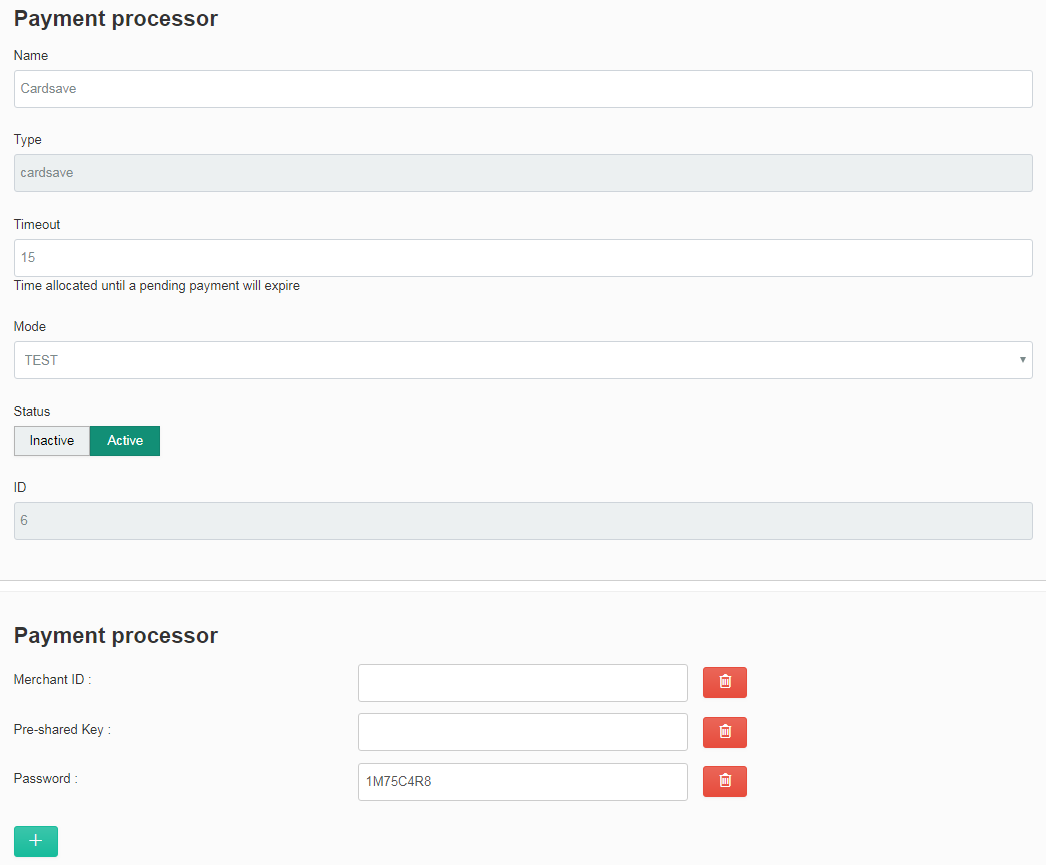
Name – the name of the processor that will be displayed on front-end
Type – the type of the processor. This is currently used for coding purposes
Timeout – time allocated until a pending payment will expire
Mode – the mode the processor is in: Live or Test
Status – set whether the processor is active or disabled
Merchant Id – will be provided by CardSave
Preshared Key – will be provided by CardSave
Password – will be set on CardSave platform
Buckaroo payment processor
You can collect payments via Buckaroo.
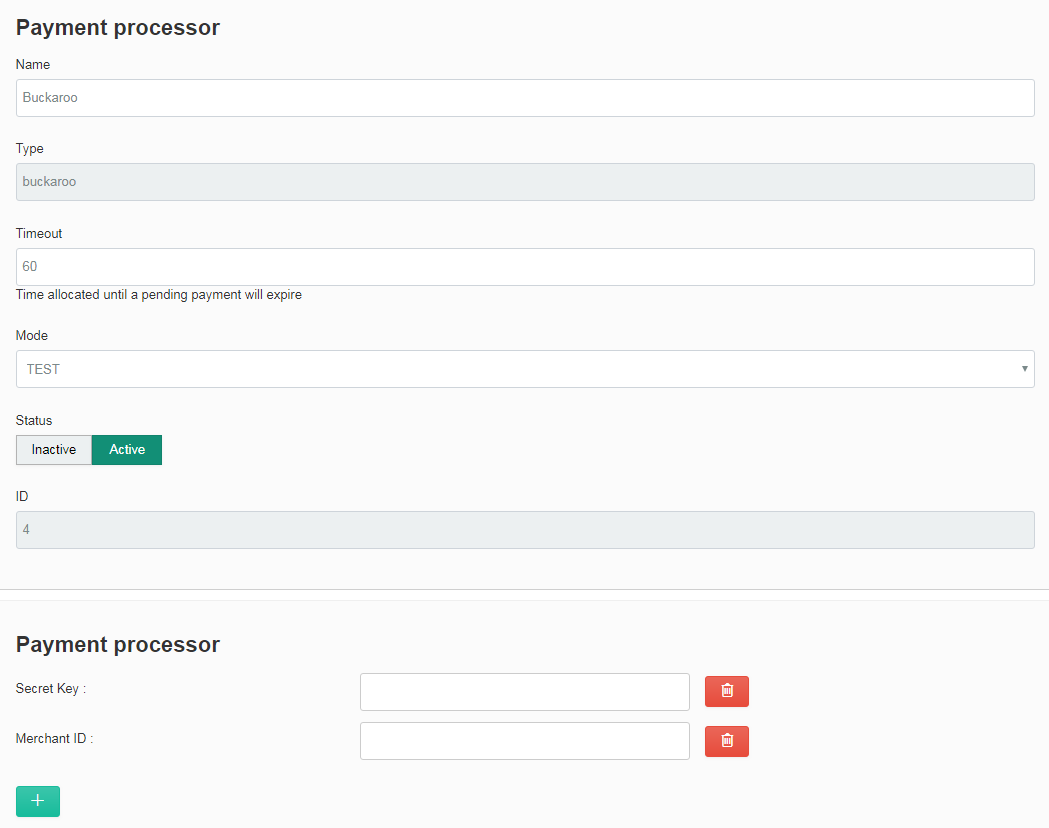
Name – the name of the processor that will be displayed on front-end
Type – the type of the processor. This is currently used for coding purposes
Timeout – time allocated until a pending payment will expire
Mode – the mode the processor is in: Live or Test
Status – set whether the processor is active or disabled
Secret Key – provided by Buckaroo
Merchant Id – provided by Buckaroo
Cash payment processor
The payment with this type of processor will be set automatically to done.

Name – the name of the processor that will be displayed on front-end
Type – the type of the processor. This is currently used for coding purposes
Timeout – time allocated until a pending payment will expire
Services - select in which service you want to use the payment processor
Mode – the mode the processor is in: Live or Test
Status – set whether the processor is active or disabled
Display Front - set whether want to show on front or not
2Checkout payment processor
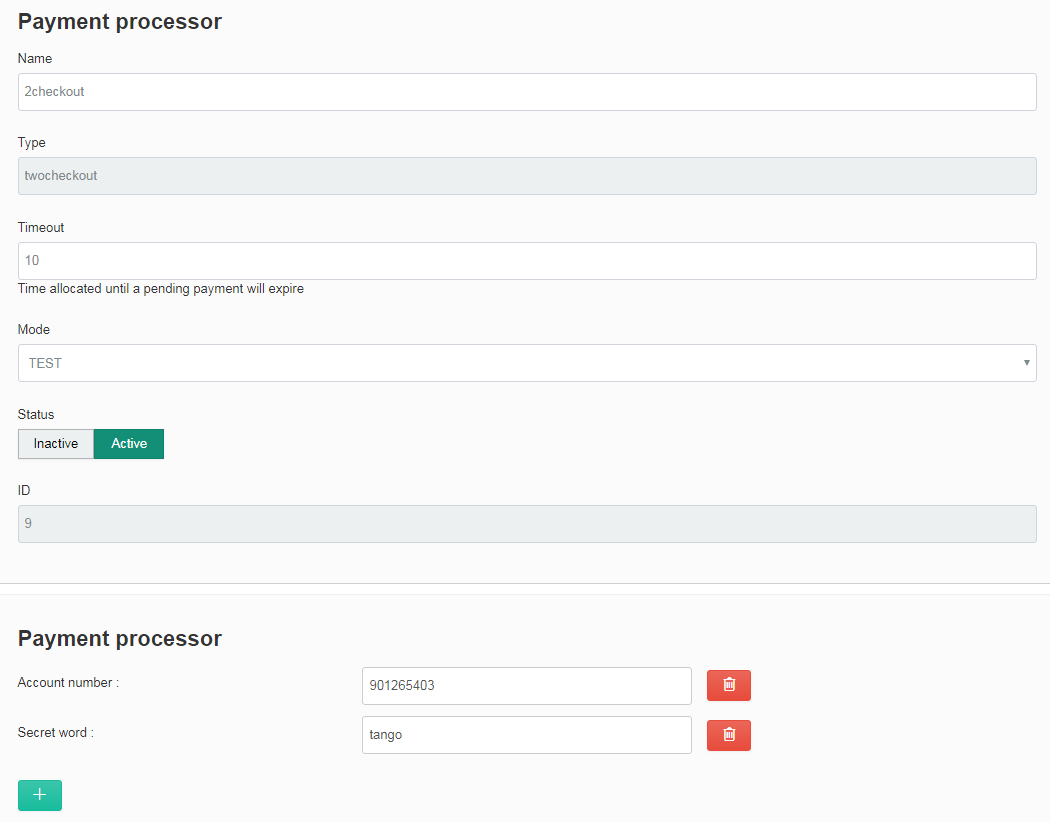
Name – the name of the processor that will be displayed on front-end
Type – the type of the processor. This is currently used for coding purposes
Timeout – time allocated until a pending payment will expire
Mode – the mode the processor is in: Live or Test
Status – set whether the processor is active or disabled
Account number – provided by 2checkout
Secret word – the secret word that is set on 2checkout platform
Authorize.net payment processor

Name – the name of the processor that will be displayed on front-end
Type – the type of the processor. This is currently used for coding purposes
Timeout – time allocated until a pending payment will expire
Services - select in which service you want to use the payment processor
Mode – the mode the processor is in: Live or Test
Status – set whether the processor is active or disabled
Display Front - set whether want to show on front or not
Transaction key – provided by authorize.net
Api login id – provided by authorize.net
Authorize.net subscriptions payment processor

In order to setup the payment processor you have to complete the following steps
You will have to fill in the configuration parameters and make sure that the payment processor is enabled.
Name – the name of the processor that will be displayed on front-end
Type – the type of the processor. This is currently used for coding purposes
Timeout – time allocated until a pending payment will expire
Business - select or search for a business
Services - select in which service you want to use the payment processor
Mode – the mode the processor is in: Live or Test
Status – set whether the processor is active or disabled.
Display Front - set whether want to show on front or not
Transaction key – provided by authorize.net.
API login id – provided by authorize.net
EWay payment processor
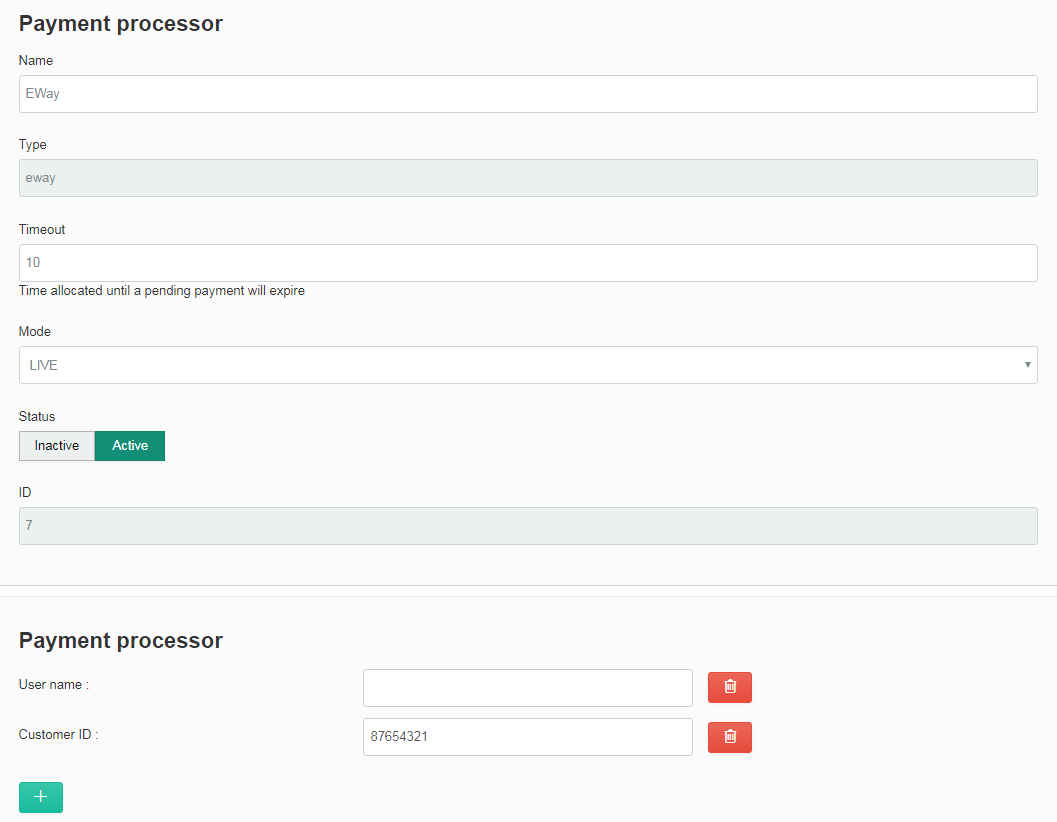
Name – the name of the processor that will be displayed on front-end
Type – the type of the processor. This is currently used for coding purposes
Timeout – time allocated until a pending payment will expire
Mode – the mode the processor is in: Live or Test
Status – set whether the processor is active or disabled
User name – set on Eway platform
Customer Id – provided by Eway
Bank Transfer (Wire Transfer) payment processor
You can collect payments via Bank Transfer.
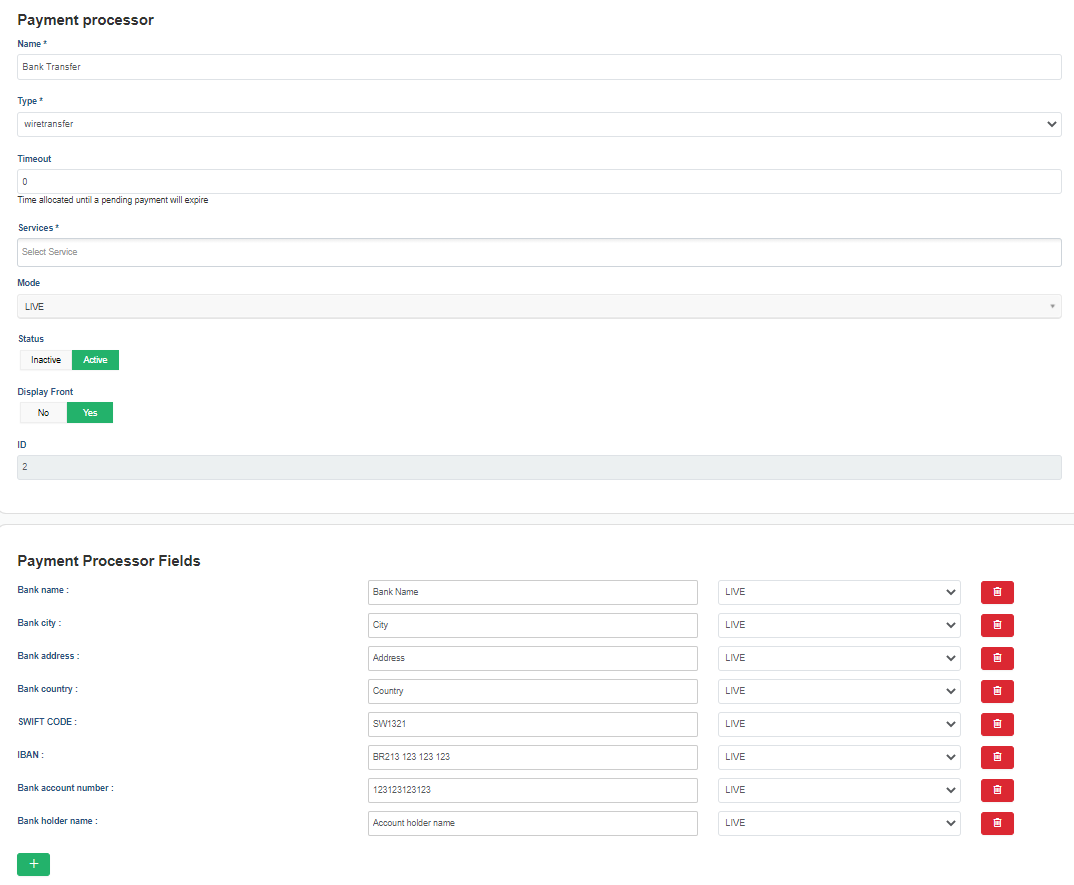
Name – the name of the processor that will be displayed on front-end
Type – the type of the processor. This is currently used for coding purposes
Timeout – time allocated until a pending payment will expire
Mode – the mode the processor is in: Live or Test
Status – set whether the processor is active or disabled
Display Front - set whether want to show on front or not
IBAN-IBAN code
SWIFT CODE - swift code
Bank country - country of the bank
Bank address - address of the bank
Bank city - city of the bank
Bank name - bank name
Bank account number - bank account number
Bank holder name - account holder name
PayFast payment processor
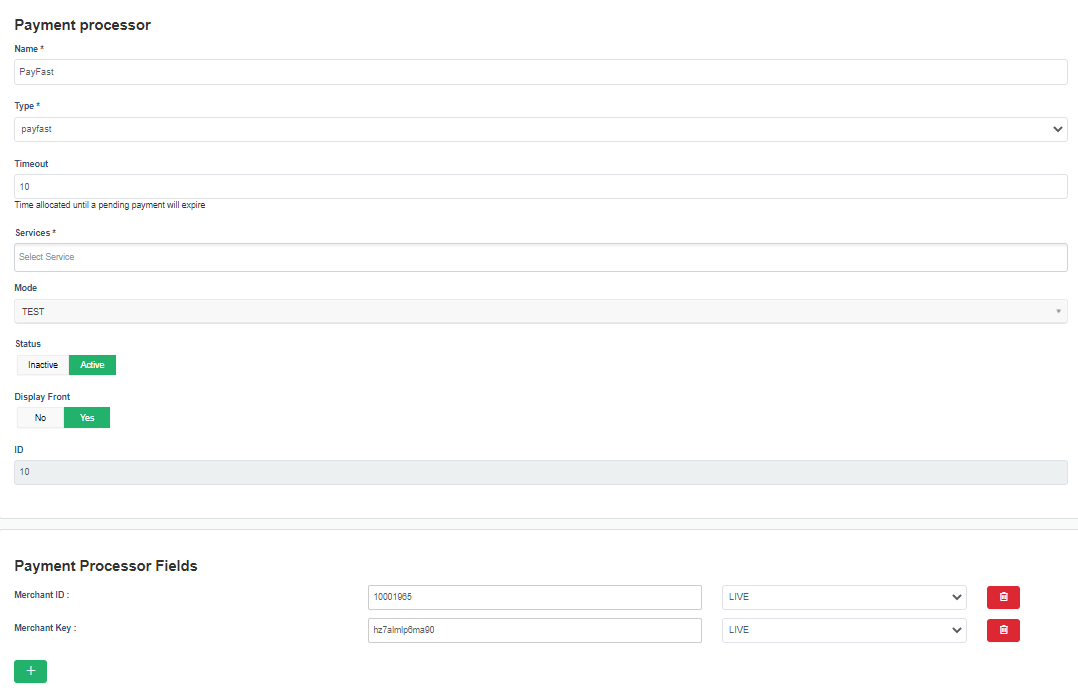
Name – the name of the processor that will be displayed on front-end
Type – the type of the processor. This is currently used for coding purposes. Please leave it to payfast.
Timeout – time allocated until a pending payment will expire
Services - select in which service you want to use the payment processor
Mode – the mode the processor is in: Live or Test
Status – set whether the processor is active or disabled
Display Front - set whether want to show on front or not
Merchant Id – provided by payfast.co.za
Merchant Key – provided by payfast.co.za
ROBOKASSA payment processor
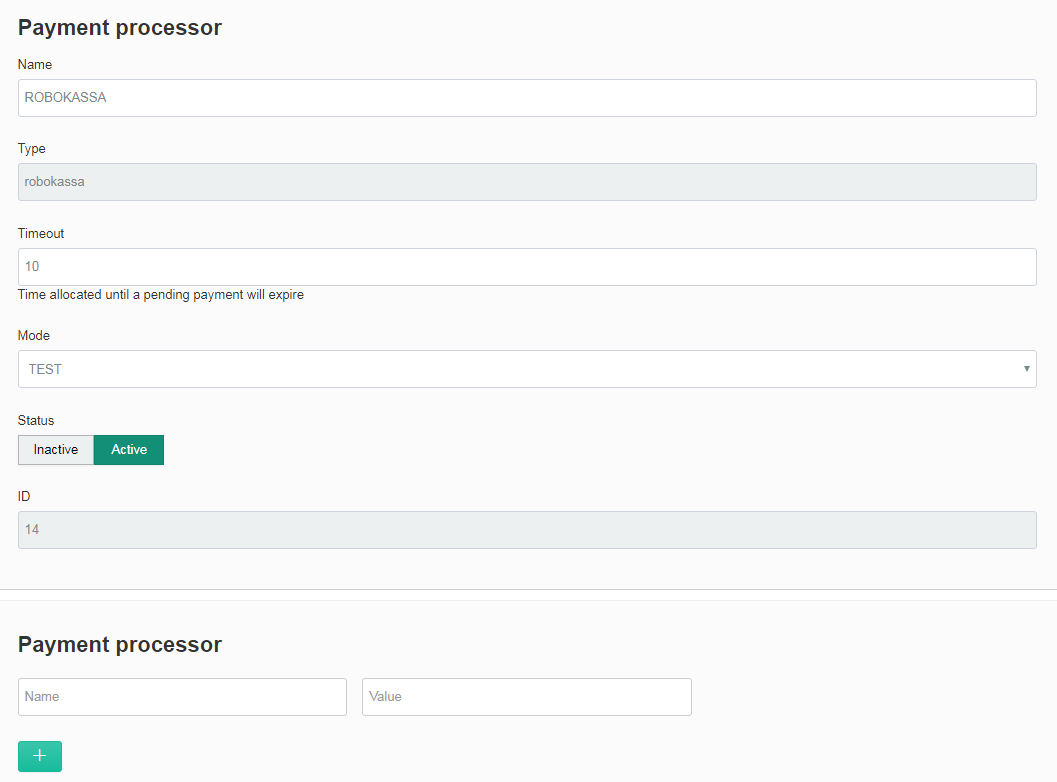
Name – the name of the processor that will be displayed on front-end
Type – the type of the processor. This is currently used for coding purposes. Please leave it to payfast.
Timeout – time allocated until a pending payment will expire
Mode – the mode the processor is in: Live or Test
Status – set whether the processor is active or disabled
Countries
The countries section allows you to manage the countries that will be used on directory. The counties will be available when filling in an address. The country information will also be shown when there will be a search done after a specific country.
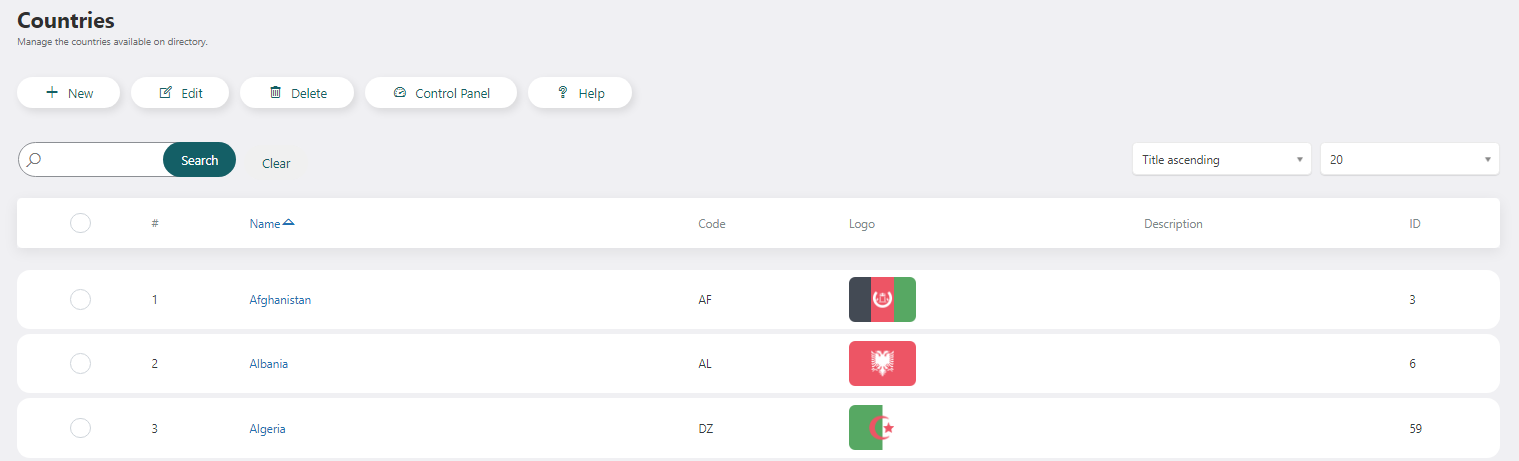
Reviews
The directory extension allows the possibility of adding reviews for the existing business listings. The reviews can be enhanced by adding review criteria or review questions. If review questions are added the current review description will be removed and replaced with the current review questions.
Reviews
As an administrator you can view and manage all the reviews made for a business listing or offer.

You can also edit and delete any reviews you find inappropriate in terms of language or content. The review is published only if the admin publishes them or if the show pending review is set to yes on general settings.
Review Questions
As an administrator you can add review questions. You can publish/unpublished a review question by clicking on the checkbox associated with each review question.
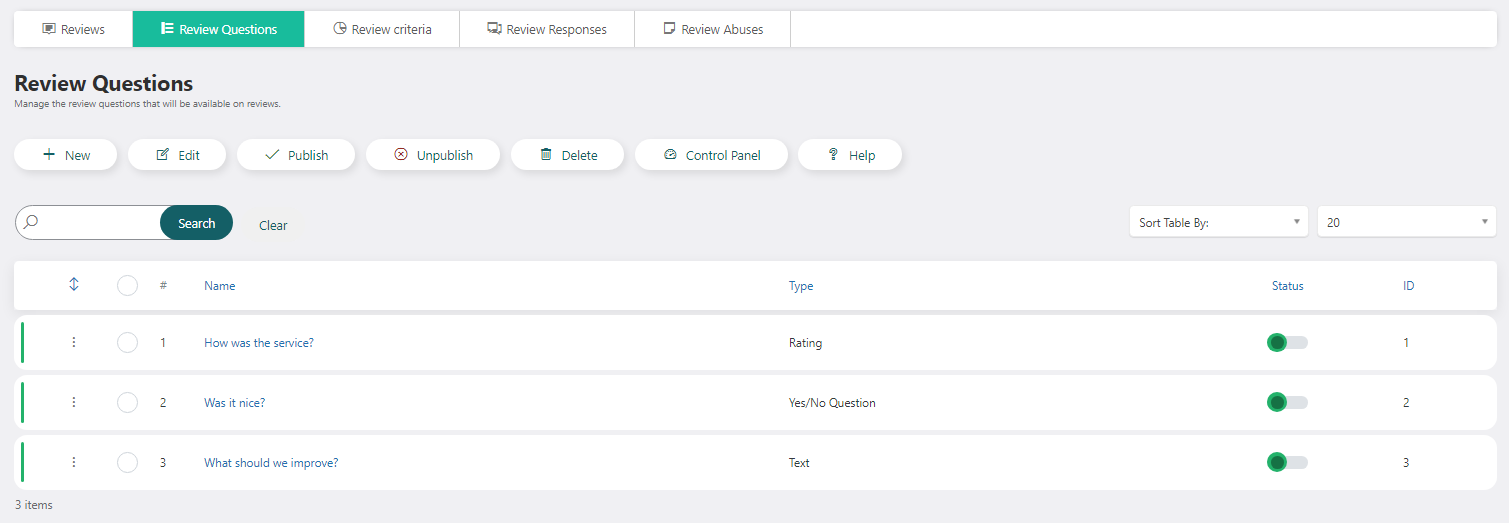
- There are three types of review questions:
Text
Yes/No questions
Rating
Review Criteria
As an administrator you can create and manage all the review criteria.
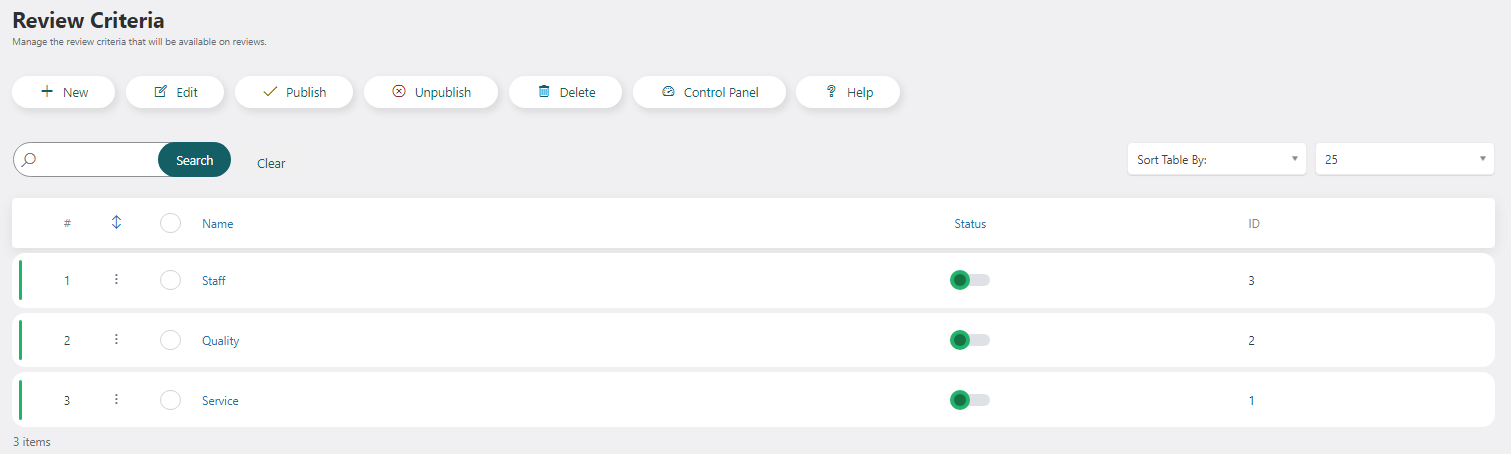
Review Responses
As an administrator you can view and manage all the review responses made for each review. You can publish/unpublished a response by clicking on the checkbox associated with each response in the State column.

You can also edit and delete any responses you find inappropriate in terms of language or content.
Review Abuses
As an administrator you can view and manage all the review abuses made for each review. You can publish/unpublished an abuse by clicking on the checkbox associated with each abuse in the State column.
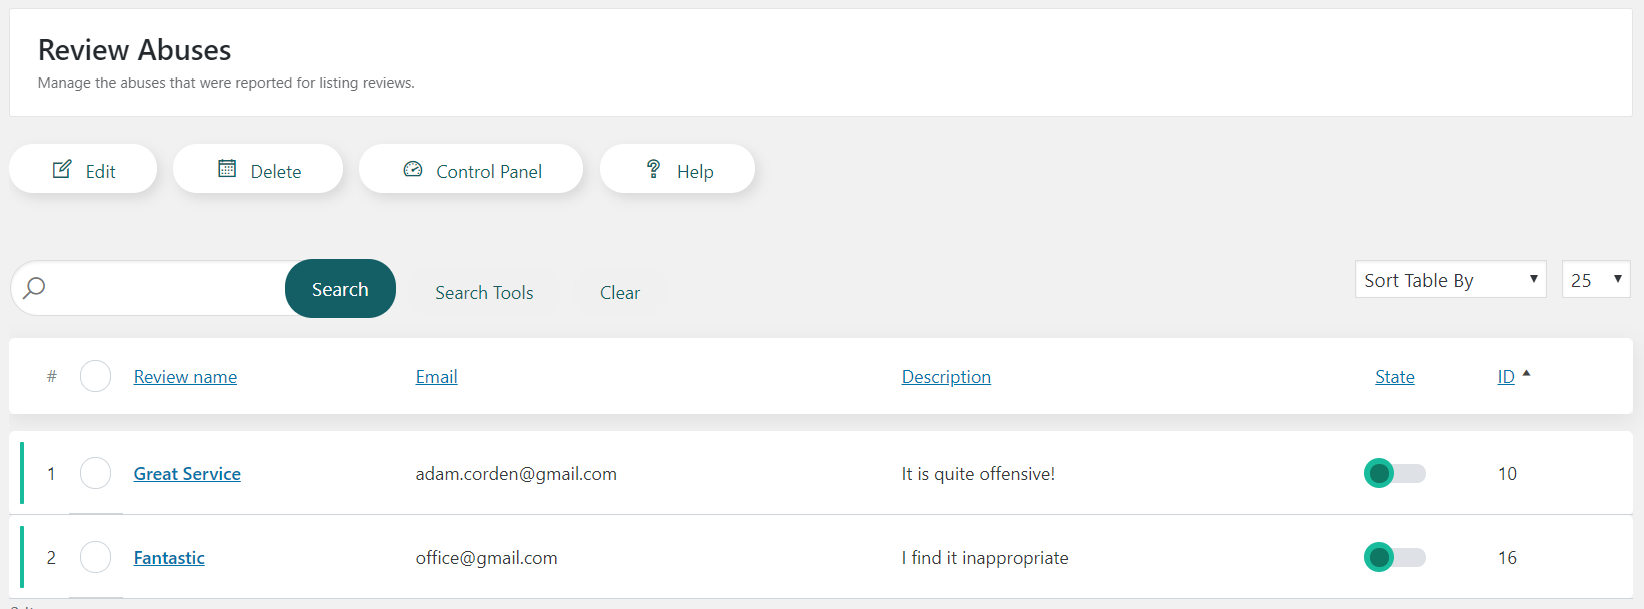
Marketing
The marketing section will help promote your services better. In this section, you are able to send the following emails to business owners:
Listing creation notification - this email should be used when a CSV import is being done to let the customers know that their business listing has been created on your website
Statistics of listings - this email contains the general statistics for business listings, offers, and events that belong to a business owner
Total View Count
Monthly View Count
Monthly Articles Views
Total Average Rating
Review Number
Upgrade package notification - this email is sent to the business listings with free packages to take advantage of the premium packages
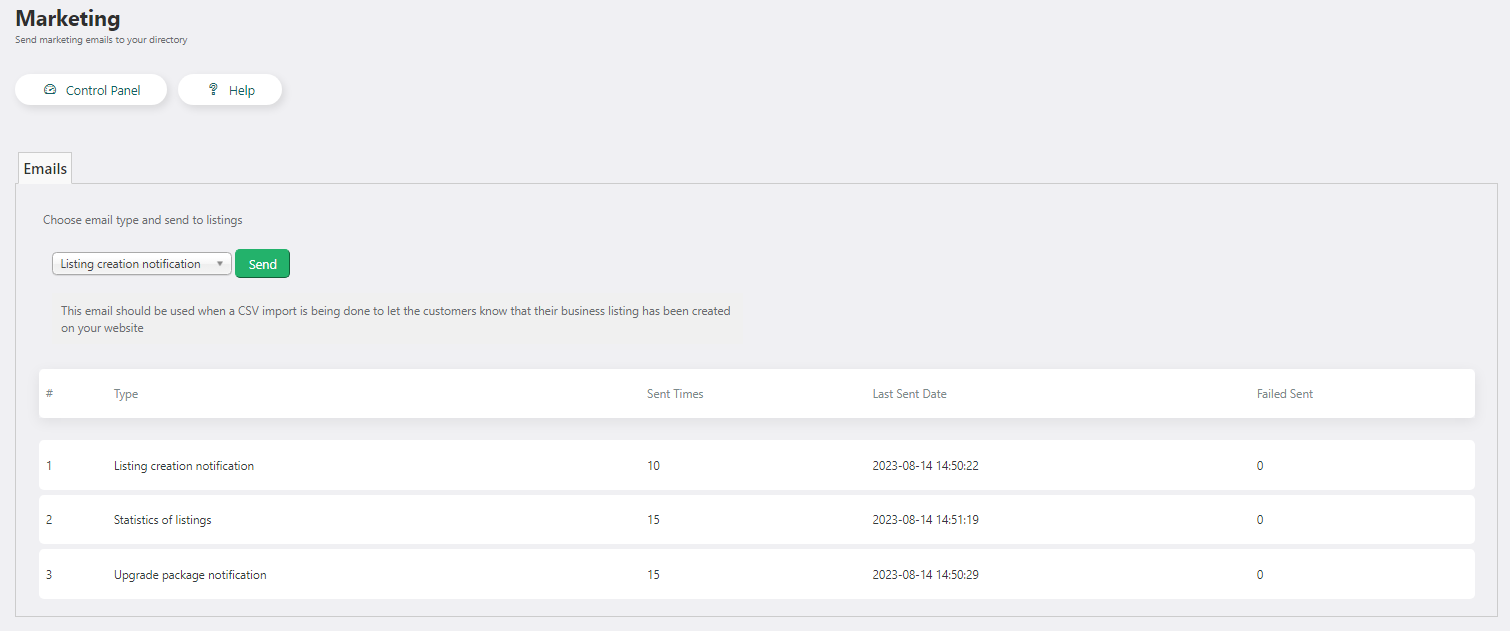
Reports
Listings Report
The report section provides the possibility of defining multiple reports.
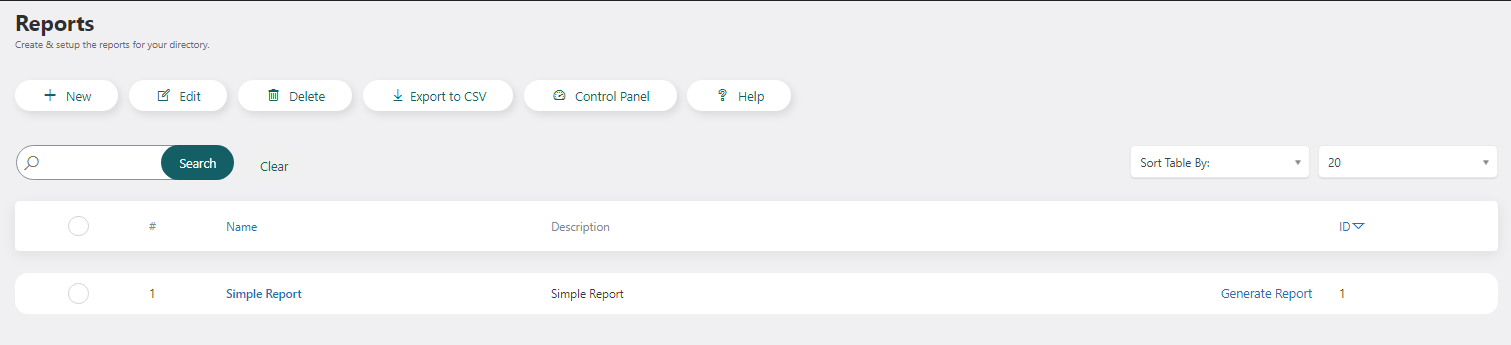
One can create a new report by clicking on new button and filling the fields, selecting the report type and the custom business listing fields.
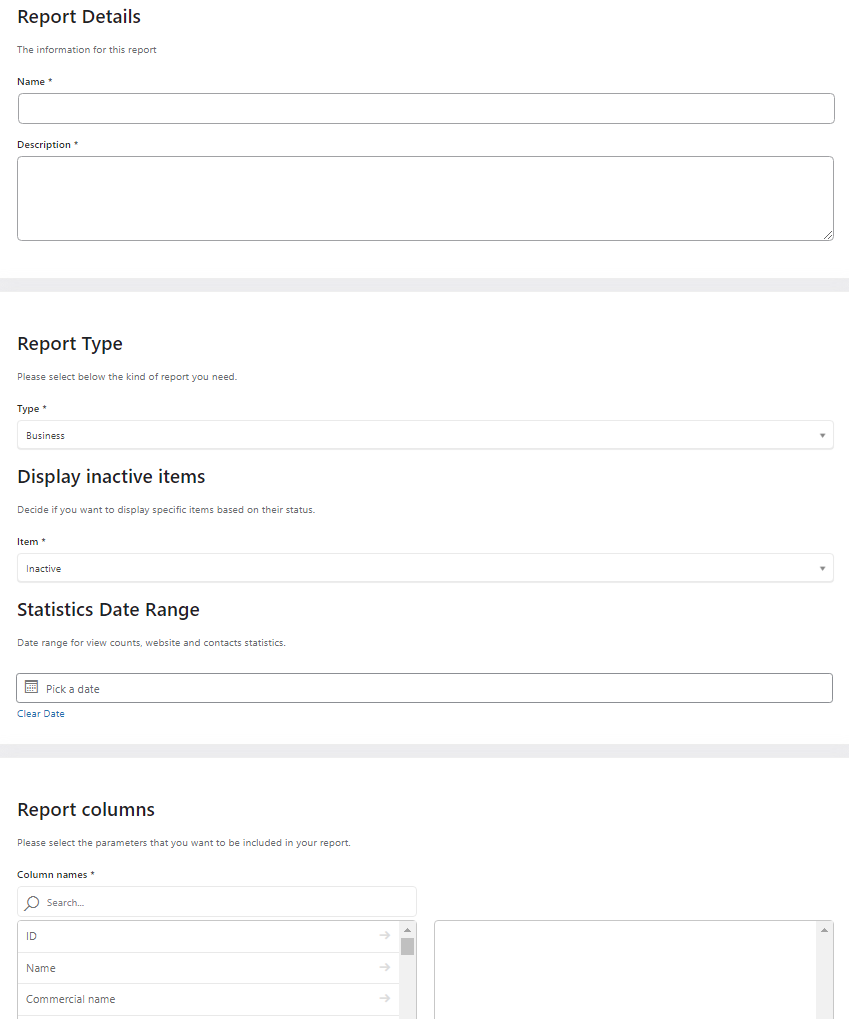
Statistics
This section gives the site administrator useful statistics about your listings, offers and events.
The site admin can filter the data based on:
item type
item name
date interval
statistics (number of views, website clicks, contacts and shares number)
categories
date range
All the information can be grouped by day, by month or by year.
This section is also available for the business owners on the front-end Control Panel section.
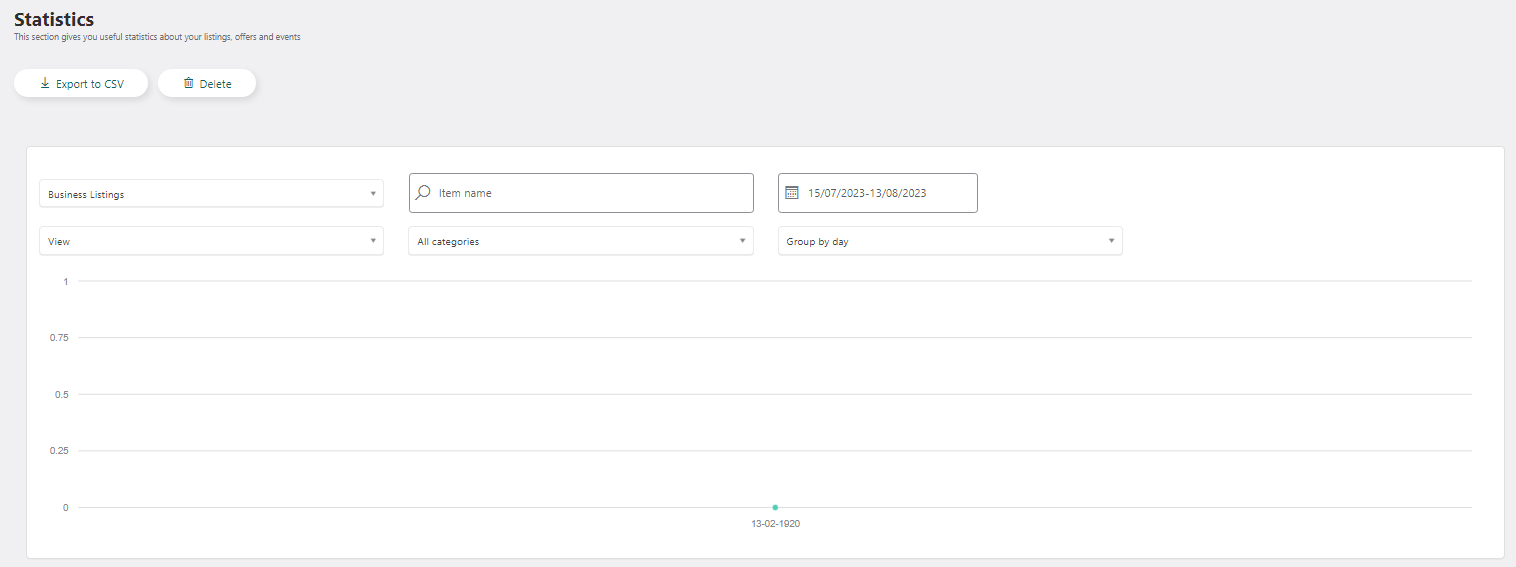
Search Logs
This section gives the site administrator useful statistics about searches on the directory.
The site admin can filter the data based on:
type (all the available search parameters)
object (listings, offers, events)
date range
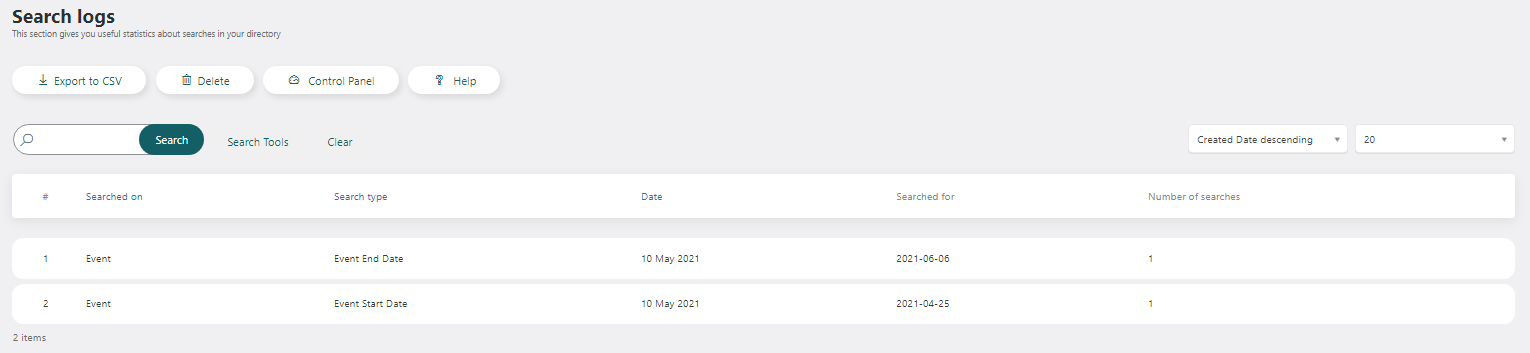
Every search value is shown, alongside with the number of times the was searched at an actual date. All the data is archived and shown up on the exact and it is needed that the extension dashboard to be accessed first, so that the data is archived. The information can be either deleted or exported to a CSV file.
E-mail Templates
The email templates section allows you, as administrator, to define the emails that are sent to you and your customers.
Each template contains the following details:
Name: the name of the template
Type: the type of the email
Send to admin (on bbc): provides the possibility for the site admin to receive the current email type, but some of the email types are received by default by the admin
Subject: subject of the email
Content: will be defined using an editor which holds a series of email tags
Available placeholders for this email: the available placeholders that can be used for the actual email
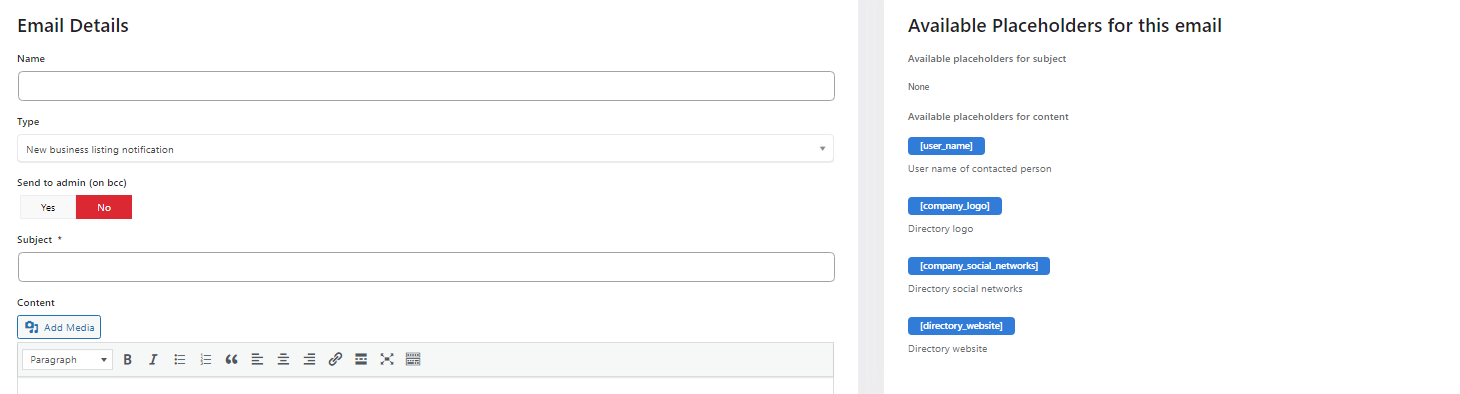
The email templates are:
Review Email: the email is received by the business owner when the business listing receives a review and after the review is approved by the site administrator.
Review Response Email: the email is received by the business owner, when the user has completed the respond to review form on a posted review in his business listing.
Order Email: this email is sent to the customer when he completes the payment for a package. Template is used as order e-mail for all payment methods except bank transfer.
Contact Email: this email is sent to the business owner when the user completes the contact form on business listing detail view or list view. If the user wants to receive a copy of the email, he/she can check the box when completing the form.
Report Abuse: this email is sent out to the admin only when the user completes the report abuse form on a posted review.
Expiration Notification: this email will be sent to the business owners before the number of expiration days is provided, once the administrator has activated the current link.
New Business Listing Notification: this email will be sent only to the admin when a new business listing is created.
Business Listing Approval: this email is sent to the business owner contact, after the created listing is approved by the administrator.
Payment Details: this email is sent to the business owner when he completes the payment for a package by using bank transfer
Request Quote: this email is sent to business owner when the user completes the request quote form on the business listing list view style 3.
Listing Creation Notification: the difference from the “New business listing notification” email is that, this email template is sent to the business owner in the moment when the listing is created.
Positive Claim Response: after being claimed, the listing will enter in the “Need claim approval” state and when the administrator approves the claim, the business owner will receive the positive claim response email.
Negative Claim Response: after being claimed, the listing will enter in the “Need claim approval” state and when the administrator disapproves the claim, the business owner will receive the negative claim response email.
Offer Creation: this email is sent to the business owner when the new offer associated with it, is created.
Offer/Product Approval: new created offer/product enters the “Need approval” state. When the administrator approves the offer, offer approval email will be sent to the business owner.
Event Creation Notification: this confirmation email is sent to the business owner when a new event associated with it, is created.
Event Approval Notification: the newly created event enters the “Need approval” state. When the administrator approves the event, this email is sent to the business owner.
Event Reservation Notification: once a ticket is created, it will display on events’ details view for the user to book it. After the payment process will be completed, an email will be received by the event owner and also by the user who booked the tickets.
Event Payment Details: this email will be received by the user, if the events’ tickets are booked and paid by using the wire transfer
Event Expiration Notification: once the event is about to expire, this email will be sent to the business owner and the events’ contact email with the list of the expiring events, only if the actual link is called by administrator.
Offer Expiration Notification: once the offer is about to expire, this email will be sent to the business owner with the list of expiring offers, only if the actual link is called.
Report Notification: in order to report the listing, the user has to complete the form on business detail view. After the listing is reported, the admin will receive the report notification email.
Business Update Notification: this email will be sent to the business owner after a business has been updated.
Offer Review Response Email: this email is sent to the business owner his offers’ review has received a response.
Offer Review Email: the offer owner receives this email when a review has been left on the offer and has already been approved by the administrator.
Report Abuse Offer Review: this email is sent to the admin only, when the posted review is reported as abusive by completing the form.
Offer Order Notification: once an offer order payment has been made, a confirmation email will be received by the user who completed the payment and also by the offer owner with all the payment details.
Event Contact Email: when the event is contacted by completing the form on event details page, this email is sent to event contact email, if one defined, otherwise it will be sent to the business listing contact email.
Offer Contact Email: since the contact button of the offer is associated with the business contact information, when the form is completed on offers details page, the email will be sent on the business contact email.
Event Appointment Email: on attending events section at business listings page, will be displayed the “Book appointment” button. Once the form details are completed, the event appointment email is sent to both, the business owner and the user who booked the event.
Event Appointment Status Notification: once the event appointment is booked, it is up to the event owner, whether to confirm or deny it. In both cases, this email will be sent to the user who booked the event.
Business Statistics Email: this email is sent to business owners to notify monthly statistical information for the business listing.
Business Upgrade Notification: this email is sent to the business owner when the admin upgrades the package to access extra features.
Service Booking Notification: once a company service is booked and paid, the booking confirmation details are received by the business listing owner, alongside the user who made the reservation.
Company Association Notification: the event owner is notified by email each time business listings join the actual event.
Business Listing Disapproval: this email is sent to the business owner after the created listing is disapproved by the administrator.
Claim Request Email: when there is no user associated with the listing, the business can be claimed by a legal representative, by completing the claim business form. In that moment, in the new owner account will be sent the claim request email.
Offer Shipping Notification: the client will be notified that the item has been shipped.
Event Reservation Waiting Notification: the client will be notified by email about the booking and the payment details for the wire transfer.
Service Booking Waiting Notification: the client will be notified by email about the booking and the payment details for the wire transfer.
Offer Order Waiting Notification: the client will be notified by email about the booking and the payment details for the wire transfer.
Campaign Payment Notification: the client will be notified by email when the budget payment will be made for a campaign, alongside with the campaign details and the buyer details.
Campaign Payment Waiting Notification: the client will be notified by email about the booking and the payment details for the wire transfer.
Request Quote: notifies the business owner when a quote request is created
Listing User Changed: notification sent when the listing user is changed
Listing Creation Notification to Owner: the business owner will be notified that the listing has been added to the directory
Product Quote: notifies the business owner when a new quote request is created
Product Creation: notifies the site admin when a new product is being created
Company Joining Notification: notifies the business owner when another company is requesting a link to his listing
New review admin notification: notification to business owner when a new review is posted
Offer low quantity notification: the offer owner will be notified when the offer stock is low
Request Quote Confirmation: notification to the business owner that the request quote is confirmed
Request Quote Reply Notification: notification sent when a reply is posted
Appointment URL notification: notification sent to end-user when the appointment URL is set
Email verification: email when a new user is created for email confirmation. This email is sent only when the custom registration mechanism is enabled in business directory settings.
Appointment Notification Message: this email is sent to the end user who has created the service booking in case he is receiving a message for it’s appointment
Test Email: this is a test email that is received after checking on the”Send Email” button on general settings
Hire Email: this is an email that notifies the business owner that it’s business has been hired
Service Booking Reminder: the client will be notified by an email some days(the days will be selected on”Service notification email days before” setting on general settings) before the service booking date
Event Appointment Reminder: the client will be notified by an email some days(the days will be selected on”Service notification email days before” setting on general settings) before the event appointment date
Event Booking Reminder: the client will be notified by an email some days(the days will be selected on”Service notification email days before” setting on general settings) before the event booking date
Listing Editor Invitation: the user will be notified by an email when he is invited to be an editor of a business listing.
General Message: general message email in order for the owner to be always informed for every change that has been made.
Payment Reminder the client will be notified by an email some days(the days will be selected on”Service notification email days before” setting on general settings) before the package ending date
Request more info the user will be notified by an email after requesting for more info for a specific business listing
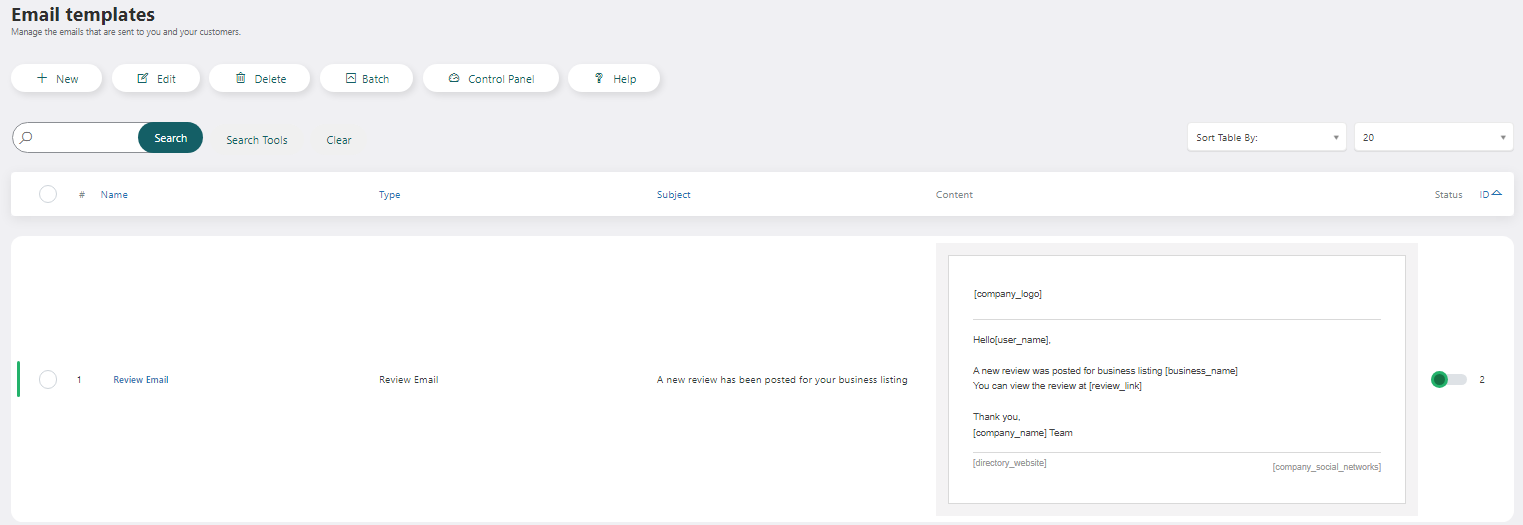
Linked Listings
The linked listings functionality provides the possibility for listings to be registered based on their type.
In the general settings of the extension, there is the “Listing type allowed for register”, where the site administrator can add the listings allowed types. On the details view of the listings, which belong to the selected types, the Join/Leave button will be shown. This listing can join or leave other listings that belong to the same logged in user. If the user is not logged in first, it will be required to log in or register in order to join other listings.
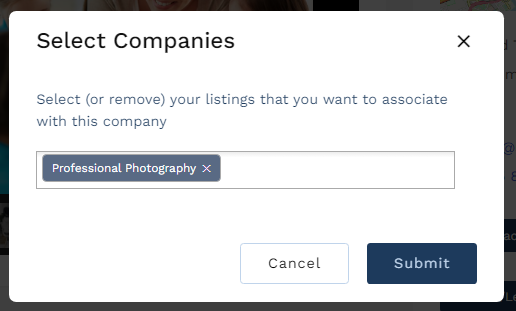
All the linking between the companies will be shown in the Linked Listings section on admin and the front-end Control Panel, where each linking can be approved or disapproved.
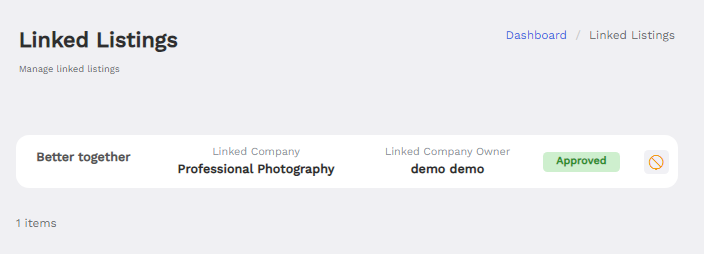
Social Networks
Companies can connect with their clients via social networks. Facebook, Twitter, LinkedIn, Skype ID, YouTube, Instagram, Pinterest and WhatsApp are available for setup.