3. Settings up your classifieds functionality
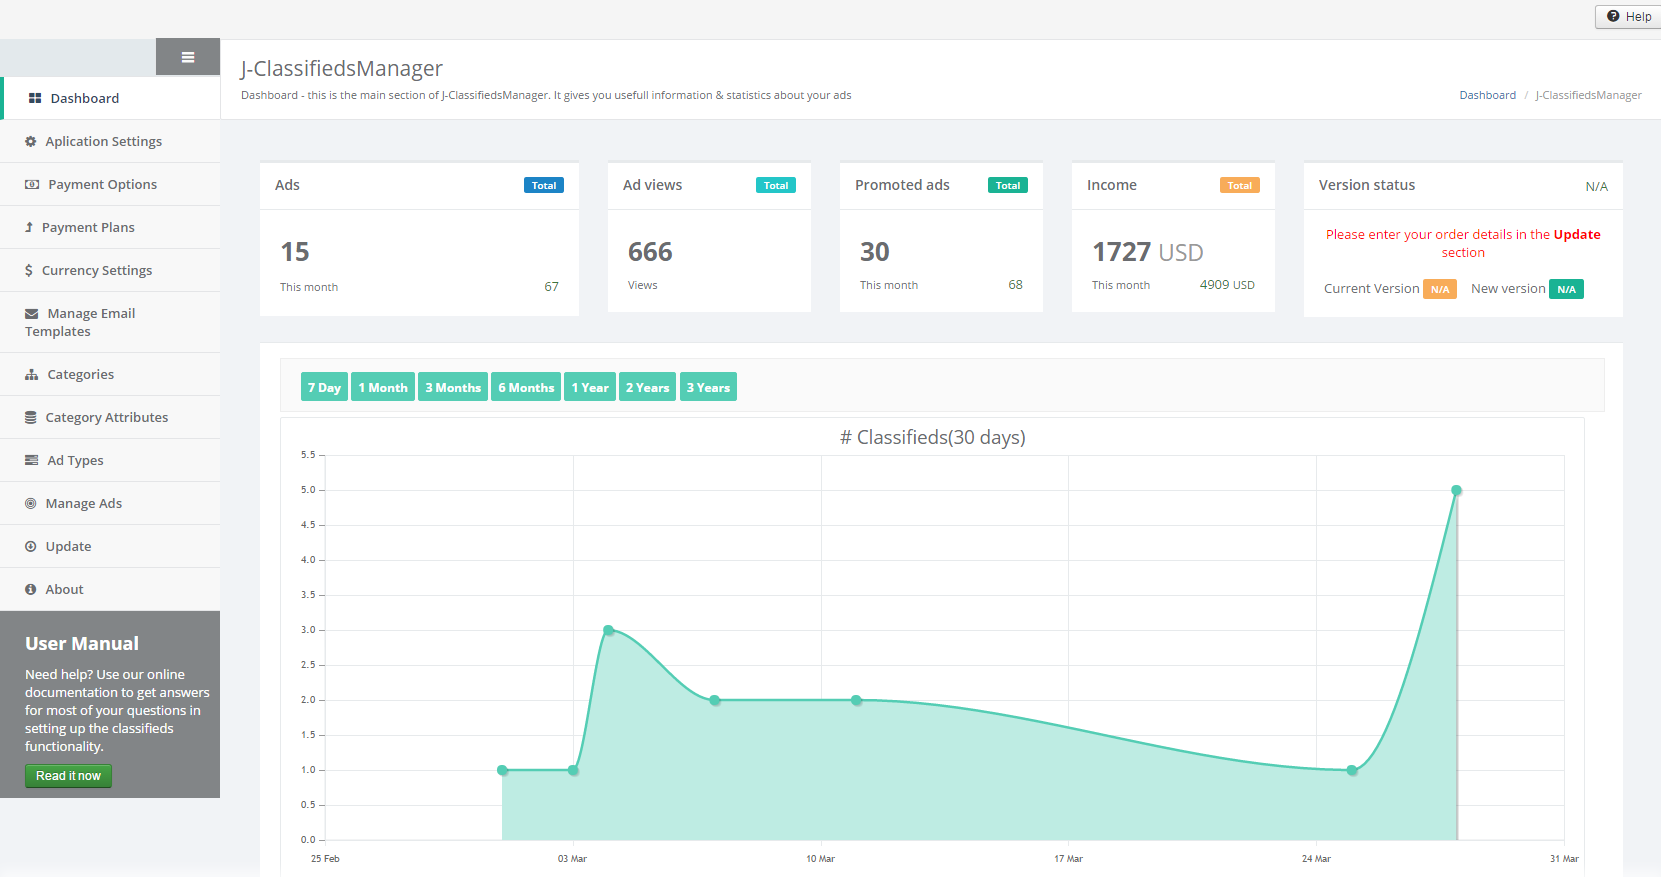
At this moment you can access the extension by selecting in the main menu the Components item and then J-ClassifiedsManager. You will be presented with a list of options that will allow you to setup your classifieds website.
The administrator has the following options
- Application Settings
- Payment Options
- Payment Plans
- Currency Settings
- Email Templates
- Categories
- Category Attributes
- Ad Types
- Manage Ads
- Update
In the following section we’ll describe in detail the above enumerated options
3.1. Application Settings
In the application settings screen a series of general settings can be set. Available settings are organized in sections as follows:
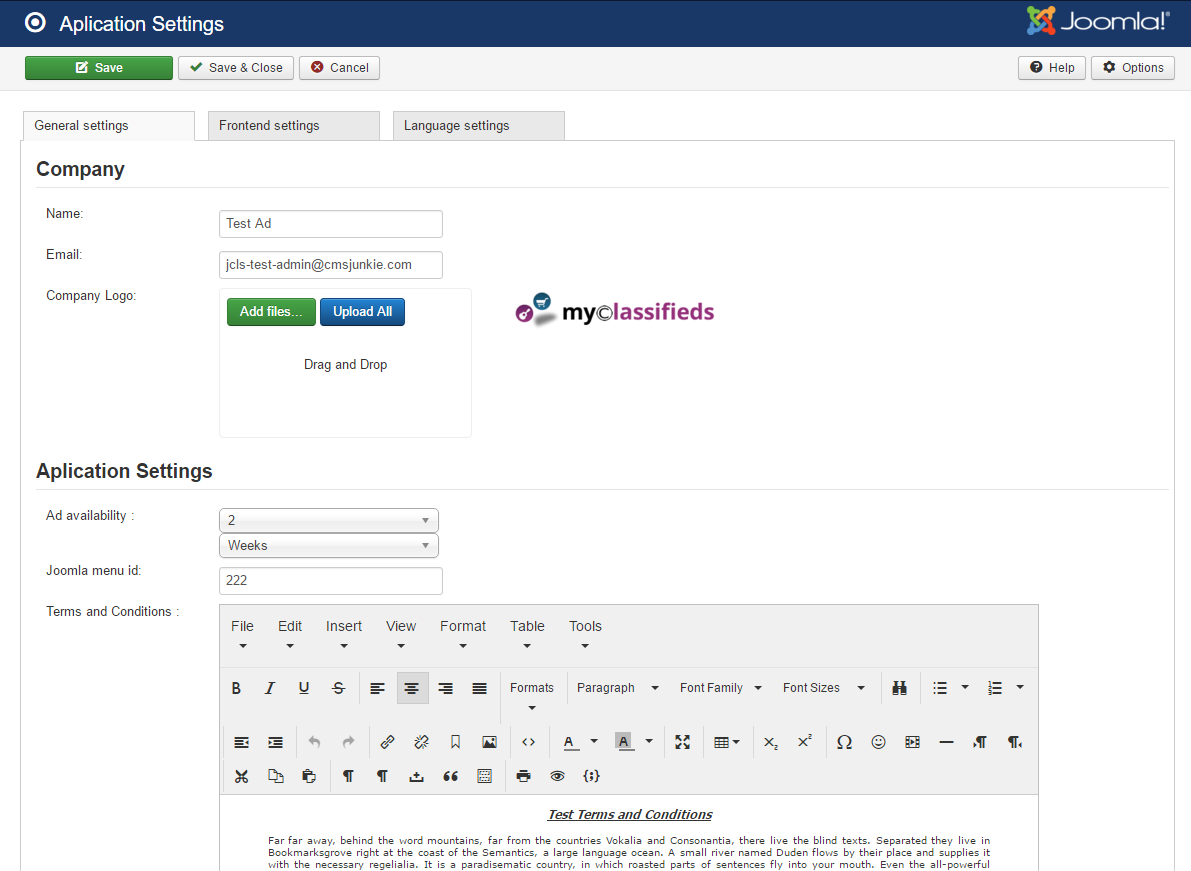
3.1.1. General settings
- Company:
- Name: Name of the business running the classified website.
- Email:The Company email. A copy of the confirmation email sent out to the client upon ad creation is sent to the provided email address. This is usually an administrator email.
- Company Logo: You have the option to upload you company log. To do that, click the Choose File button to locate the desired company logo. This logo will be used in the email going out to your customers.
- Application Settings:
Ad Availability: you can set how long an ad will be available since it has been publish. After this period the ad will expire and can be renewed by the user. To automate the process of expiring ads you can create a cronjob that runs every day for the following URL:
http://yourwebsite.com/index.php?option=com_jadmanager&controller=manageads&task=expireads
Simply replace yourwebsite.com with your domain.
Joomla menu id: Set the menu item id for search and ads listing view
Terms and Conditions: the terms and conditions of the website. These are currently displayed when creating an ad.
3.1.2. Frontend settings
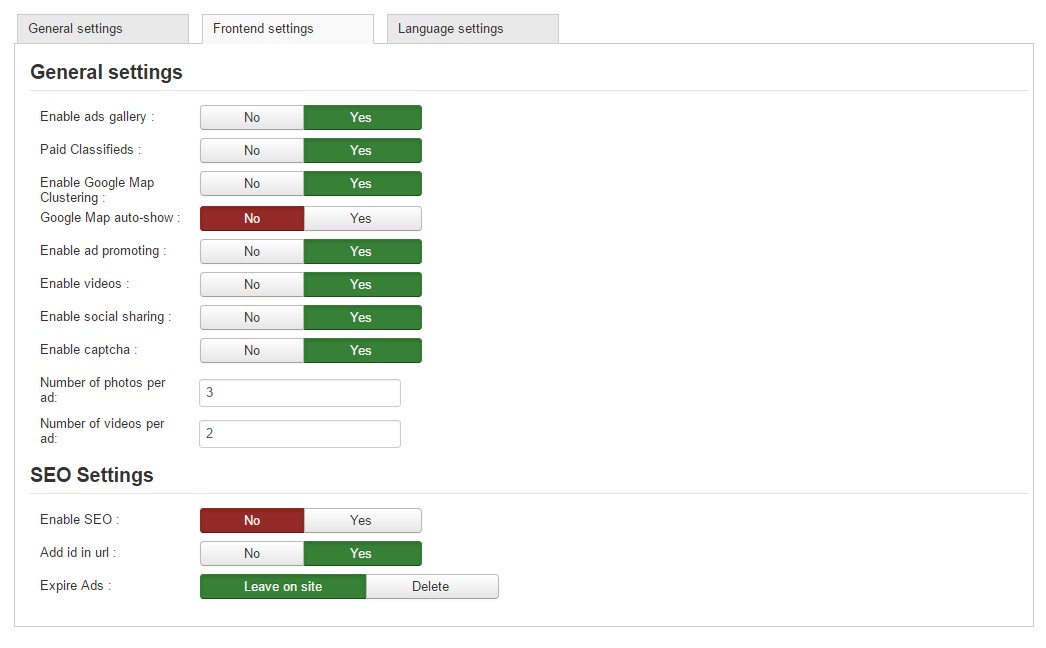
- General settings:
Enable ads gallery: display the ad gallery on top of the ad search result
Paid Classifieds : force the users to select a payment option and pay when posting a new classified. In this case the Ad Listing payment types will be considered. Also this option will force the user to select a payment option of type renewal to pay when renewing an existing ad.
Enable Google Map clustering: enables you to cluster search result markers.
Google Map auto-show: automatically display the Google map with all ads on search result
Enable ad promoting : enables the promotion of ads. Ads will be placed in the ad gallery and marked as featured.
Enable videos : enables users to add videos to ads
Enable social sharing : enable/disable social sharing when viewing an ad
Enable captcha : enables captcha check when creating a new ad
Notice: When enabling CAPTCHA on J-ClassifiedsManager you must enable also CAPTCHA plugin in manage plugins and set default captcha in Joomla General Configuration.
Number of photos per ad: sets the maximum photos can be added to an ad
Number of videos per ad: sets the maximum videos can be added to an ad
- SEO Settings:
Enable SEO: You can set whether you want or not to enable the SEO mechanism for ads. When you enable the SEO please make sure that the J-Classifieds URL Translator plugin is enabled.
Add id in url: You can set whether you want to add or remove id of the ad/category in the URL
- Expire ads: Currently you have two option when it comes to expired ad:
Delete: expired ads will be deleted when you run the URL that deletes expired ads after 30 days as of the expiry date. The URL that deletes expired ads is the following:
http://yourwebsite.com/index.php?option=com_jclassifiedsmanager&controller=manageads&task= deleteLongExpiredAds
Simply replace yourwebsite.com with your domain.
Leave on site: expired ads will be left on site even if they expired. The ads will not be available on the search result or other classifieds modules but they will be available via the direct URL. Seller contact info and price will not be displayed. The above URL will not delete ads. Also ads deleted by user who created them will be marked as deleted and will not be displayed in the user account. They will be however accessible on the website.
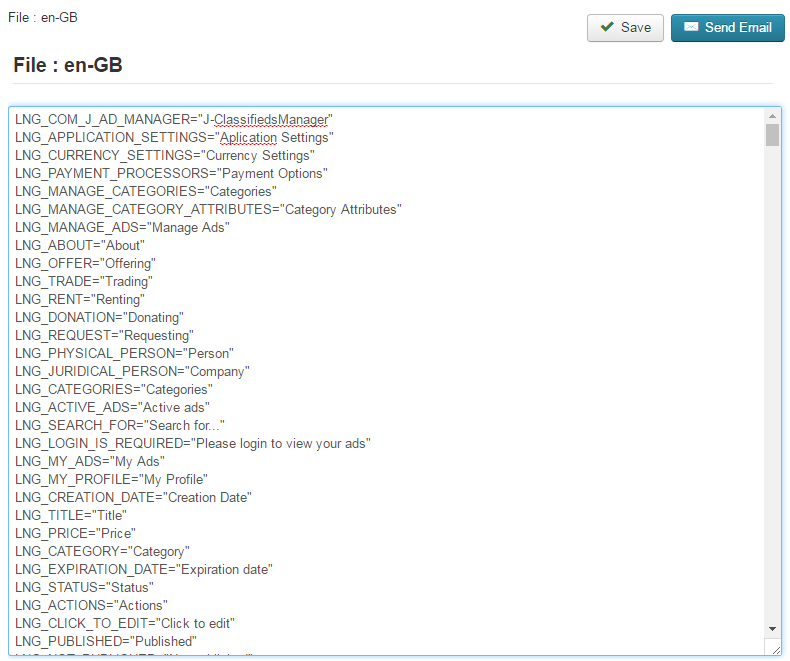
3.1.3. Language settings
This section allows you to modify the existing languages . All classifieds languages are displayed in this section and are available for modification. The classifieds manager language changes automatically when you change the Joomla language. Any changes made to a language file will reflect in the displayed content. Should you not need any language you can delete it by selecting the language(s) and pressing the Delete button.

To edit a language simply push the edit icon in the edit column or click on the language name. You’ll be presented with the screen below. The Custom File section allows you to input your own translations whether new or existing. The custom translations will not be overwritten by the automatic updates process.
You can also enhance a current translation by editing the language tags in the first section of the popup(File: en-GB) and send it to us by using the Send Mail button located at the top. We’ll review your modifications and include them in our next release so that others can benefit from your work.
After you’ve finished editing the translations don’t forget to save. You can cancel at any time by pressing the X button located at top right.
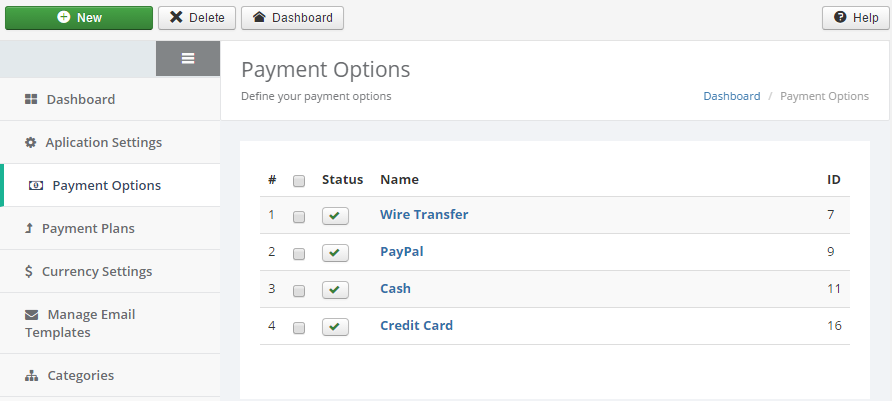
3.2. Payment Options
Payment processors will allow you to collect promotion costs from your customers ahead of their ad promotion start or when creating or renewing an ad(Paid Classifieds option enabled).
Currently there are twopayment processors available with the classifieds software.
- Wire Transfer
- MobilPay
- PayPal
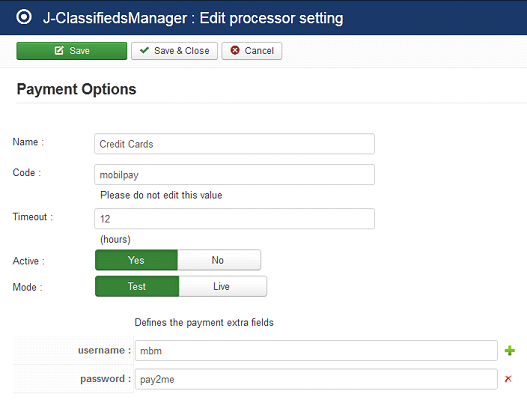
3.2.1. Defining a processor
The above mentioned processors can be setup within the reservation component. The information below is intended for a better understanding of the payment processor setup. To activate a payment processor for your lodging facility you’ll have to define the following:
- Name – the name of the processor to be displayed in the front end. Can be set at your choice
- Code – the code of the processor. This value has to remain as defined by default or by a developer developing a new payment processor
- Timeout (minutes) – the number of minutes to wait for a pending transaction. After the time minutes a pending reservation will be deleted by the reservation process.
- Active – select Yes to enable the processor or No to disable the processor. Active processors will be available for selection in the reservation process.
- Mode – set mode to Live for the production mode and Test for the test mode
3.2.1.1. Processor Extra Fields
The extra fields’ functionality is built to define additional information you might need for your Processor. This is different from processor to processor and could be anything from an API login to an email address.
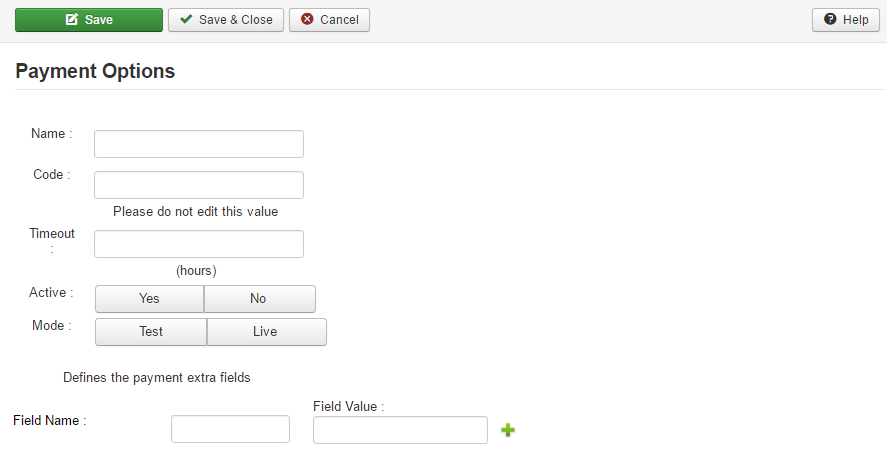
To define an extra field, click on the plus icon. You’ll be presented with two inputs:
- Fields Name: the name of the added Field. As a best practice if your field has multiple keywords it is best to join them with an underscore. Ex: api_login; Also you can add a language tag in the language file to have the added fields translated in the language you want. For example for the api_login field you’ll add a new language tag in the language file: LNG_API_LOGIN
- Field Value: the value of the added Field
3.2.2. PayPal
The PayPal Processor is built on PayPal Standard and can be used from any country where PayPal is available. All you need is a Premier or Business account to start accepting payments.
To activate the PayPal processor for your lodging facility you’ll have to define the following:
- Name – the name of the processor to be displayed in the front end. Can be set at your choice
- Type – the type of the processor. Currently set to paypal–please do not change this value.
- Timeout (minutes) – the number of minutes to wait for a pending PayPal transaction. After the time minutes a pending PayPal reservation will be deleted by the reservation process.
- Active – select Yes to enable the processor or No to disable the processor.
- Mode – set Mode to Live for the production mode and Test for the test mode
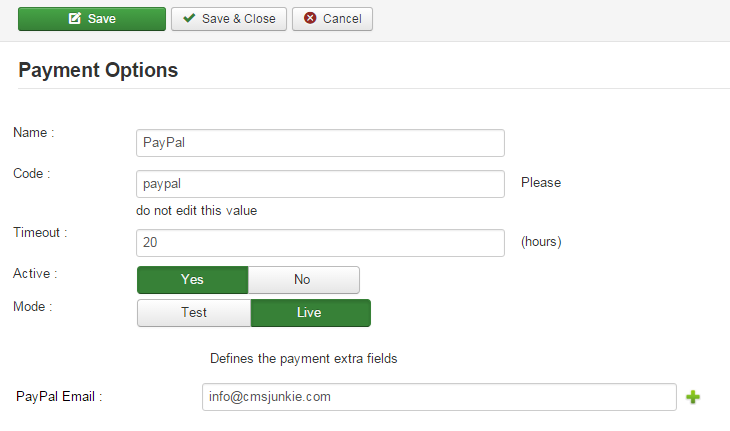
As an extra field define the PayPal Merchant Email to the email connected with your PayPal account. You need to setup this with Field Name to paypal_email and your paypal email as Field Value. All payments will go in the account associated with this email.
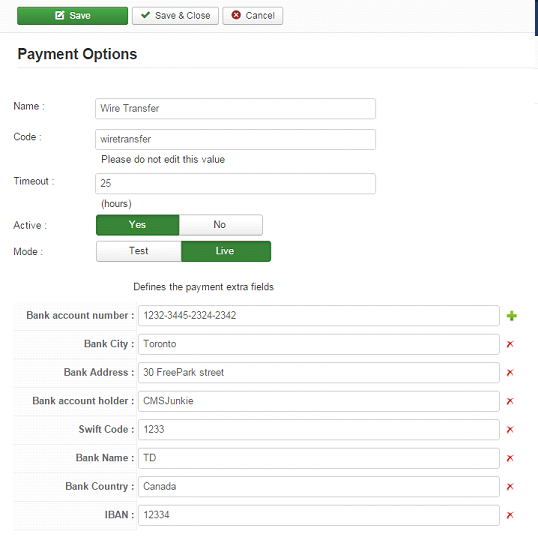
3.2.3. Wire Transfer
The Wire Transfer processor will help you collect payments from your clients by the means of wire transfers.
Below is described how the process works:
- The admin sets the required bank account information in the Wire Transfer processor(Explained below)
- Upon creating the ad , the application sends via email the complete bank account information where the client can wire transfer the money.
- The client goes to the bank and transfers the money into the admin’s account based on the data received.
- Once the transfer has been made the admin confirms the payment and approves the ad promotion.
To activate the Wire Transfer processor for your lodging facility you’ll have to define the following:
- Name – the name of the processor to be displayed in the front end. Can be set at your choice
- Code – the code of the processor. Currently set to wiretransfer – please do not change this value.
- Timeout (minutes) – the number of minutes to wait for a pending PayPal transaction. After the time minutes a pending PayPal reservation will be deleted by the reservation process.
- Active – select Yes to enable the processor or No to disable the processor.
- Mode – set Mode to Live for the production mode and Test for the test mode
Extra Fields
Extra Fields are subject to your needs and can be adjusted as needed. The wire transfer processor comes with the following fields predefined:
- Bank Name – the name of the bank you want you want your clients to transfer the money. The Field Name will be set to bank_name
- Bank Address – the address of the bank. The Field Name will be set to bank_address
- Bank City – the city where the bank is located. The Field Name will be set to bank_city
- Bank Country – the country where the bank is located. The Field Name will be set to bank_country
- Bank Account Holder Name – the name of the account holder. The Field Name will be set to bank_account_holder_name
- Bank Account Number – the number of the bank account. The Field Name will be set to bank_account_number
- Swift Code – the bank swift code. All the banks have one. The Field Name will be set to swift_code
- IBAN – the IBAN code. The Field Name will be set to iban_code
All of these fields are included automatically into the reservation email sent out to the client. Should you add or modify any field(s) the modification will be included in the reservation email. All the fields should have a translation by default if correct.
Adding an extra fields
You can add any extra fields at your liking. When adding a new field that includes multiple words use underscore to connect the words for the Field Name. For example “bank name” should be entered as “bank_name”. The Field Name will be used to compose a label, for example bank_name will have the label LNG_BANK_NAME. This label is used for translation purposes and will be displayed in the wiretransfer details. You can then define this label in your language files. Please refer to chapter 5 of the user manual.
3.2.4. Cash
The Cash processor will allow you to promote ads without collecting any payment. This is useful when you’re promoting ads for free.
To activate the Wire Transfer processor for your lodging facility you’ll have to define the following:
- Name – the name of the processor to be displayed in the front end. Can be set at your choice
- Code – the code of the processor. This is currently used to identify a processor.Currently set to cash –please do not change this value.
- Timeout - can be set to anything. It’s not considered in the cash payment processor.
- Active – select Yes to enable the processor or No to disable the processor.
- Mode – set Mode to Live for the production mode and Test for the test mode
Extra Fields
There are no extra fields.
3.2.5. MobilPay
The MobilPay processor will allow you to promote ads by means of credit card. The processor is currently available for Romania only.
To activate the Wire Transfer processor for your lodging facility you’ll have to define the following:
- Name – the name of the processor to be displayed in the front end. Can be set at your choice
- Code – the code of the processor. This is currently used to identify a processor.Currently set to mobilpay–please do not change this value.
- Timeout -currently set to 24 hours.
- Active – select Yes to enable the processor or No to disable the processor.
- Mode – set Mode to Live for the production mode and Test for the test mode
Extra Fields
- Username – the merchant username.
- Password – the merchant password.
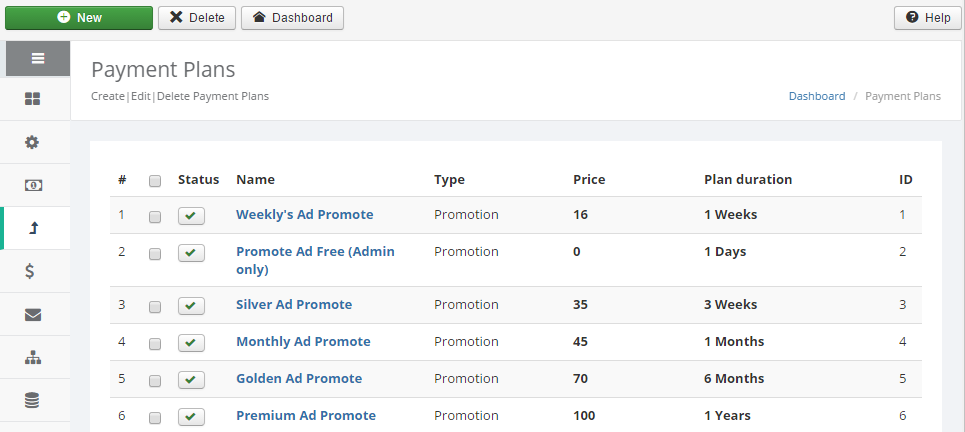
3.3. Payment Plans
The Payment Plans section allows you to define a list of payment plan to be displayed to your clients in various conditions. From this list the customers can choose a plan of their liking to promote, list or renew an ad.
Promotion payment plans will be displayed in the Ad Gallery and listed as featured on the ad list.
Ad listing payment plans are displayed to user when creating an ad and the Enable Paid Classifieds option is set to Yes in the Applications Settings.
The Renewal payment plans are displayed to the user when renewing an ad and the Paid Classifieds option is set to Yes in the Applications Settings.
You can create new, edit, delete an existing plan. Once you have created a new plan it will be displayed in the list below.
The Payment Plans section will display a list of all the created plans. In the list below you’ll be able to set whether a plan is available or not, delete, edit a plan.
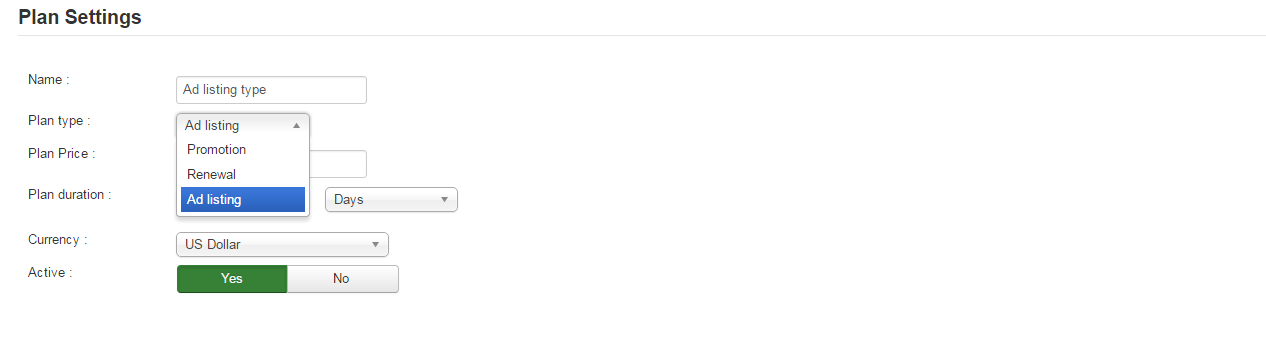
3.3.1. Add/Edit Plan
To edit a payment plan simply click on the plan’s name
Each plan has a set of properties as presented below properties it holds.
- Name: Name of the plan. This will be displayed in the frontend
- Plan type: Choose between Promotion, Ad listing and Renewal type
- Plan price: The price of the payment plan.
- Promotion duration: the period of time for the payment plan. You can select between days, weeks, months and years.
- Currency: the type of currency by the payment plan.
- Active: select yes if you want your plan to be active or no to disable it.
3.4. Currency Settings
This feature will allow you to define the currencies you are using. Clicking the Currency Settings option will display a list with all the currencies available
You can add a new currency by pressing the New button located at the top or edit a currency by clicking on the currency name.

Adding/Editing a currency will display the following:

Select the currency you wish to use in your hotel and click the save button located at the top. By default there is a list with all the available currencies in the world. To use one simply search for it click on it and the input fields on the left will be populated. You can correct them as you please.
3.5. Manage Email Templates
Same as the other sections the Email Template section will display all the added email templates at the moment. Multiple email templates for the same task can be defined but only one of them can be used as the default.
The default template for that specific task will be taken in consideration when sending out an email: for example if there are two confirmation email templates the default one will be sent out to the customer upon confirmation.
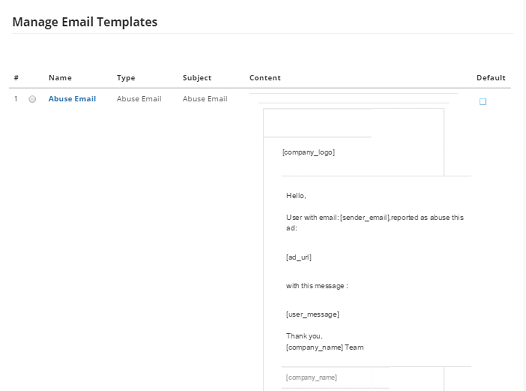
When editing or adding a template you will be presented with screen below.
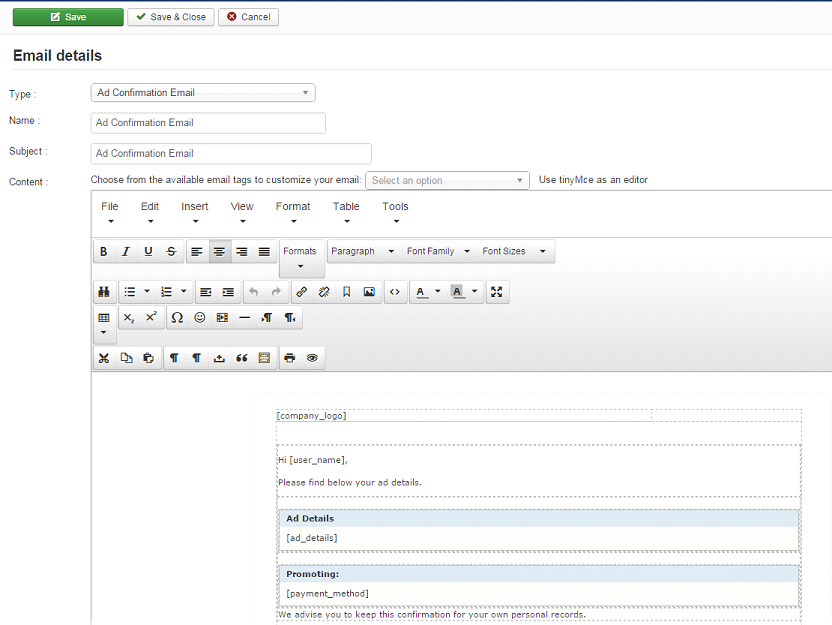
For a template the following need to be defined:
Name: the name of the template
- Type - the type of email defined :
- Abuse Email: email sent out to the client when a user reported the ad as abuse.
- Activation Email: email sent out to the client upon ad creation. This email will allow a customer to activate a published ad.
- Ad Confirmation Email: email sent out to the client upon ad creation. The email contains all the ad details along with payment details if any.
- Contact Seller Email: email sent out to the client by the user.
- Email to Friend: email sent by a user to a friend when he wants to recommend the ad.
f.Invoice Email: email sent out as an invoice to a promoted ad.
The email content: will be defined using a series of email tags which will be processed on the fly when the email is sent out. When selecting a tag this will be automatically inserted in the email’s content. Please use the tinyMCE editor when editing the content.
These email tags will be processed when the email is sent out and will replaced with the corresponding information as follows:
- [use_rname]: client’s first and last name
- [company_name]: represents the name of the classified website, this will be picked up from the Application Settings section ->Company Information -> Name.
- [company_logo]: The company logo. Currently setup in Applications Settings.
- [ad_details]: A summary with all the ad specific details.
- [payment_method]: method of payment used.
- [published_date]: the date the ad was published
- [activation_url]: use this tag when sending out the activation email. This will generate the activation URL specific for the ad being published.
- [user_information]: represents the user specific personal data like address, country, city.
- [invoice_date]: the date of the invoice.Use this tag when sending out invoices to your customers.
- [invoice_number]: represents the invoice number. Use this tag when sending out invoices to your customers.
- [order_amount]: represents the invoice amount. Use this tag when sending out invoices to your customers.
- [user_ads_url]: URL to client dashboard.
- [ad_url]: represent the URL for an ad. It is being used when sending out referrals.
- [sender_email]: represents the sender email when reporting abuse or contacting a seller for an ad.
- [sender_name]: represents the sender name when reporting abuse or contacting a seller for an ad.
Emails will be automatically sent to the admin email registered in the Application Settings. The email is sent as bcc so that it’s not visible for the users receiving the ads.
3.6. Categories
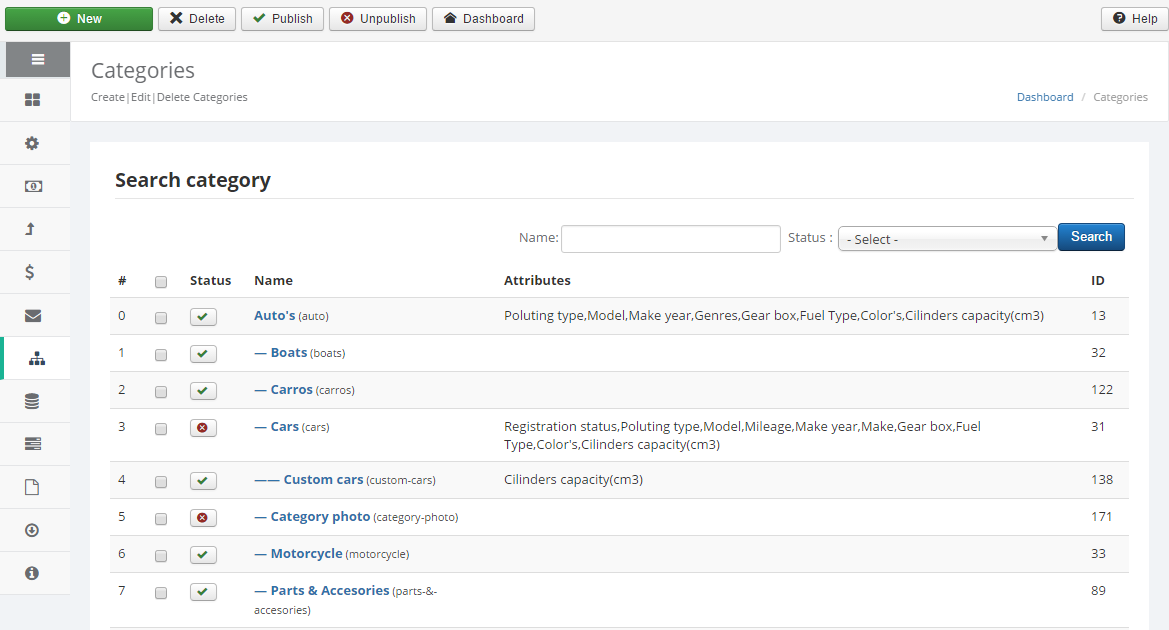
The Categories section will display all the available classifieds categories. You can add a new category by pressing the new button located at the top or edit a category by clicking on the category name.
You can filter categories by name. Simply enter the name you’re looking for and click the search button. You can also filter by status.
You can modify the status of a category by clicking on the status icon. This will enable/disable a category from being displayed in the frontend.
The screen below will be displayed when accessing the Categories section.
When editing or adding a category you will be presented with screen below.
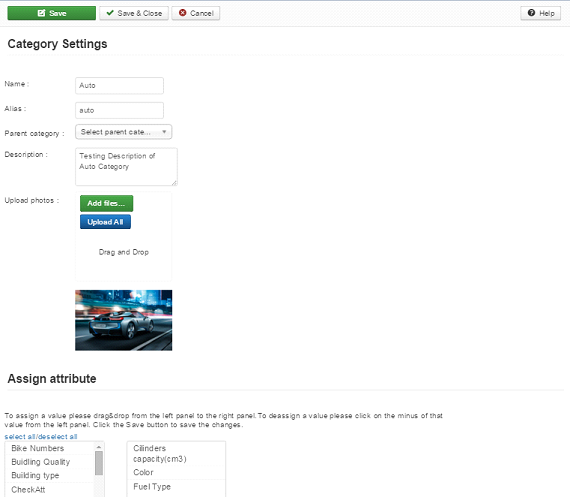
Following properties can be set:
- Name – the name of the category. This will be displayed in the frontend.
- Alias – the alias of the category. The alias is used to build SEO friendly URLs and can be set by preference. If left empty it will be auto generated.
- Parent category – you can define a parent category for your category if any. The category will be displayed in the frontend as a subcategory of the selected parent category.
- Description – the category description. The description will be used for your own purpose and will not be displayed in the frontend.
- Upload Photo - you can upload a photo for the classifieds category. The photo is displayed on the category view page.
- Assigning attributes – you can assign attributes to your category. Please refer to the Category Attributes for more details on how to define Category Attributes. To assign an existing attribute simply drag & drop from the left panel to the right panel. To de-assign a value please click on the minus of that value from the left panel. Click the Save button to save the changes.
3.7. Category Attributes
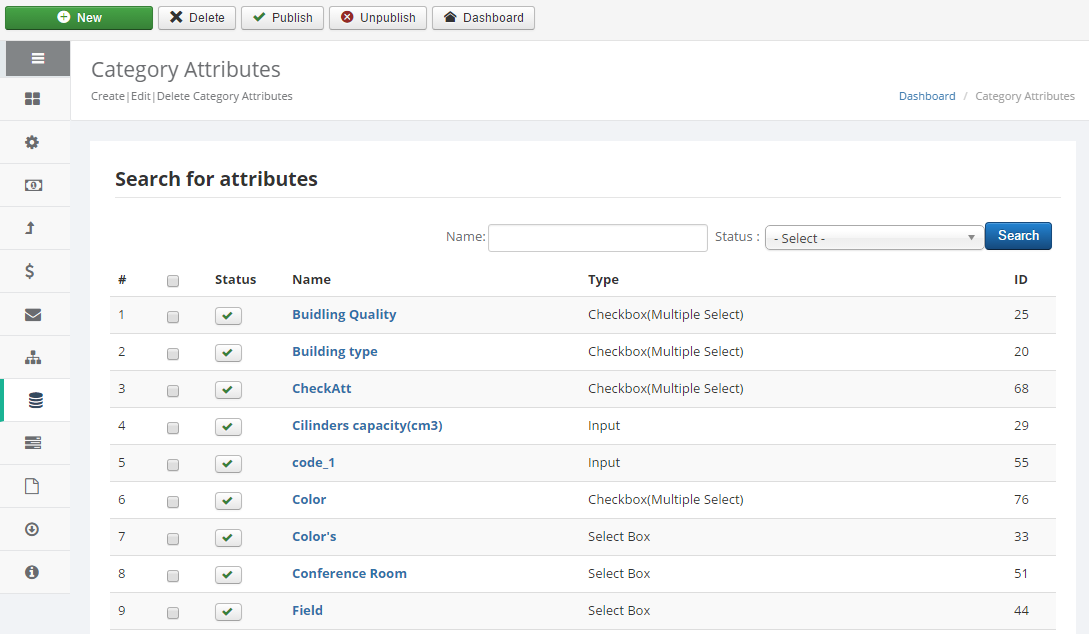
The Categories Attributes section will display all the available category attributes. You can add a new category by pressing the new button located at the top or edit a category by clicking on the category name.
You can filter categories attributes by name. Simply enter the name you’re looking for and click the search button. You can also filter by status. You can choose between active and inactive.
You can modify the status of a category attribute by clicking on the status icon. This will enable/disable a category attribute from being displayed in the frontend.
The screen below will be displayed when accessing the Categories section.
When editing or adding a category attribute you will be presented with screen below.
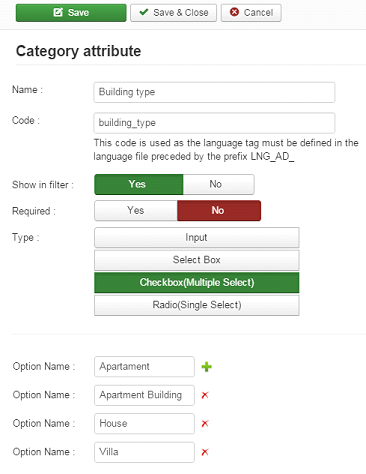
Following properties can be set:
Name – the name of the category attribute. This will be displayed in the frontend.
Code – the code is used as a language tag and must be defined in the language file preceded by the prefix ‘LNG_AD_‘. This is useful for multilingual support if your website runs in multiple languages.
Show in filter – You can if you want to display an attribute or not in the search filter available in the frontend.
Required – Set if an attribute is required or not when a user is creating a new ad.
- Type – the type of the attribute.
- Input – the attribute will be displayed as a free text entry in the frontend when creating a new ad
- Select box – the attribute will be displayed as a select box in the frontend when creating a new ad. Further you can define the select options for the attribute.
- Check box - the attribute will be displayed as a group of check boxes in the frontend when creating a new ad. This type of attributes allows you multiple selections. Further you can define the options for the attribute.
- Radio - the attribute will be displayed as a group of radio controls in the frontend when creating a new ad. This type of attributes allows you single selection. Further you can define the options for the attribute by clicking on the plus icon. To delete an option click the delete icon situated next to it.
Don’t forget to save your settings by clicking the Save button located at top.
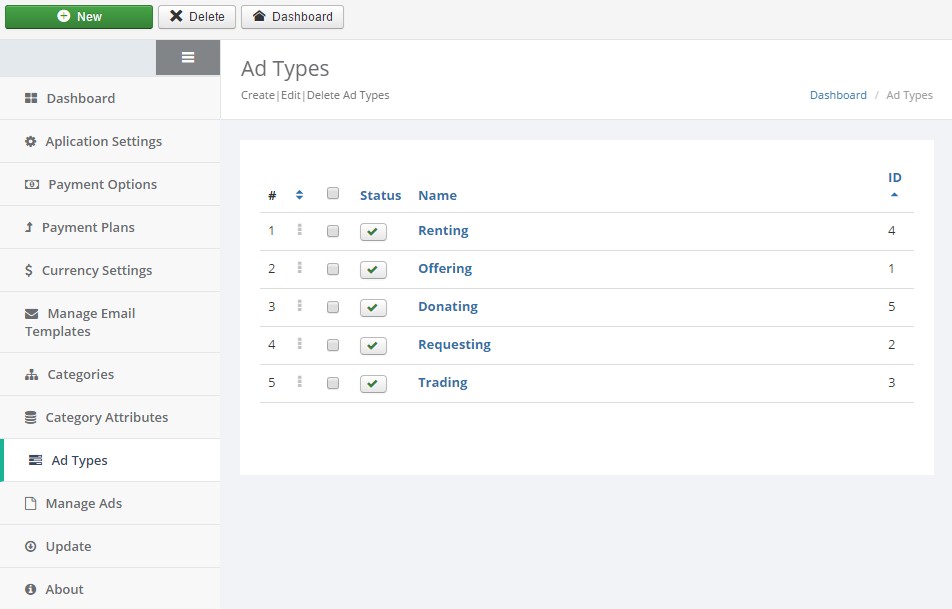
3.8. Ad Types
This section will allow you to manage all the ad types made and also create new ad types . The administrator will have the possibility to create/delete/modify ad type and to enable/disable an ad type. The administrator will have also the possibility to order and reorder the ad types.
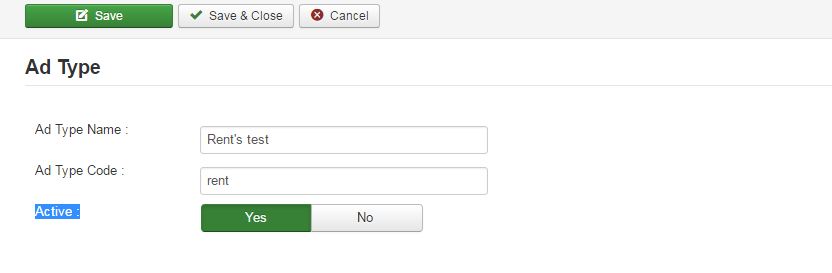
The edit view will have this fields:
- Ad Type Name - The name of the ad type
- Ad Type Code - Code field will be used to display the ad type name by prefixing the code with LNG_ to form a language tag available in the language file.
- Active - Activates or no the ad type
3.9. Managing Ads
This section will allow you to manage all the ads made. Clicking the Manage Ads option will display a list with all the available ads/classifieds. You can search an ad by user name, type, status, category, subcategory, state/province or city. Select the desired filters and press the Search button.
This section allows you to publish/unpublished ads if any. The ads screen allows you to see a status of all the existing ads, to see whether they’re active, promoted or to confirm a pending payment.
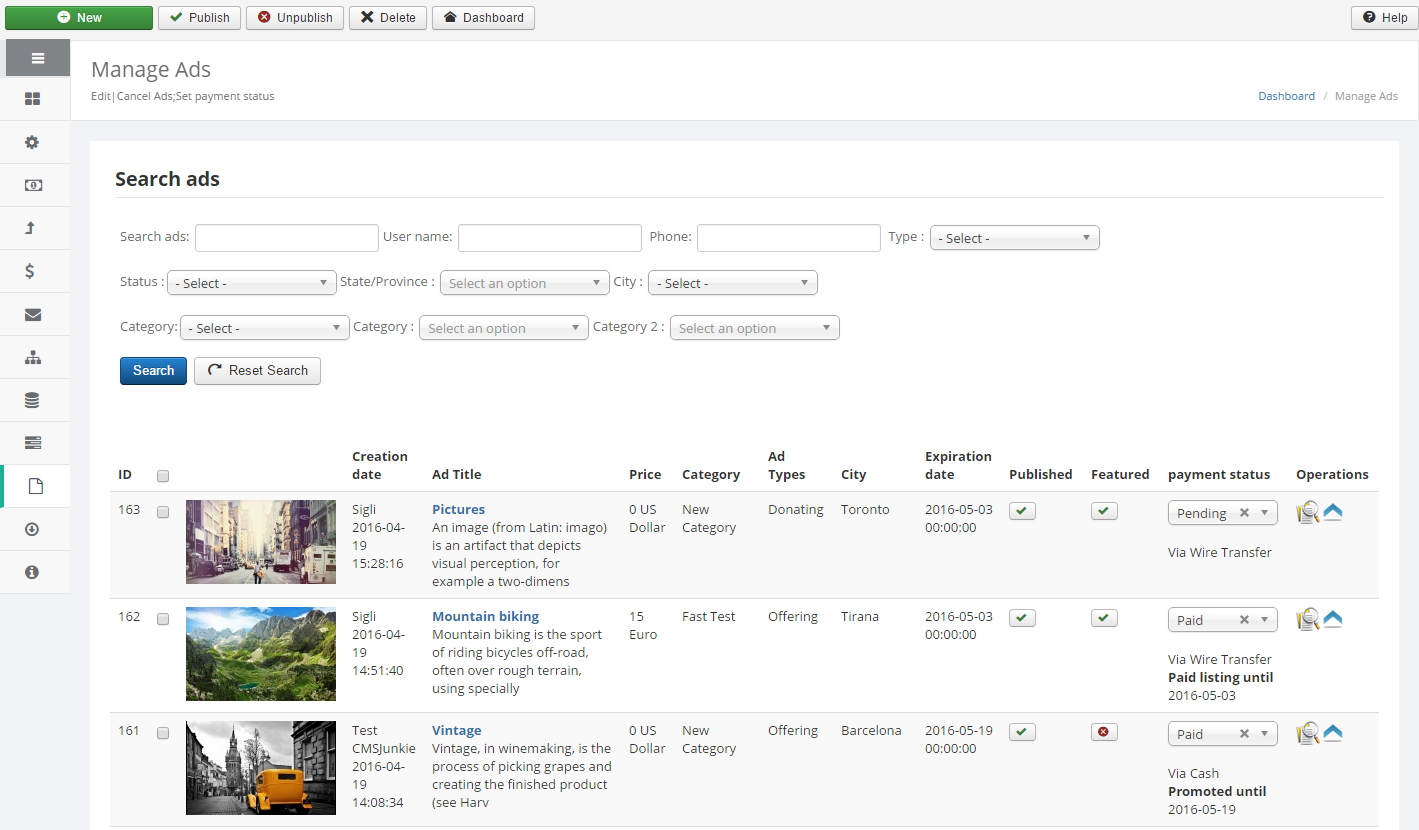
Several payment statuses apply to an ad:
- Paid: The client has promoted an ad and the payment has been completed
- Canceled: The payment for promoting an ad was canceled.
- Pending: The payment for promoting an ad is pending. Once you’ve received confirmation for payment you can set the status to Paid. On the contrary you can set the status to Not Paid.
- Not Paid:The payment was not made for this ad.
Admin users have the option to promote ads for free by using the Promote button located on the very right of each ad. The ad will be automatically promoted using the Cash processor available in the Payment options section. The 2 weeks promotion plan will be used to promote the ad. The ad owner will be notified via a 0 amount invoice.
Note
Leave this plan unpublished so it’s not available to the users in the frontend.
There is also another option available for admin users, they can preview an ad just by clicking on Preview button located near to the Promote button.
3.10. Editing an ad
To edit an ad simply click on the ad title while in the manage ads screen. You’ll be presented with the screen below where you can modify the existing ad info.
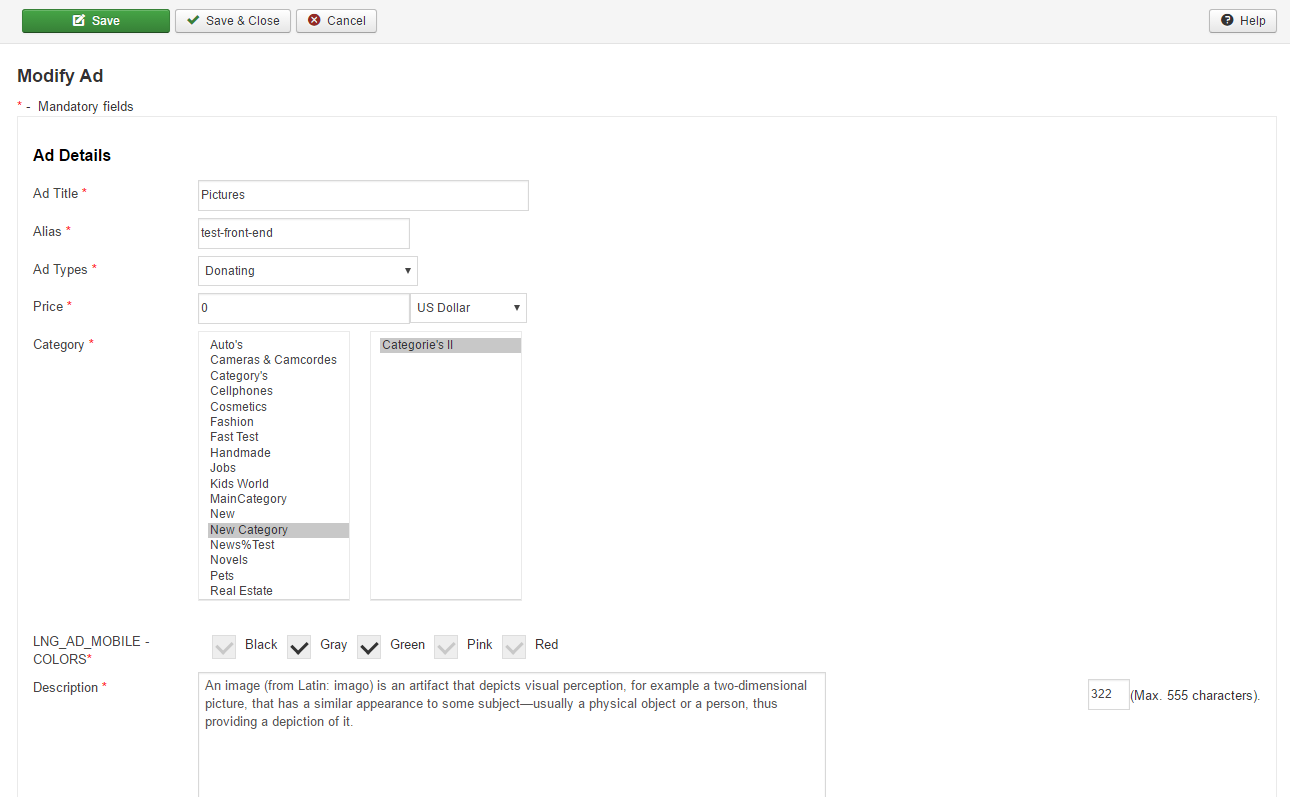
- Ad Title: the name of the ad. This will be displayed in the frontend.
- Alias: the alias of the classified. The alias is used to build SEO friendly URLs and can be set by preference. This value is auto generated and can be edited by admins only.
- Ad Type: the type of the ad, which can be: donating, offering, requesting, trading or rating.
- Price: the price of the ad
- Category: select/edit the ad category/subcategory (If there are attributes related to the category, they will also display)
- Description: enter/edit a description for the ad
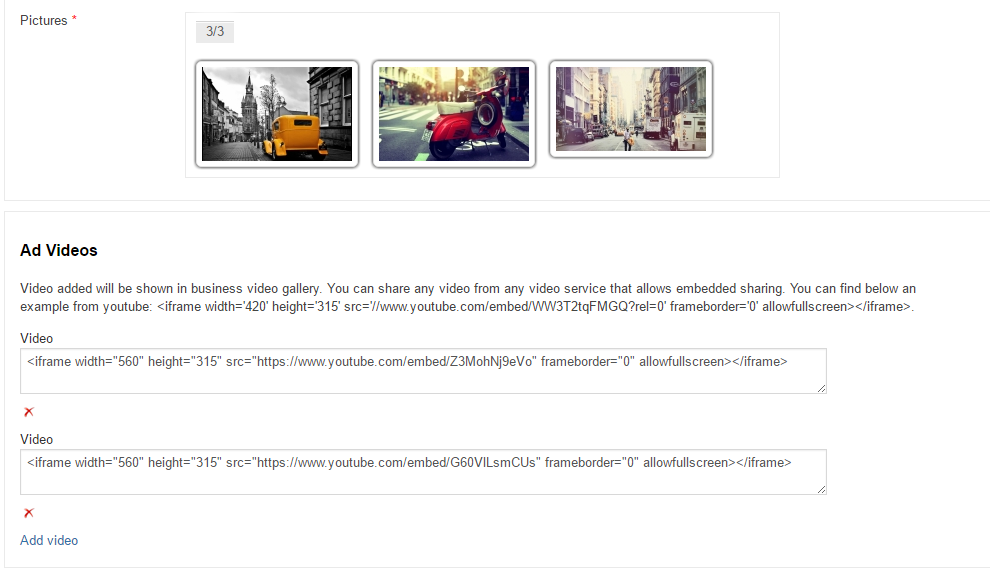
- Pictures: Pictures uploaded for this ad, which will be displayed in the frontend.
- Videos: Set the ad videos. The client can share videos from any video service that allows embedded sharing.
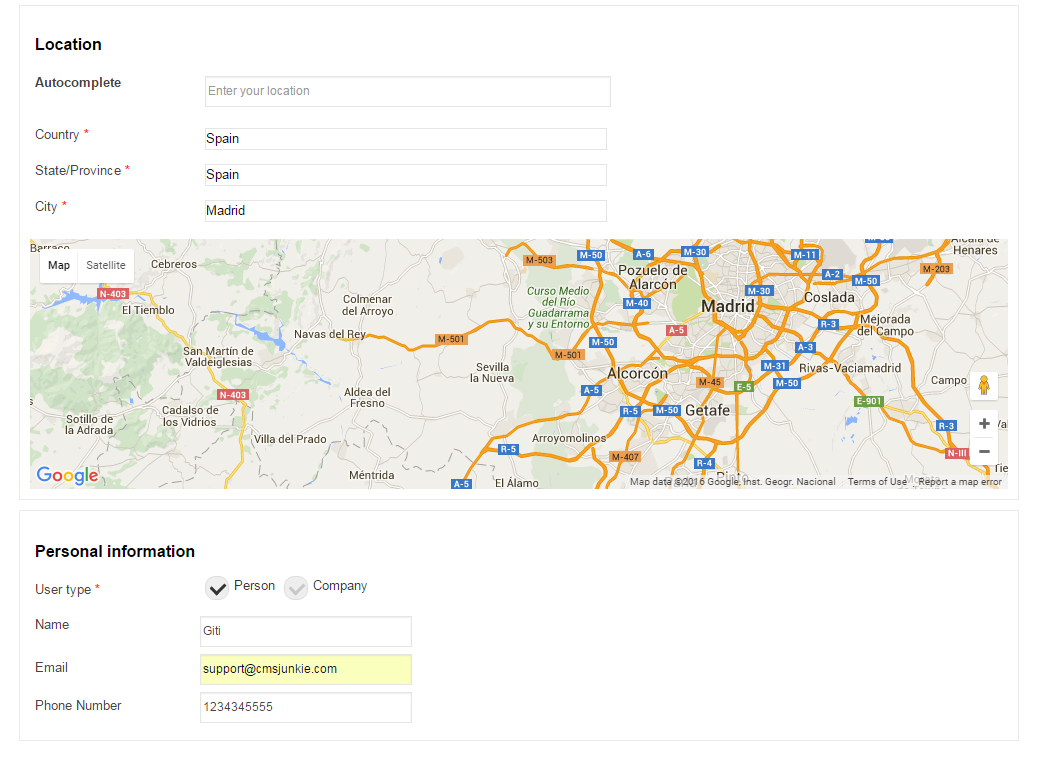
- Location: The client can set the address (country, state/province or city) manually or he can use the autocomplete address feature, which will complete all the address fields automatically.
- Personal information: the client can enter individual information like user type, name, email and phone number.
You can change the ad details as you please. When done don’t forget to save your changes by pressing the save button at the bottom.