Setting up your reservation functionality
At this moment you can access the component by selecting in the main menu the Components item, J-HotelReservation. You will be presented with a list of options that will allow you to setup your lodging facility.
- The administrator has the following options
- Application Settings
- Manage Hotels
- Manage Rooms
- Manage Availability
- Currency Settings
- Manage Taxes
- Manage Email Templates
- Payment Processors
- Manage Discounts
- Manage Extra Options
- Manage Offers
- Manage Hotel Reviews
- Manage User Access
- Add Reservations
- Manage Reservations
- Reservations Reports
- Manage Invoices
- Update
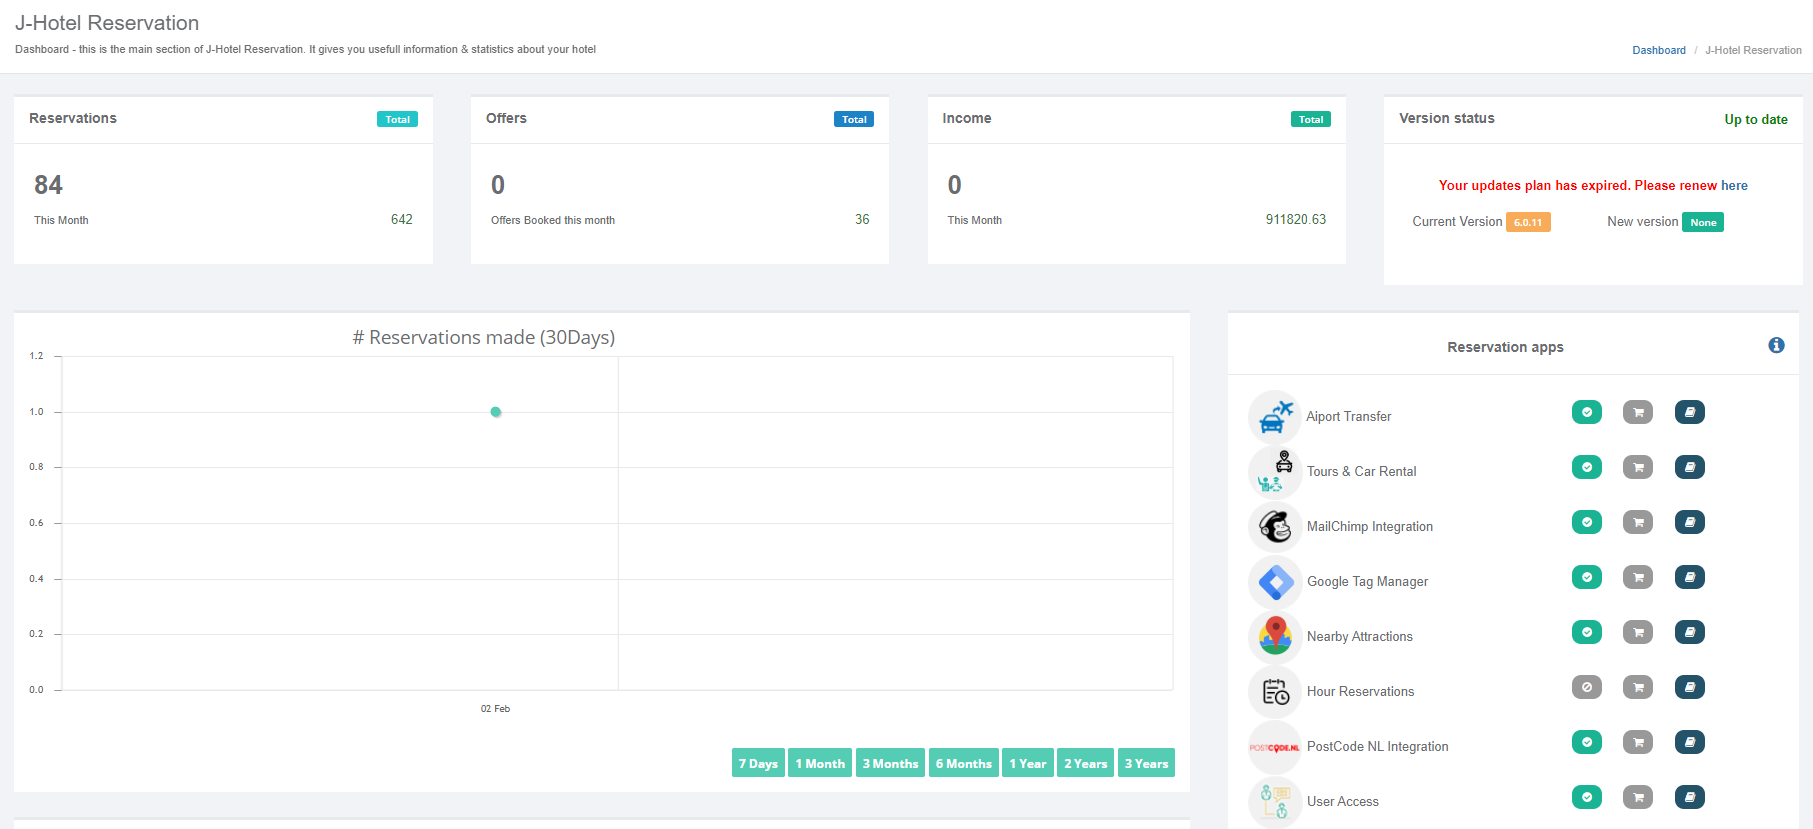
In the following section we’ll describe in detail the above enumerated options. Below you’ll see the hotel reservation dashboard as presented in the backend.
Application Settings
In the application settings screen a series of general settings can be set. Available settings are organized by tabs as follows:
General Settings Tab
Hotel Information
Name: Name of the lodging facility. The value of the name field is used to replace the [company_name] email tag when used in the reservation email template.
Email: A copy of the reservation email sent out to the client upon reservation completion is sent to the provided email address.
Company Logo: You have the option to upload you company log. To do that, click the Choose File button to locate the desired company logo. The logo will be included in the emails sent out to your customers
Application Settings
Enable Reservation: you have the possibility to activate/deactivate the reservation component. If the reservation functionality is deactivated the client will see a notification message: Reservations are currently offline. Please try again later.
Enable Offers: you have the possibility to activate/deactivate the offers defined in the Manage Offers Section.
Date Format: the format of the date displayed throughout the application, front end and backend. The language in which the date is displayed is determined by the used language.
Notify pending reservation cancelation: The admin of the hotel receives an email notification when a pending reservation is canceled.
Hide hotel guest Email: When set to yes this option hides the customer email from the hotel administrators.
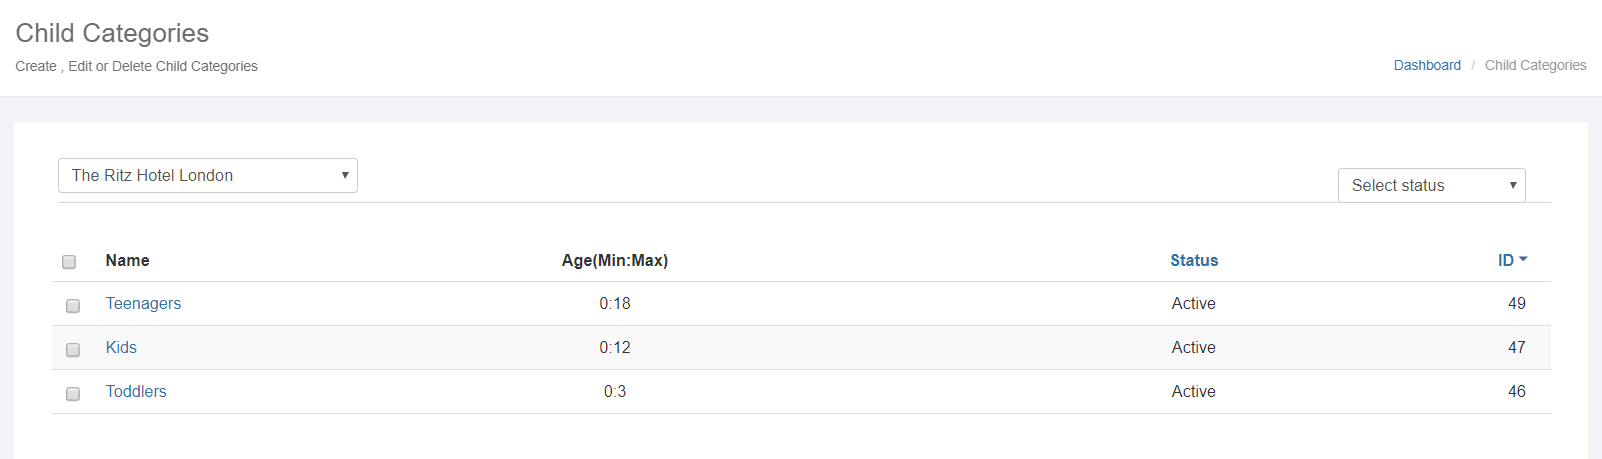
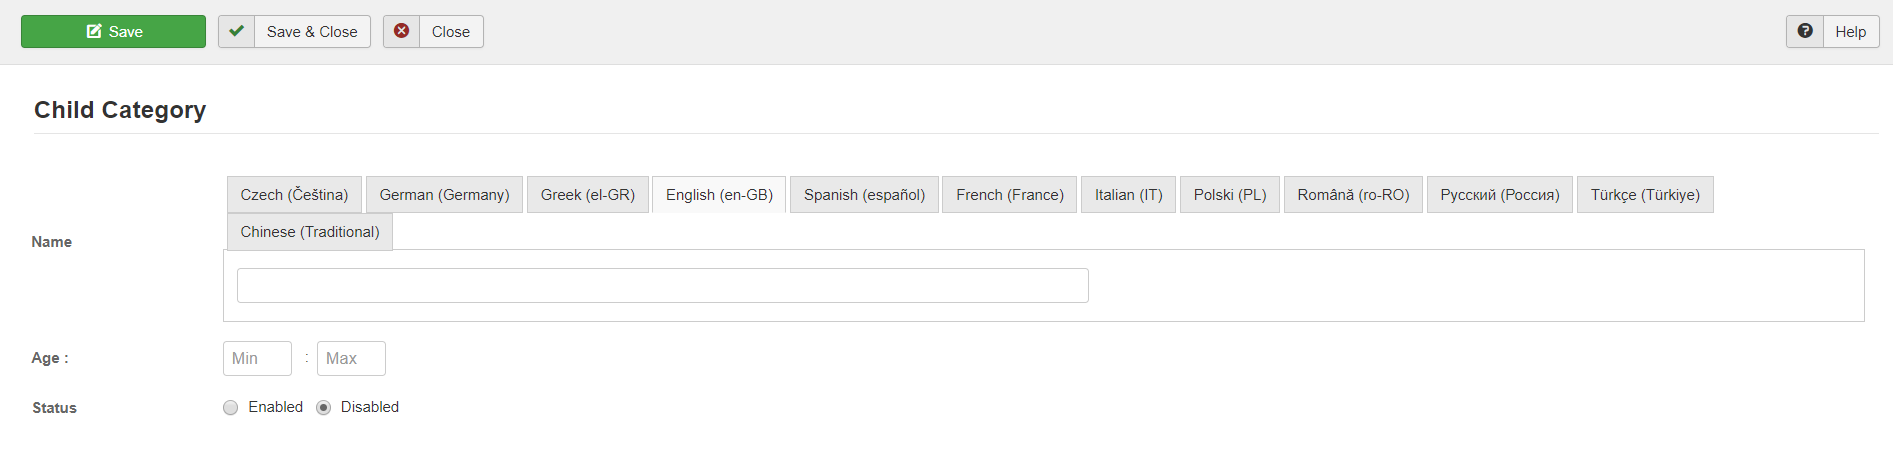
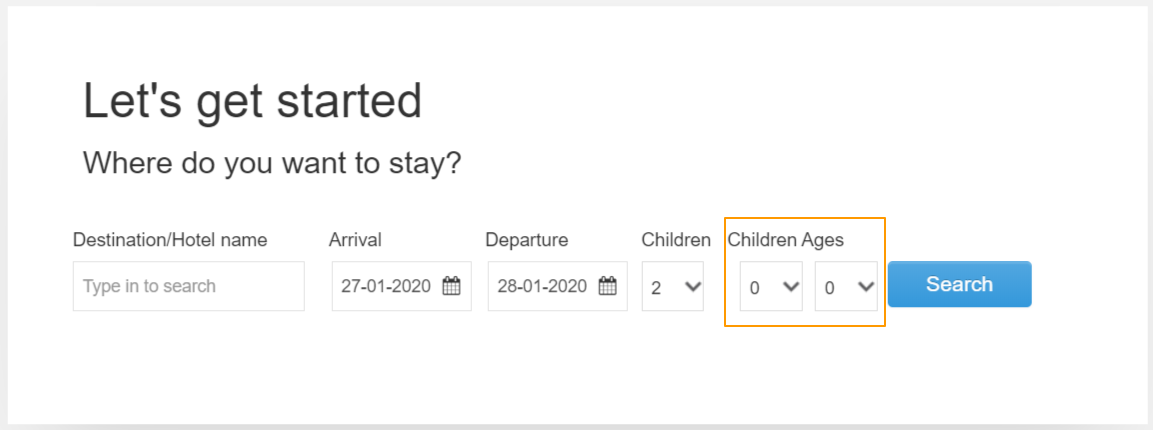
Show children: When set to yes this option displays and considers the children functionality.
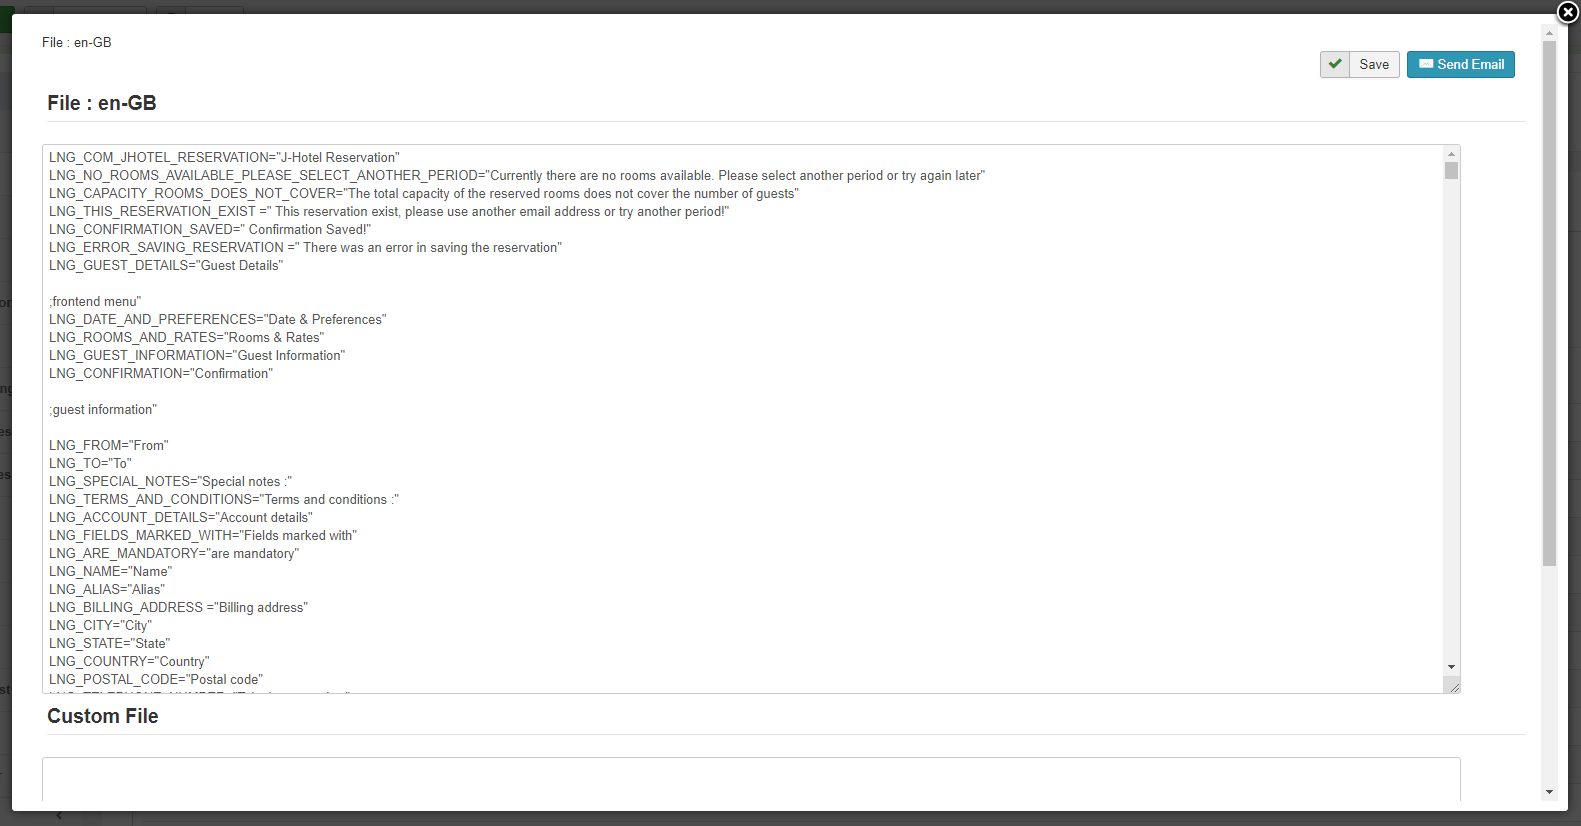
Terms and Conditions info is defined in the language file. Look for the LNG_HOTEL_TERMS_AND_CONDITIONS tag
Please refer to chapter 5 Language Management on how to edit a language file.
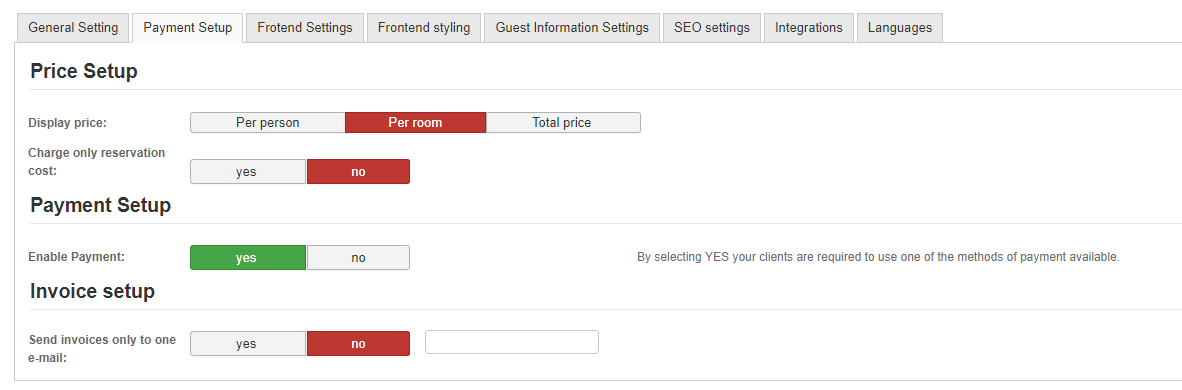
Payment Setup Tab
- Price Setup
Show Price per Person: By selecting yes the client will be informed that the price displayed for the rooms is per person or per room. The actual setting is made for each room accordingly. Please see the Manage Rooms section.
Charge only reservation costs: By activating this option only reservation costs will be considered when charging a customer. The cost of a reservation can be set when editing a hotel on the Extra Option tab.
Payment Setup
Enable Payment: By selecting yes, the clients are obligated to use one the payment methods made available by the hotel. Payment methods can be enabled/disabled from the Payment Processor section in the backend.
Invoice Setup
Send invoices only to one email: You can specify an email address for the invoices to be sent at. By entering an email address all invoice emails will be sent to the entered address.
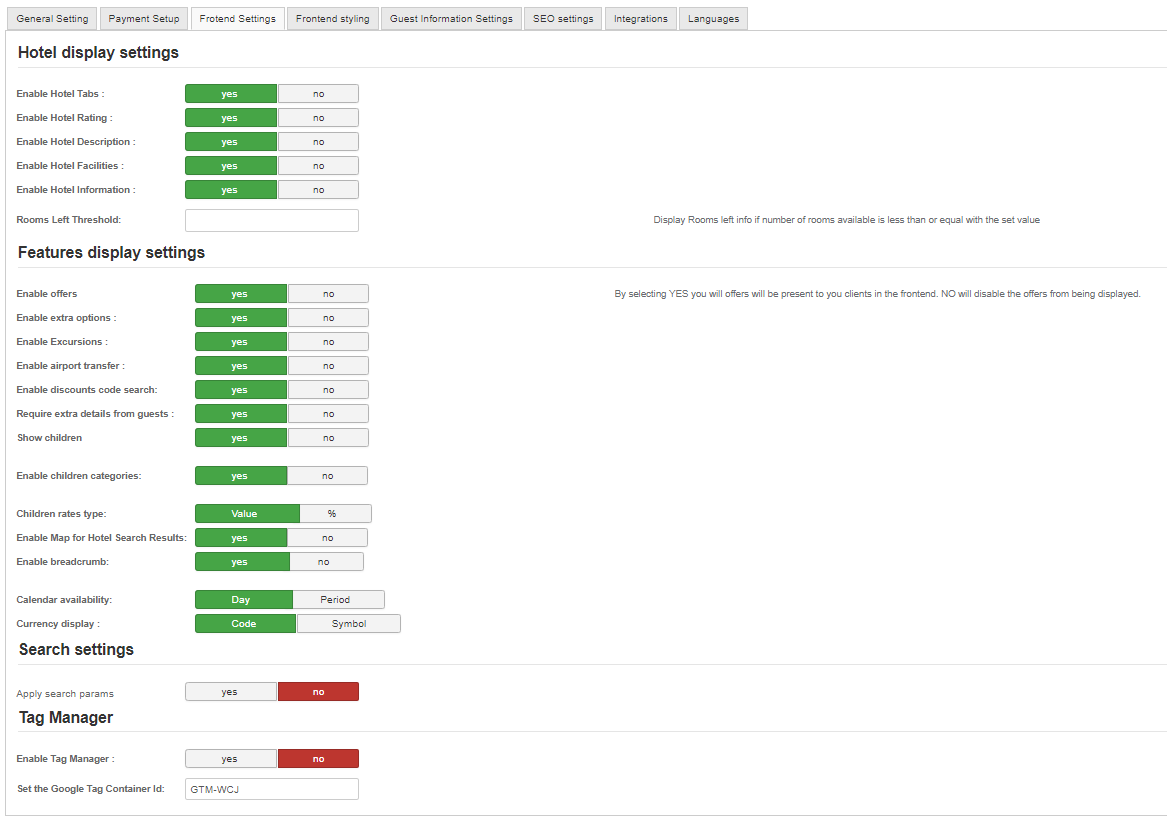
Frontend Settings Tab
Front End Setup:
This section will allow you to dictate how the reservation process will look. For example you can disable the extra options or set how the hotel page will look. We’ll explain in detail what each option stands for.
Enable Hotel Tabs: You can simplify your hotel view by disabling the information tabs that are available on the Hotel’s page: Overview, Map, Gallery and Facilities.
Enable Hotel Rating: You have the option to enable ratings information to be displayed in the frontend reservation process, specifically on the hotel’s detail page.
Enable Hotel Description: By setting this option to Yes you will enable the hotel description to be displayed in the frontend on the hotel’s page.
Enable Hotel Facilities: By setting this option to Yes you will enable the hotel facilities to be displayed in the frontend on the hotel’s detail page.
Enable Hotel Information: By setting this option to Yes you will enable the hotel information to be displayed in the frontend on the hotel’s detail page.
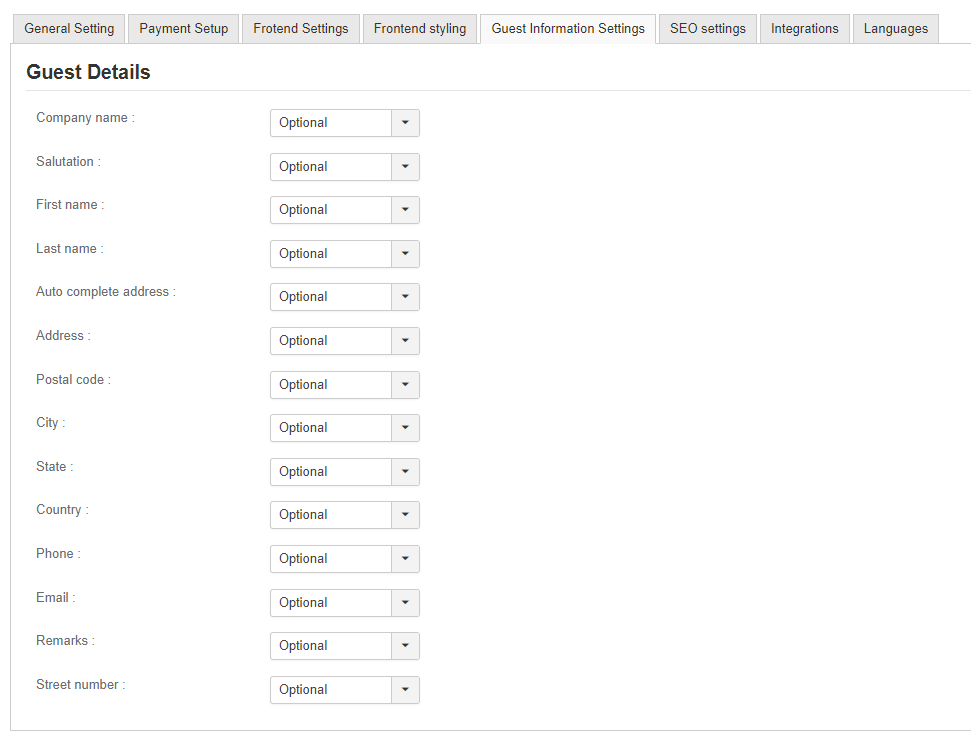
Require extra details from guests: You have the option to require extra information from your clients. The requested fields are First Name, Last Name and Passport ID. These fields will be displayed in the Front End on the Guest Details page.
Enable Extra Options: You can enable/disable extra options from being showed to your customers. This setting will apply to all hotels. If you want to have Extra Options disabled for only some of the enabled hotels please refer to the Manage Extra Options section on how to set Extra Options.
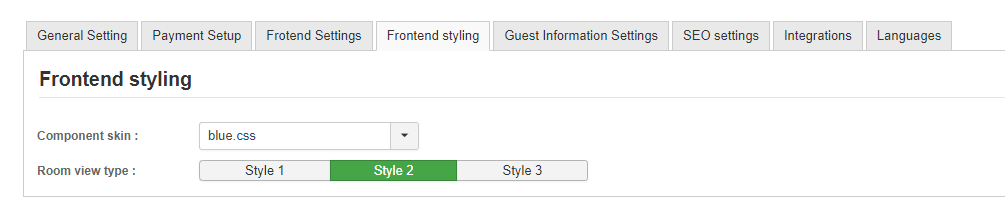
Module style: You can choose how the module will look like in the frontend. Currently there are 5 styles to choose from.
Component style: You can choose how your module will look like in the frontend. Currently there are 5 styles to choose from.
Payment Processors (Not available in the starter version)
A payment processor will allow you to collect reservation costs from your customer ahead of their reservation start. You can collect the full amount or a percent. This can be set from hotel’s Extra Info tab. Please refer to the Manage Hotels for more information.
- Below you will find the available payment processors for the reservation software.
- PayPal
- Wire Transfer
- Authorize.net
- Offline Credit Card
- Ideal
- Omnikassa
- BKT
- JCC
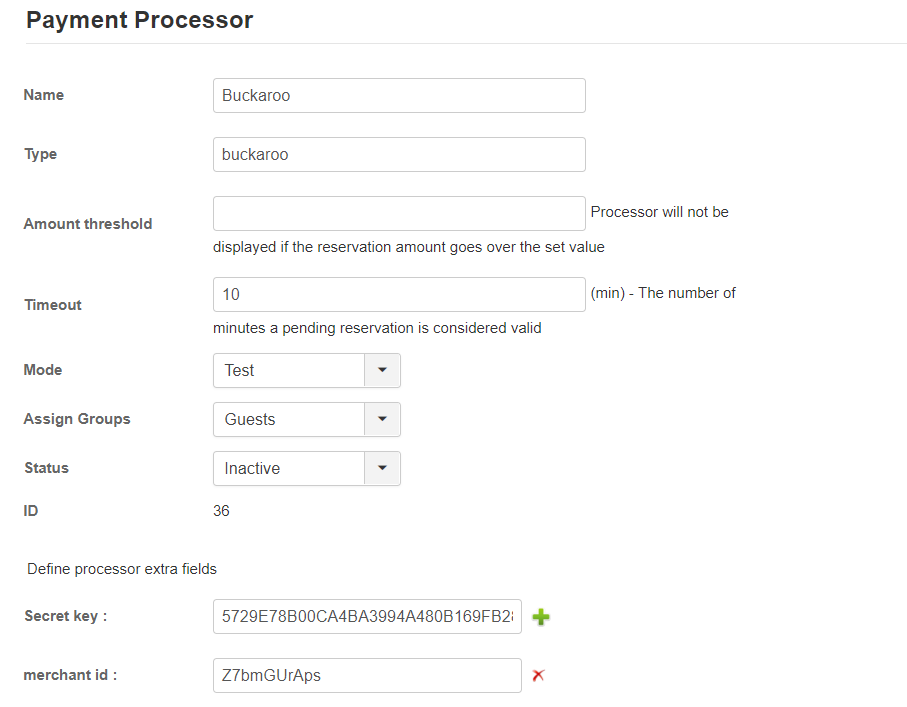
- Buckaroo
There are more processors on the way. Any other payment processor can be implemented on demand. Please contact us info@cmsjunkie.com to obtain a quote.
Defining a processor
The above mentioned processors come with predefined fields and extra fields. The information below is intended for a better understanding of the payment processor setup.
- To activate a payment processor for your lodging facility you’ll have to define the following:
- Name – the name of the processor to be displayed in the front end. Can be set at your choice
- Type – the type of the processor. This value has to remain as defined by default or by a developer developing a new payment processor
- Mode – set mode to Live for the production mode and Test for the test mode
- Timeout (minutes) – the number of minutes to wait for a pending transaction. After the time minutes a pending reservation will be deleted by the reservation process.
- Status – set active to enable the processor or Inactive to disable the processor. Active processors will be available for selection in the reservation process.
Processor Extra Fields
The extra fields’ functionality is built to define additional information you might need for your Processor. This is different from processor to processor and could be anything from an API login to an email address.
- To define an extra field, click on the plus icon. You’ll be presented with two inputs:
- Fields Name: the name of the added Field. As a best practice if your field has multiple keywords it is best to join them with an underscore. Ex: api_login; Also you can add a language tag in the language file to have the added fields translated in the language you want. For example for the api_login field you’ll add a new language tag in the language file: LNG_API_LOGIN
- Field Value: the value of the added Field
Note
FOR DEVELOPERS: To integrate a new payment gateway please refer to the Implementing a new Payment Gateway section.
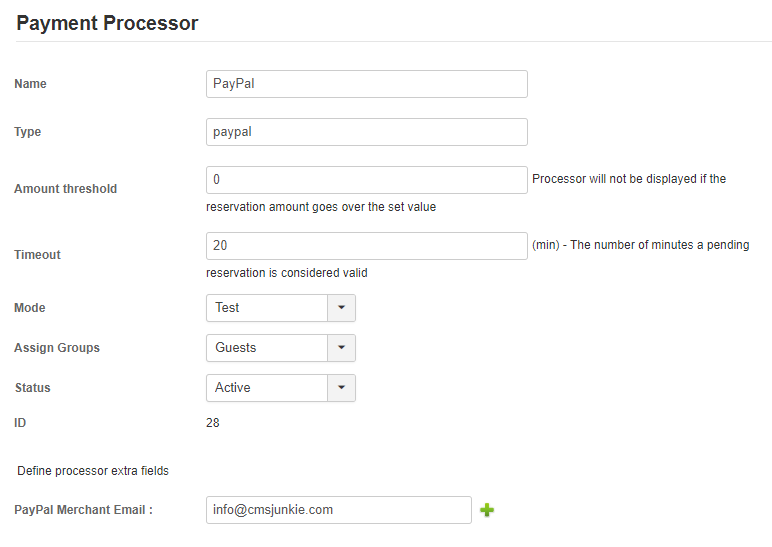
PayPal
The PayPal Processor is built on PayPal Standard and can be used from any country where PayPal is available. All you need is a Premier or Business account to start accepting payments.
- To activate the PayPal processor for your lodging facility you’ll have to define the following:
- Name – the name of the processor to be displayed in the front end. Can be set at your choice
- Type – the type of the processor. Currently set to paypal–please do not change this value.
- Mode – set Mode to Live for the production mode and Test for the test mode
- Timeout (minutes) – the number of minutes to wait for a pending PayPal transaction. After the time minutes a pending PayPal reservation will be deleted by the reservation process.
- Status – set active to enable the processor or Inactive to disable the processor.
As extra field define the PayPal Merchant Email to the email connected with your PayPal account. All payments will go in the account associated with this email.
Wire Transfer
The Wire Transfer processor will help you collect payments from your clients by the means of wire transfers.
- This is how it works:
- The hotel admin sets the required bank account information in the Wire Transfer processor(Explained below)
- Upon reservation completion the hotel sends via email (in the reservation email) the complete bank account information where the client can wire transfer the money.
- The client goes to the bank and transfers the money into the hotel’s account based on the data received.
- Once the transfer has been made the hotel confirms the payment and approves the reservation.
- To activate the Wire Transfer processor for your lodging facility you’ll have to define the following:
- Name – the name of the processor to be displayed in the front end. Can be set at your choice
- Type – the type of the processor. Currently set to wiretransfer–please do not change this value.
- Mode – set Mode to Live for the production mode and Test for the test mode
- Timeout (minutes) – the number of minutes to wait for a pending PayPal transaction. After the time minutes a pending PayPal reservation will be deleted by the reservation process.
- Status – set active to enable the processor or Inactive to disable the processor.
Extra Fields
Extra Fields are subject to your needs and can be adjusted as needed. The wire transfer processor comes with the following fields predefined:
- Bank Name – the name of the bank you want you want your clients to transfer the money.
- Bank Address – the address of the bank.
- Bank City – the city where the bank is located.
- Bank Country – the country where the bank is located.
- Bank Account Holder Name – the name of the account holder
- Bank Account Number – the number of the bank account.
- Swift Code – the bank swift code. All the banks have one.
- IBAN – the IBAN code.
All of these fields are included automatically into the reservation email sent out to the client. Should you add or modify any field(s) the modification will be included in the reservation email. All the fields should have a translation.
Adding an extra fields
You can add any extra fields at your liking. When adding a new field that includes multiple words use underscore to connect the words for the Field Name. For example “bank name” should be entered as “bank_name”. The Field Name will be used to compose a label, for example bank_name will have the label LNG_BANK_NAME. This label is used for translation purposes and will be displayed in the wiretransfer details. You can then define this label in your language files. Please refer to chapter 5 of the user manual.
Offline credit card processor
To setup the offline credit card processor simply create a new processor and set the type field with the value: offlinecreditcard
The rest can be set to whatever you like. Please find below an explanation of the process.
- The client inputs the credit card details in the reservation process. The credit card is not charged. The client would be on a secured page. We recommend having a SSL certificate in place.
- The credit card details are stored in the database for later processing.
- In the backend, when editing a reservation(Manage Reservations), the hotel admin will be able to see the credit card details so that he/she can process them.
- After processing them the admin will be able to secretize the credit card details.This means that the credit card number will be transformed into something like this xxxx-xxxx-xxxx-1234, leaving only the last 4 digits available.This reduces the security risk involved in storing the credit card details.
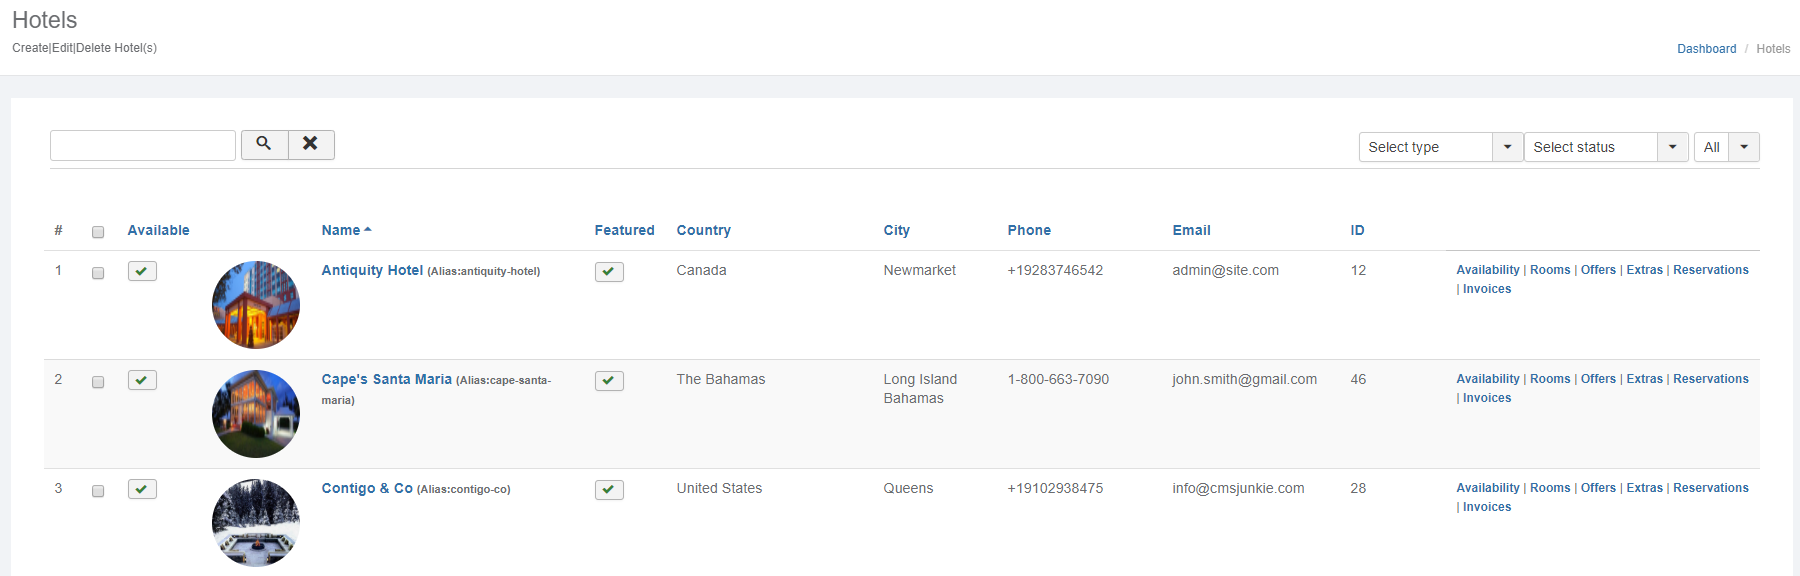
Manage Hotels
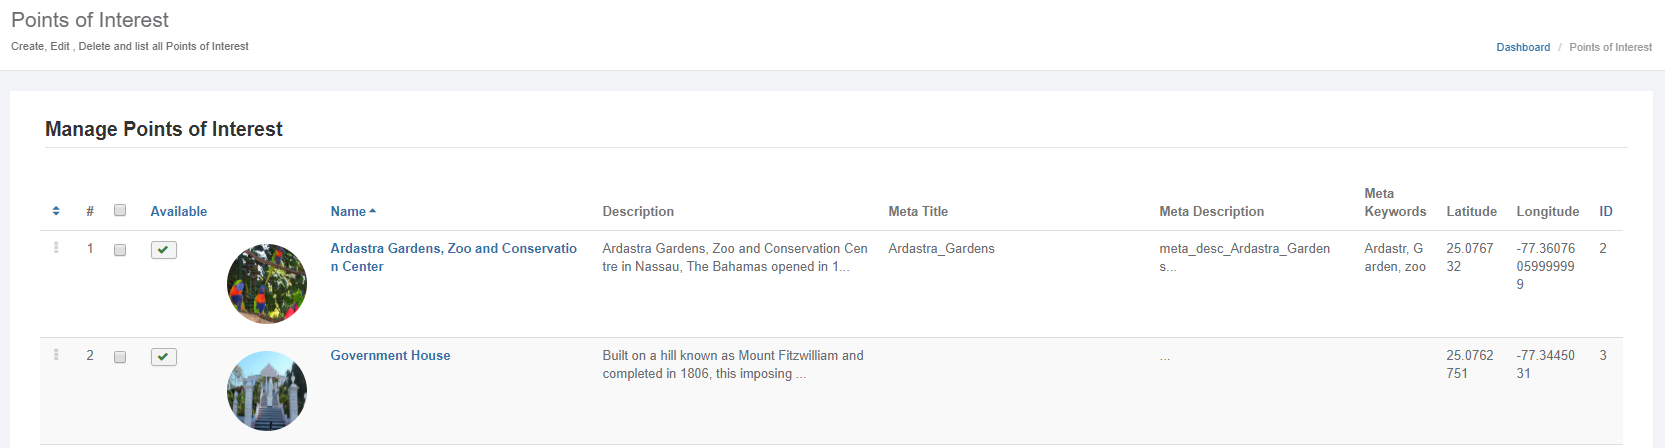
The Manage Hotels section allows you to define a list of hotels to be displayed to your clients. From this list the customer can choose a hotel of their linking.
With the single version of the hotel you can have one hotel only whereas with the multiple version you can have as many hotels as you like.
You can create new, edit, delete an existing hotel. Once you have created a new hotel it will be displayed in the list below. You also have the possibility to search a hotel by name, country or city by using the search input located at top left. You can also filter hotels based on type, status with the available select boxes at the top right.
The Manage Hotels section will display a list of all the created hotels. In the list below you’ll be able to set whether a hotel is available or not, delete, edit or visit the hotels website if one is available. Also you can edit directly the Availability, Rooms, Offers, Extras and Reservations for a specific hotel.

Add/Edit Hotel
To edit a hotel simply click on the hotel’s name or select the hotel and click the upper right Edit button.
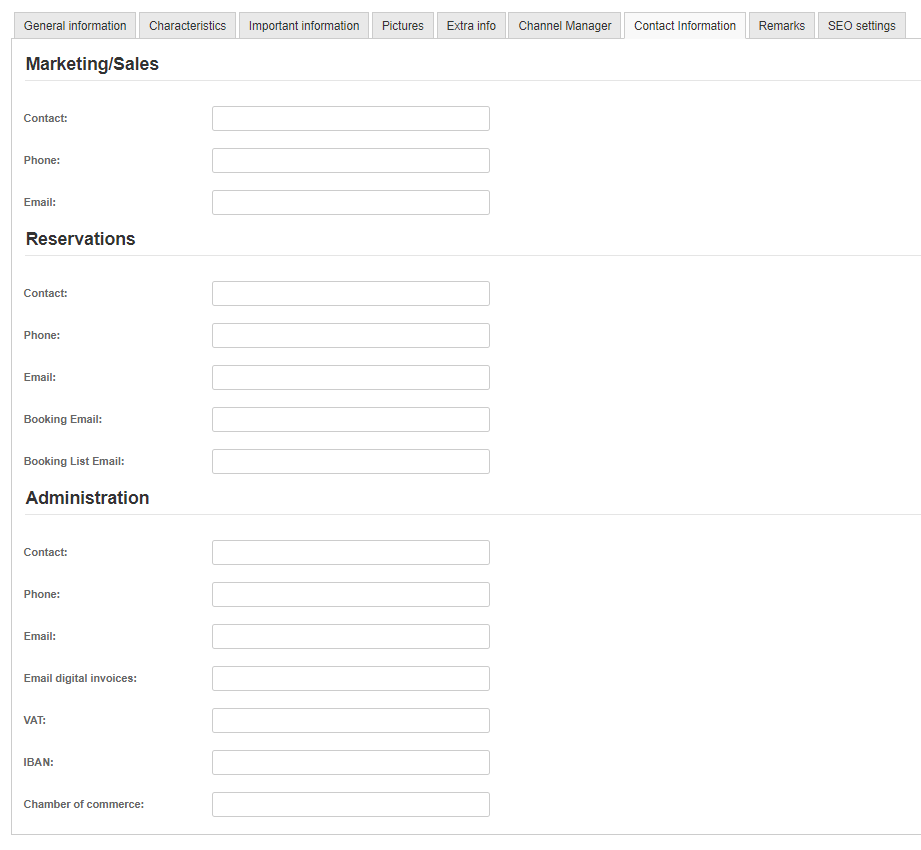
Each hotel has a set of properties divided in five tabs: General Information, Characteristics, Important Information Pictures, Extra Info, Contact Information and Channel Manager. We’ll go through each tab and explain what properties it holds.
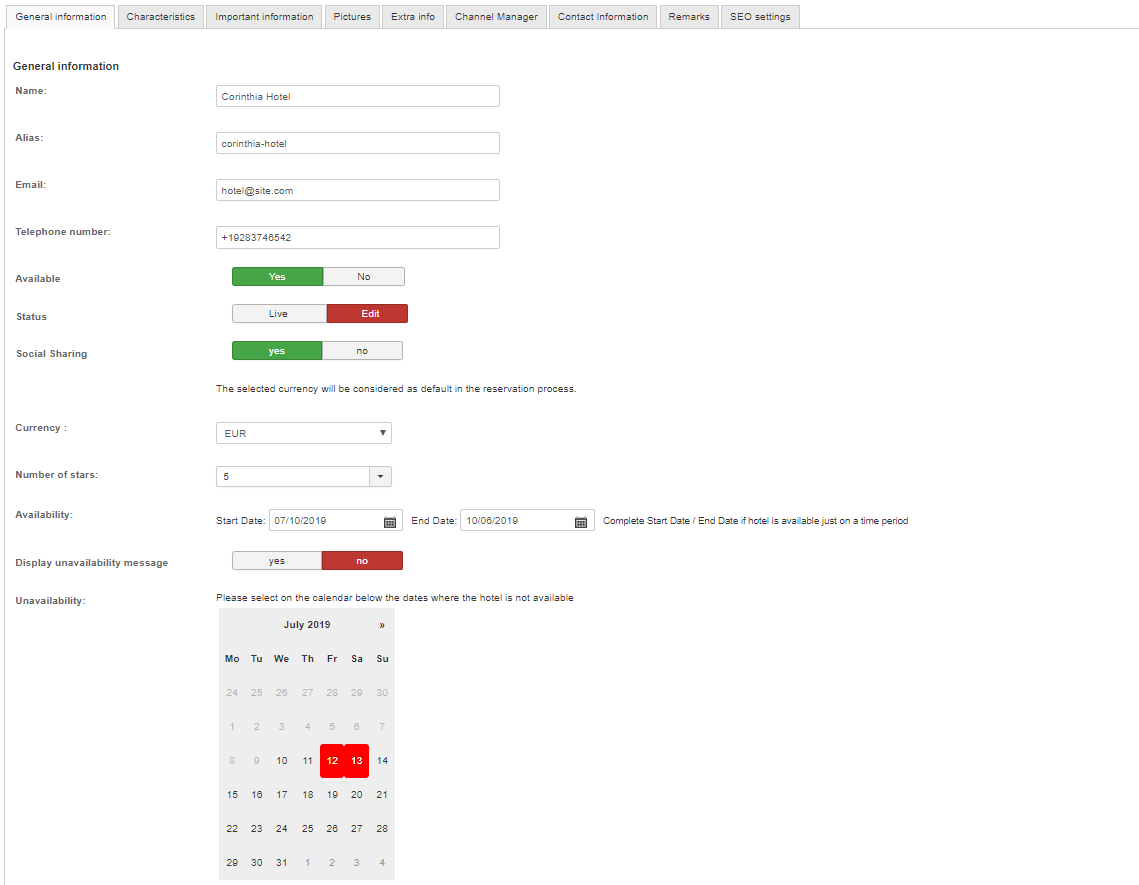
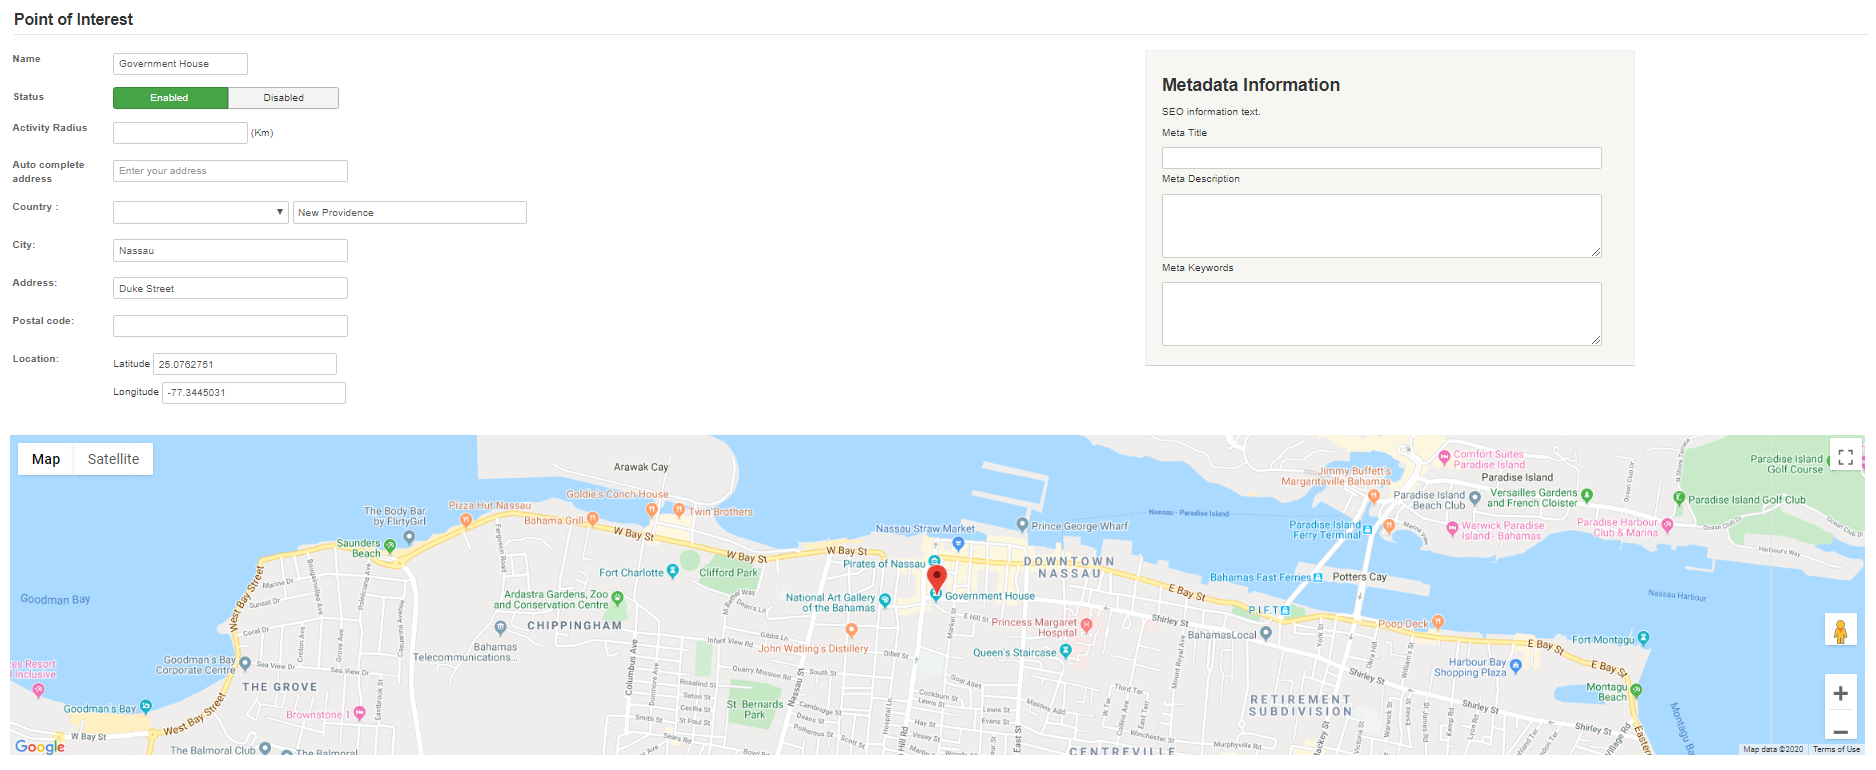
General information
Name: Name of the hotel
Email: The email of the hotel administrator. Email notifications will be sent to this address.
Telephone Number: the telephone number of the hotel.
Currency: the type of currency used in the reservation. All the prices for this hotel will use this currency; reservations will be displayed and made using this currency. Currency can be added by using the available Manage Currency option.
Number of Stars: if the hotel has a number of stars you can define that here.
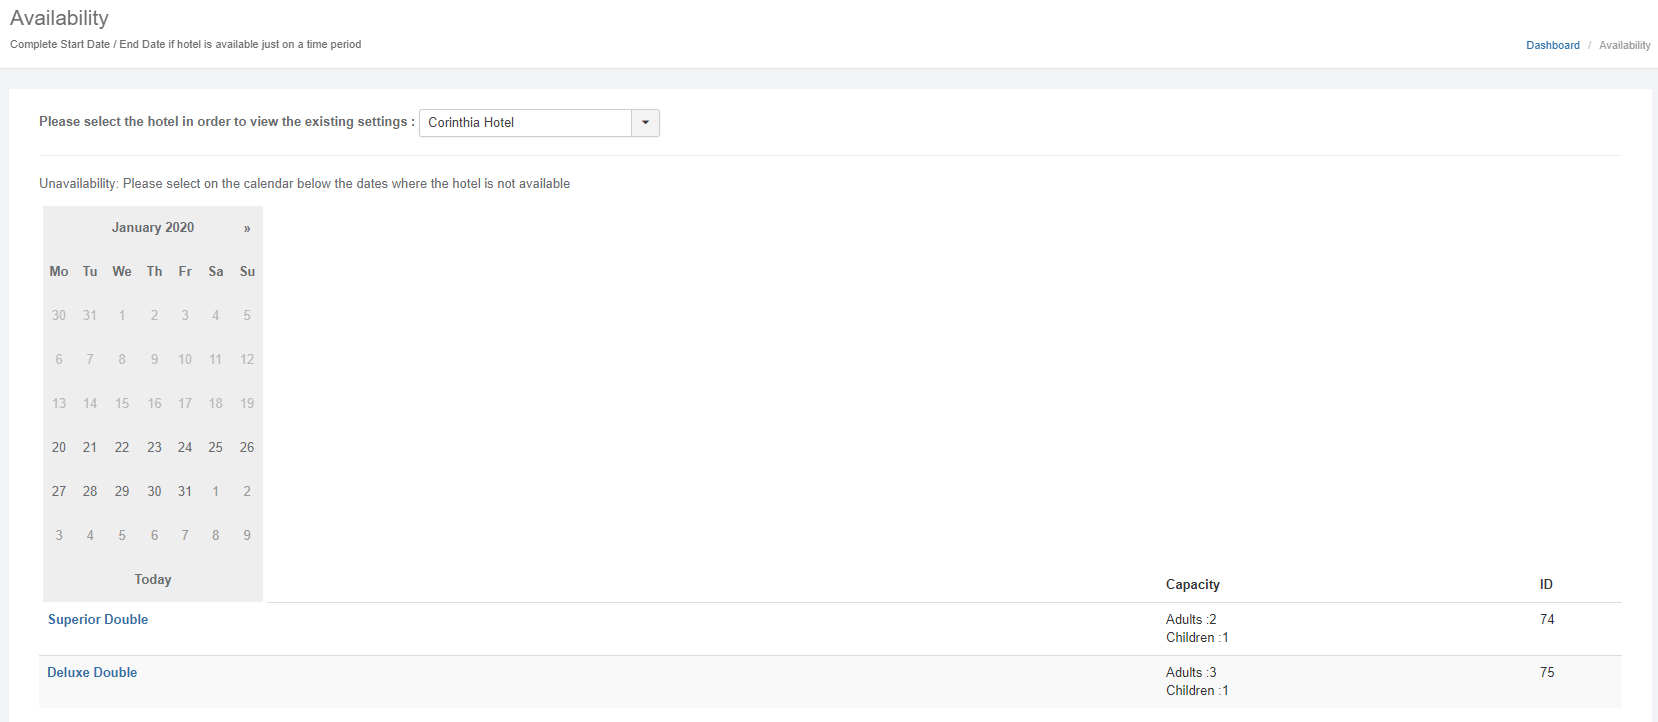
Availability: the hotel availability from a start date up until an end date. If you don’t want to set an end date leave the field blank.
Unavailability: You can also define days or periods when the hotel is not available with this functionality. Simply click on the available calendar. A not available day will be marked with red.
Description: the description of the hotel
Selling points: information in regards to selling point. This will be displayed in the list of available hotels.
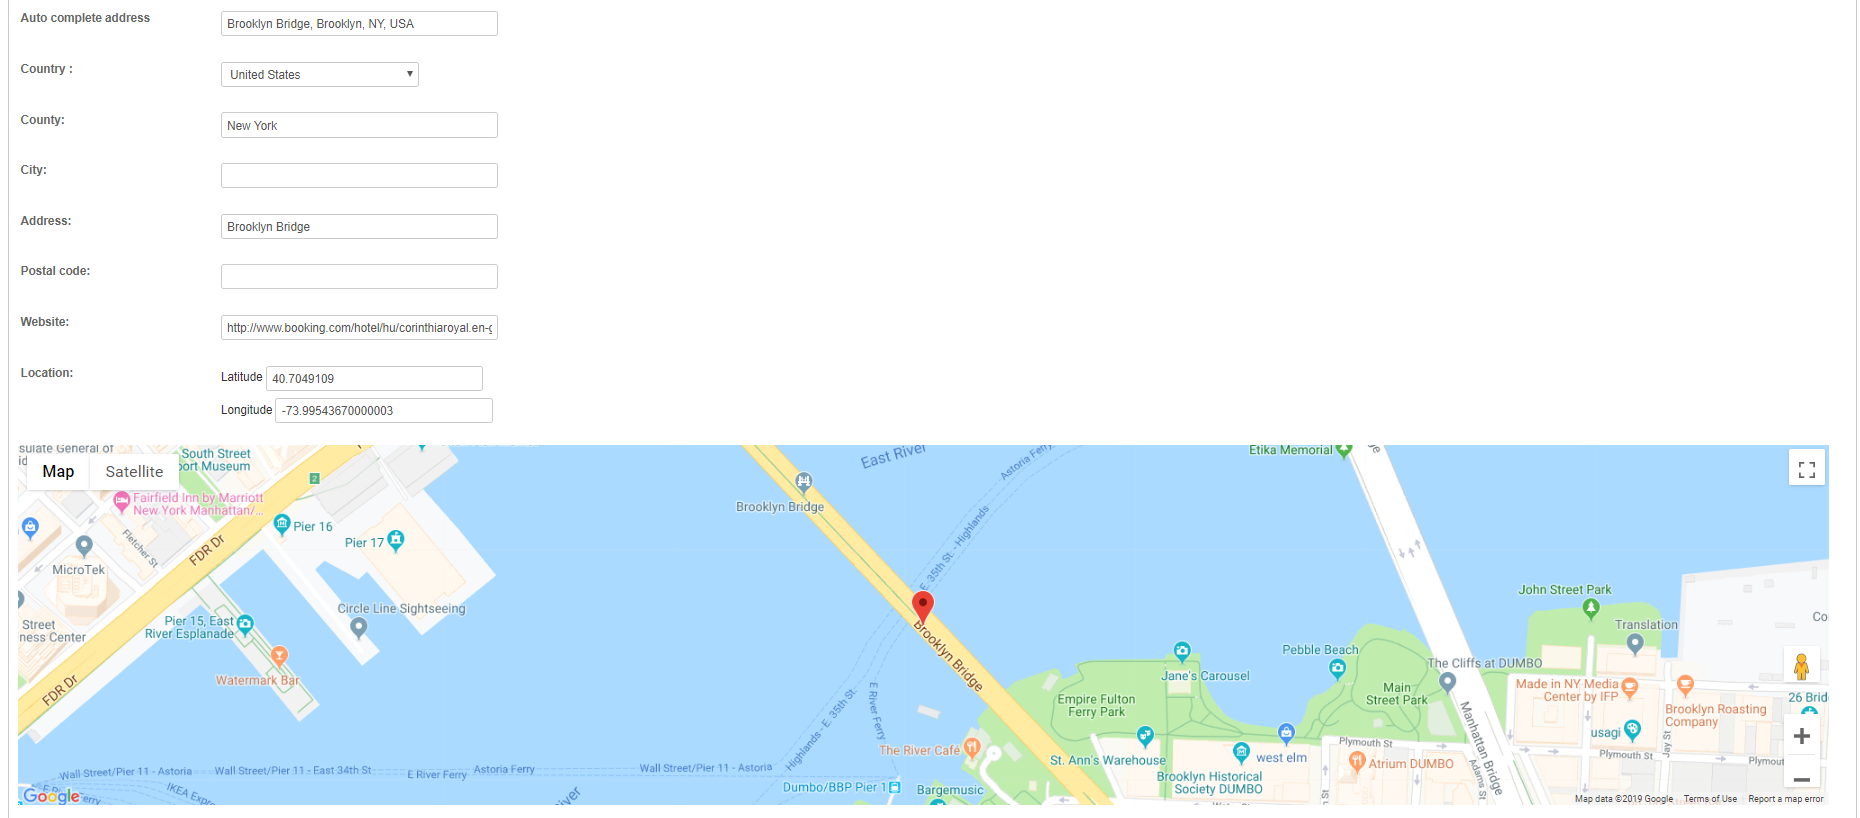
Country: the hotel country
Auto complete address: you can simply type in the hotel address and the address related fields will be populated.
City: the hotel city
Address: the hotel address
Postal Code: the hotel postal code
Website: hotel website address ( if one is available)
- Location: you can define the latitude and longitude of the hotel location. This will depict the hotel on the map presented in the frontend when viewing a hotel. These coordinates are automatically filled in when you use the Auto complete address. If for some reason that fails you can get the location of your hotel please follow these steps:
- Go to maps.google.com
- Input the hotel address
- Right click on the location. You’ll be presented with a menu. Select the What’s here? Option.
- On the map you’ll have a green marker showing up. Click on that and you’ll have your coordinates. First is the latitude and second is the longitude.
- Copy the coordinates in the location inputs.
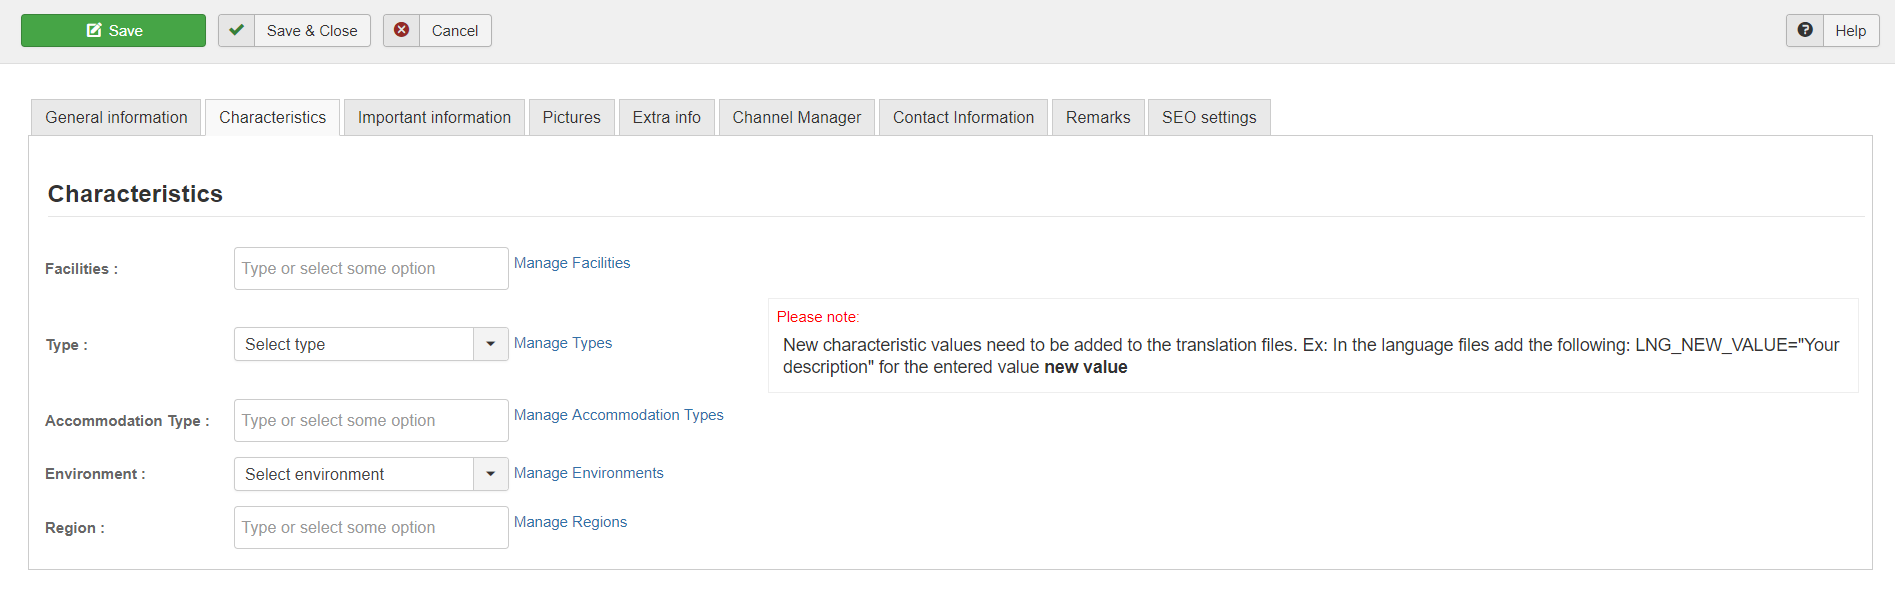
Characteristics
For your hotel you can define the key characteristics it holds. Key properties like:
Facilities: represents the facilities your hotel is offering
Type: the type of the hotel, Ex: Apartment, Bed, Cottage etc.
Accommodation Type: the type of accommodation you are offering. Ex: Apartment, Bed, Cottage etc.
Environment: the environment the hotel is built in. Ex: Sea Side, Forest, Mountain, etc.
Region: the region the hotel is situated in. This usually depicts the name of the region. You can name a state, a province or a country.
To assign a value to the above described properties simply select a value from the drop down. It will automatically be added to the list below the drop down. If can’t find the value or you want to delete some of the existing values press the Manage option associated with each property. A popup will be presented.
You can manage the options as you wish. You can delete, modify or add new options.
These characteristics will be displayed in the hotel details in the front end and also will be used as search criteria in the front end filter.
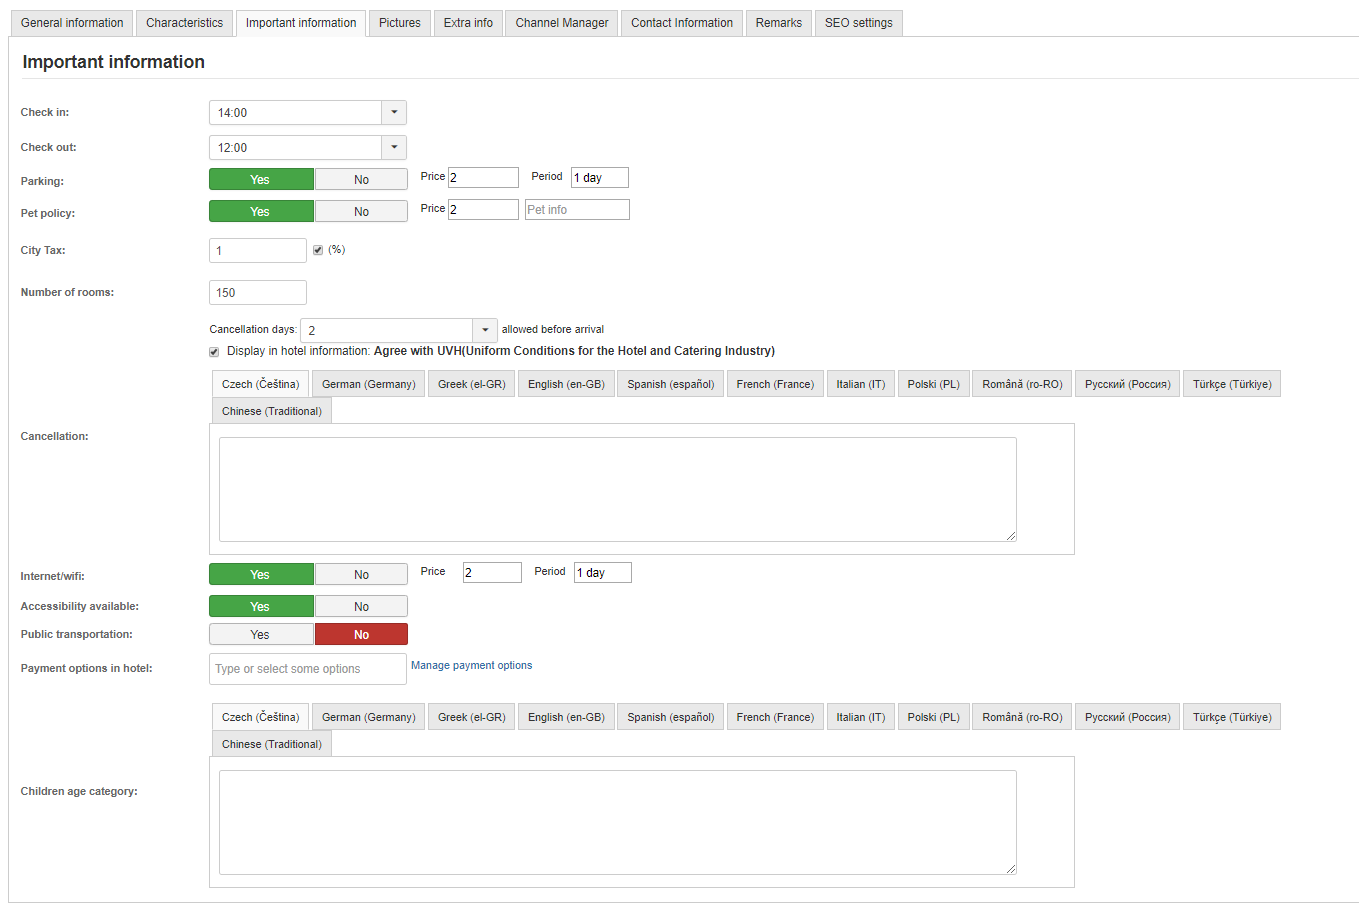
Important Information
In this section you’ll be able to define key information for the hotel like:
Checked in: the check in start hour. Starting this hour your clients can begin the check-in process.
Checked out: the checkout end hour. Ending this hour your clients can check-out.
Parking: if the hotel offers parking you can set that here. If you’re charging for it you can set a price in the Price input. The price is for the client’s information only; it will not be added to the reservation cost. This price will be charged on site.
Allow pets: if the hotel allows pets you can set that here. If you’re charging for it you can set a price in the Price input. The price is for the client’s information only; it will not be added to the reservation cost. This price will be charged on site.
City Tax: You can set the price for the city tax here. The price is for the client’s information only; it will not be added to the reservation cost. This price will be charged on site.
Number of rooms: the number of rooms available in the hotel.
Cancelation Days: You can offer information in regards to your cancellation policy. You can set a number of cancellation days that will be displayed to the client in the cancelation description. In the description field you can enter the Cancellation description.
Internet/Wi-Fi: if the hotel offers internet/Wi-Fi you can set that here. If you’re charging for it you can set a price in the Price input. The price is for the client’s information only; it will not be added to the reservation cost. This price will be charged on site.
Suitable for Disabled/Modified Room: set this option to yes if your hotel can accommodate persons with disabilities.
Public Transportation: if you’re hotel has access to public transportation you can set that here.
Payment Options in Hotel: you can select the available methods of payment in hotel. Payment options can be managed in the same way described for the options in the characteristics tab.
Children age category: this will serve as information in regards to children age categories and different benefits for each category. This is for informative purposes only.
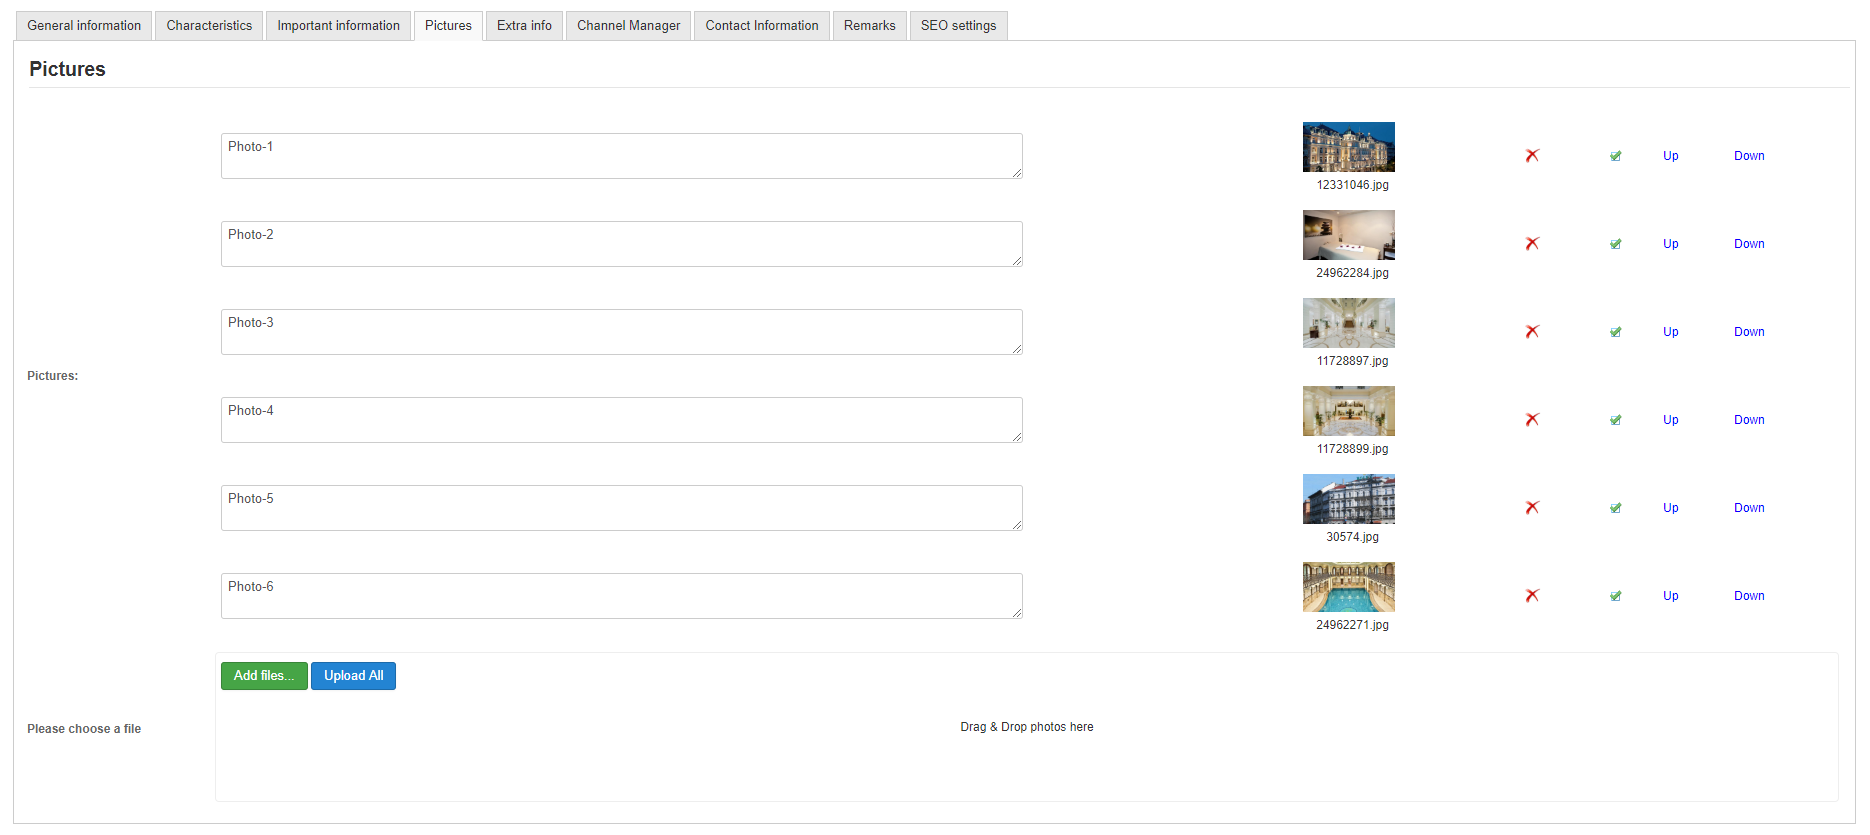
Pictures
This section allows you to upload pictures for the hotel. To upload a picture simply click the browse button located at the bottom of the page. Choose the desired file using the popup browser provided. For each image you can enter a description. You can also define the order of the displayed images by using the Up and Down options.
Don’t forget to save to apply the changes.
Extra Info
On the extra info tab you can set the following information:
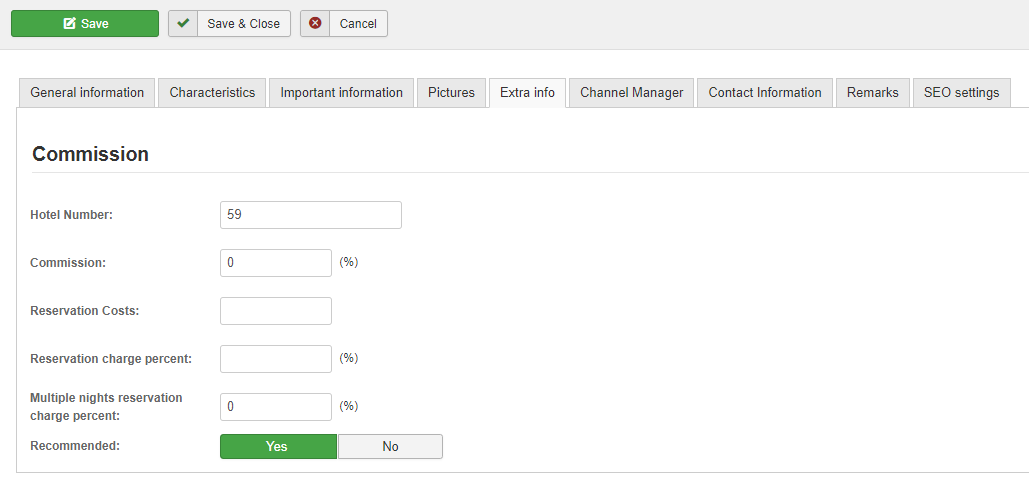
Hotel number: the hotel number. This is being used when displayed on the map.
Commission: represents the commission charged per reservation and is currently set in percentage. This commission is paid by your customers as an initial tax.
Reservation Costs: represents the reservation cost. Customers will pay this cost.
Reservation Charge Percent: represents how much will the customer pay from the reservation total. The value can be set from 0% to 100%.
Recommended: you have the option to recommend a hotel to your customers by setting Recommend to yes. A small banner will be displayed in the frontend when viewing the hotel.
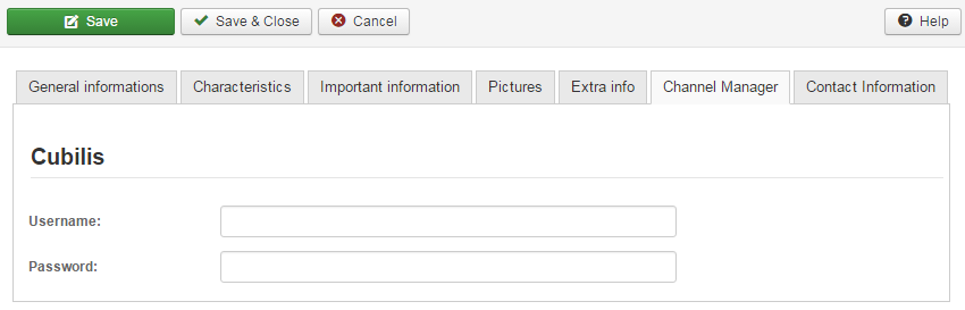
Channel Managers - Available for JHotelPortal or on demand
- In this section you can define the connection details with the available channel managers. Currently implemented channel managers are:
Cubilis
For Cubilis you will have to define login information: a username and password.
A channel manager allows you to connect with other hotel portals like booking.com, agoda.com, hotels.com and others to synchronize availability between your portal and other portals. Subscription with Cubilis is required.
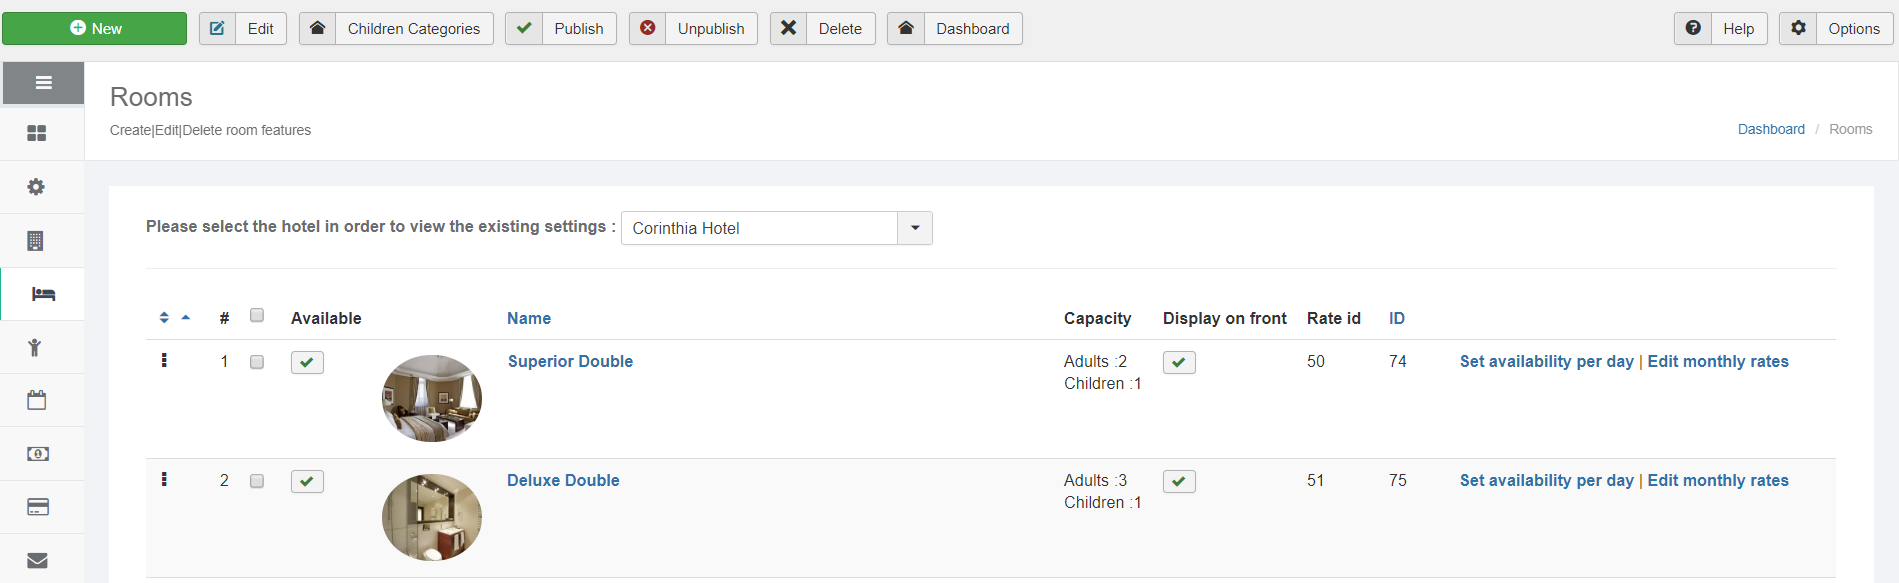
Manage Rooms
This feature will allow you to define the room types that are available within your lodging facility, as well the number of rooms per room type. Further you can also specify whether a room type is available or not.
Clicking the Manage Rooms will display a list of existing hotel. After you choose the hotel the list of available rooms will be displayed. For each hotel you can define a list of different rooms.
You can add a new room by pressing the new button located at the top corner or edit a room type by clicking on the room type name.
With the Available option you can specify whether a room is available or not. One click will enable/disable a room from being taken in consideration when the search is done.
With the Display on Front option you can specify whether to display a room type on front or not. This can be useful when creating offers for a specific room and you don’t want that room to be displayed in front end for booking.
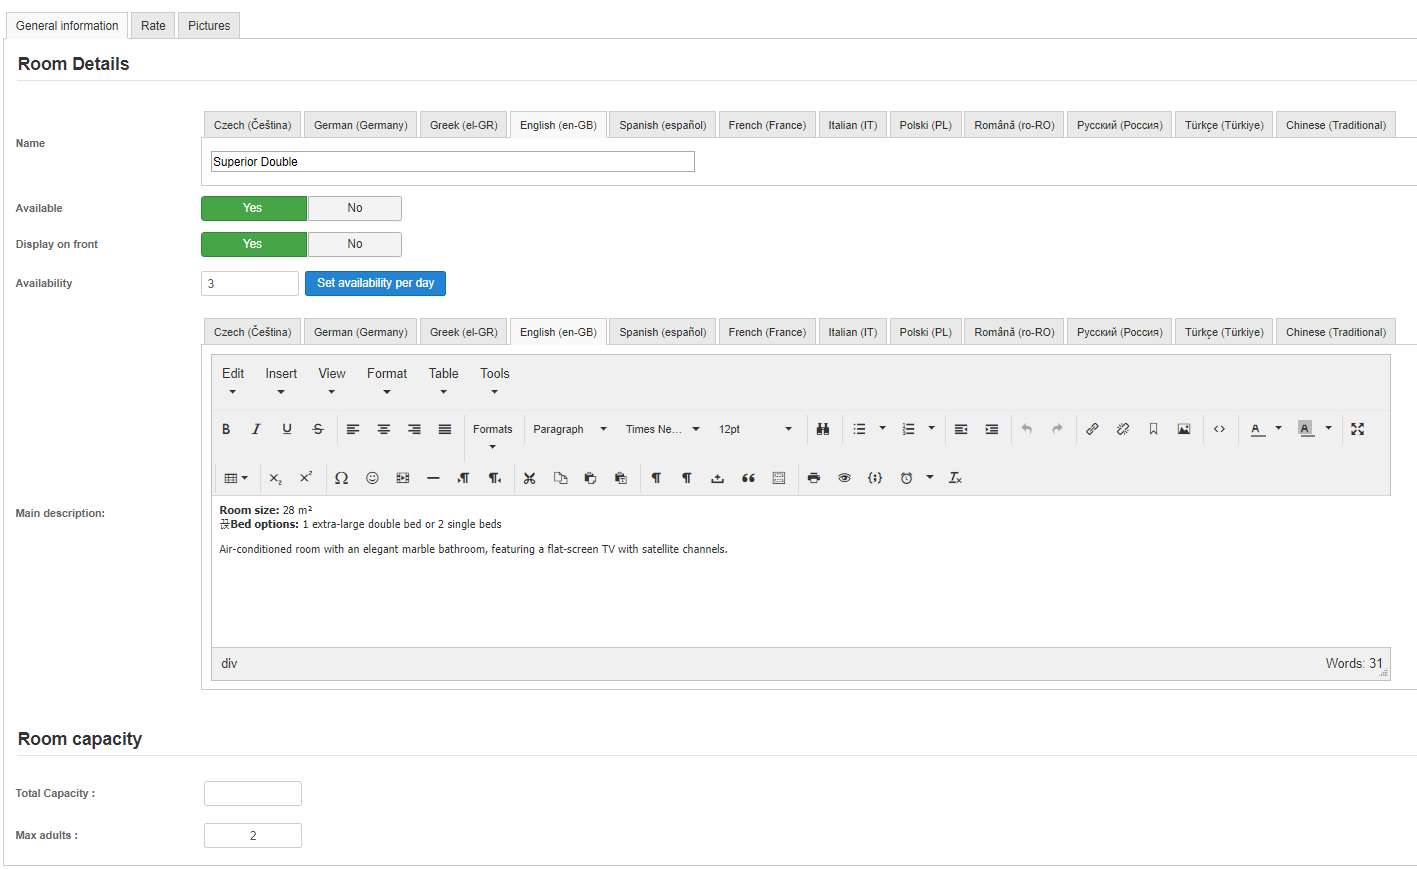
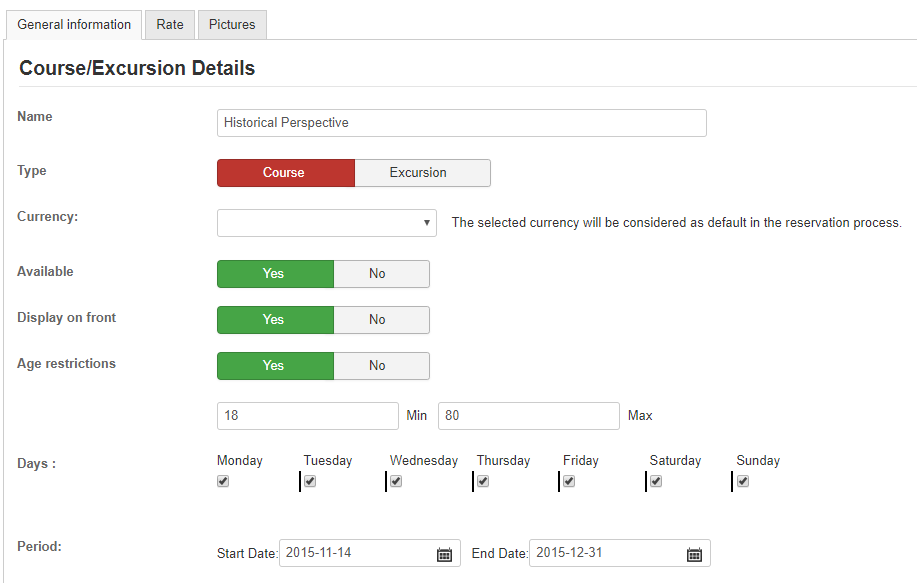
When editing/adding a room the user will be presented with the screen below.
Each room type is divided in 3 tabs: General information, Rate and Pictures. We’ll go through each tab and explain what it does.
General information tab
You can define properties of the room like:
Name: the name of the room.
Available: You can define whether the room is available or not
Display on front: you can define whether to display the room in the front end reservation process. This can be useful when creating offers for a specific room and you don’t want that room to be displayed in front end for booking.
Main Description: main description of the room. This can be currently set in all the available reservation languages. To add a language, please refer to Manage Languages section.
Details: Room details are displayed in the front end when viewing more details about the room.
Room Capacity: The maximum capacity of the room.
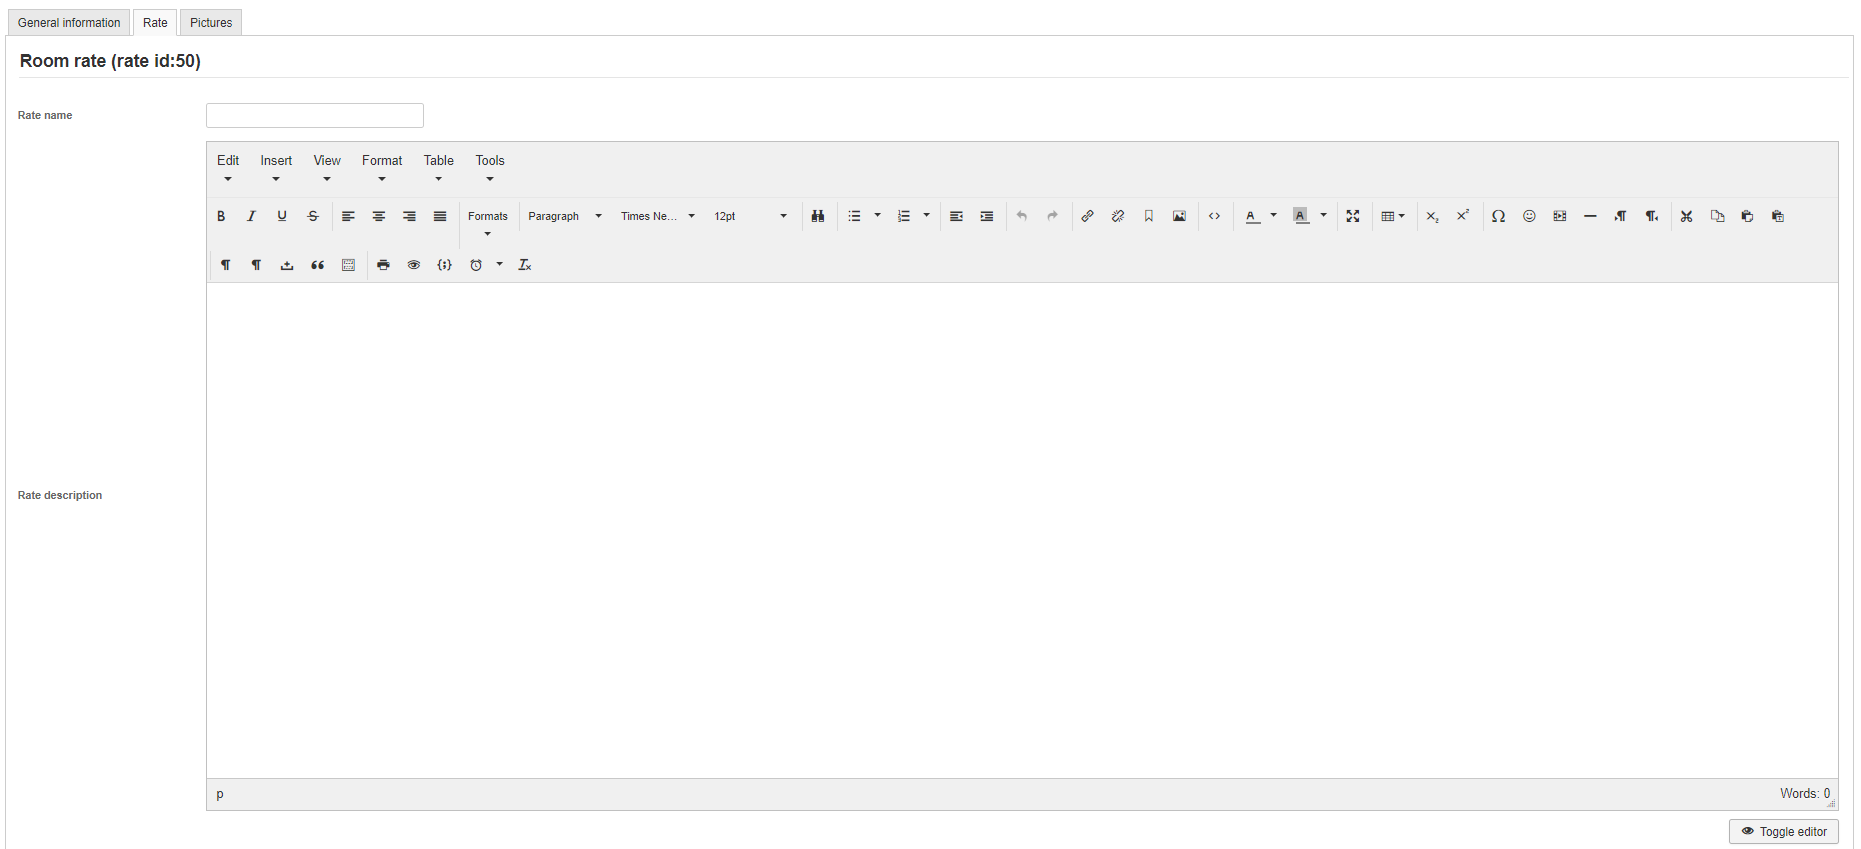
Rate Tab
The rate tab allows you to define the rates for a room. You can start by defining a Rate Name and a Rate description.
- Currently you are allowed to select between two types of prices
- Price per Person
With the price per person option you can set the amount you are going to charge for each person occupying a room. Associated with this option is the Single Supplementoption which allows to set an additional amount should there be only one person booking the room. This is useful in the situations when a single person is booking, let’s say, a four person room and you want to charge extra for that.
- Price per Room
With the price per room option you can set the amount you are going to charge for a room no matter how many persons occupy the room. Associated with this option is the Single Discountoption which allows to set a discount amount should there only one person booking the room. This is useful in the situations when a single person is booking, let’s say, a four person room and you want to provide a discount for that.
Further you can the Price for each day of the week.
Number of rooms: the number of rooms available for this room type.
Base adults (maxim n): The number of adults to occupy this room type. Maximum to the room capacity value.
Single Supplement: You can offer discounts in the case a room is occupied by a single person. The entered value will be subtracted from the room’s rate.
Extra Person Price: If the number of guests go over the Base Adults setting you can charge an extra price.
Min Days: The minimum number of days for this room type to be booked.
Max Days: The maximum number of days for this room type to be booked.
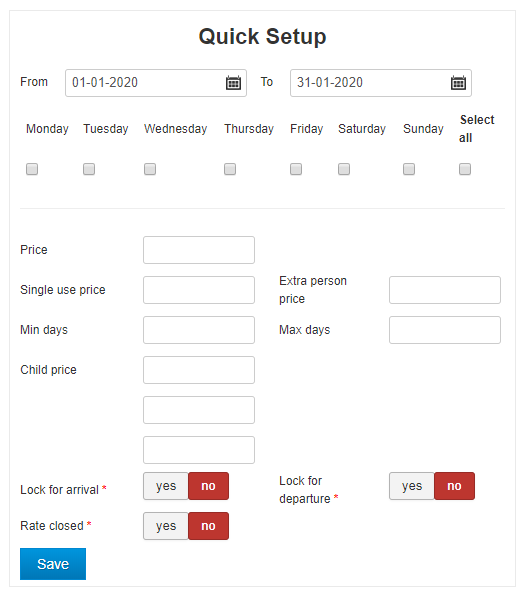
Important: Please note that if custom rates are defined the values set for Custom Rates will be applied. Use the Edit custom rates button at the top to define your rates.
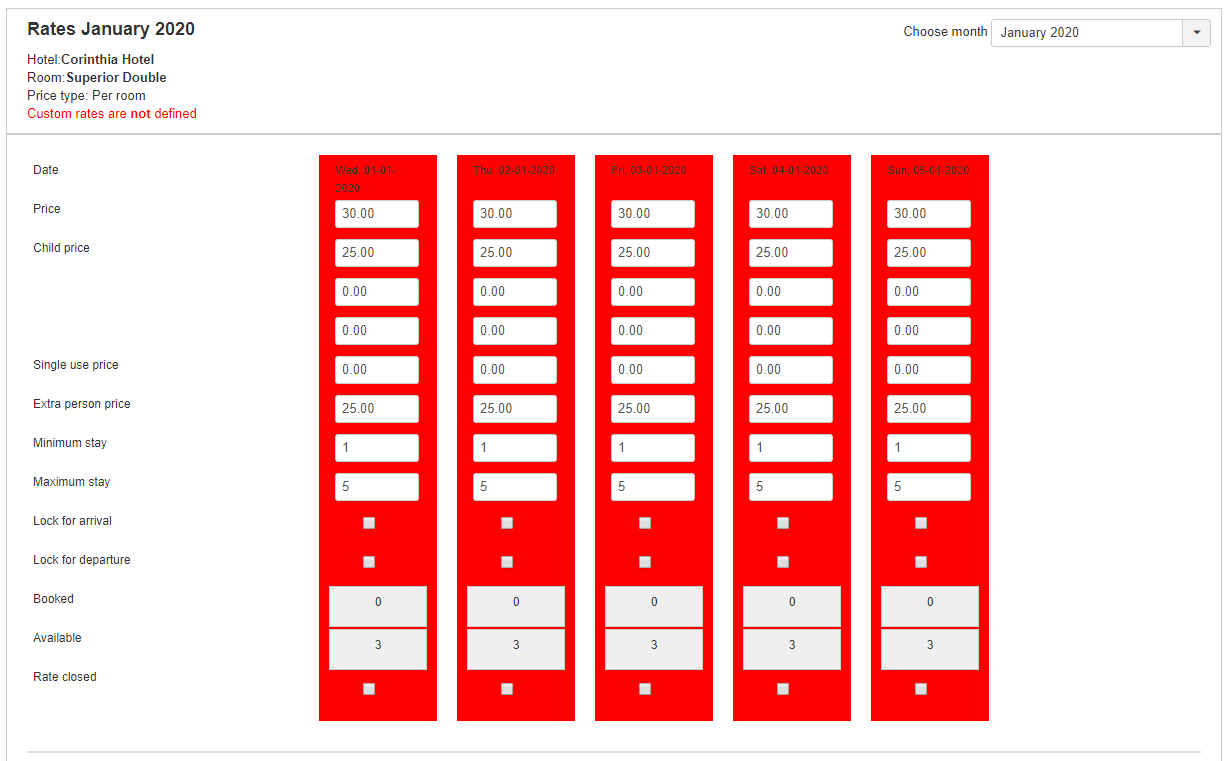
If you have rates that differ from one period to another please click on the Edit Custom Rates button located at the top. You’ll be presented with the screen below.
You have the possibility to define rates by day or select an interval to set with custom rates.
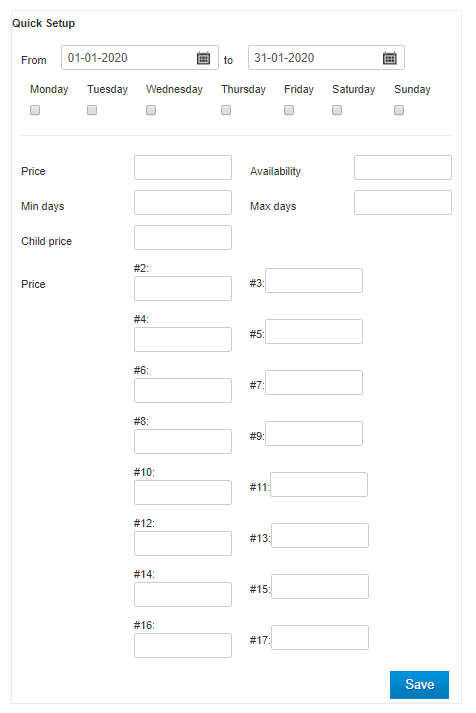
The Quick setup section will allow you to set prices for a certain period.
You can set the following fields:
Price: the room price for that night.
Availability: the number of guests occupying the room.
Single use price: price when used by a single person.
Extra person price: price for an extra person. Min days: The minimum number of days for this room type to be booked.
Max days: The maximum number of days for this room type to be booked.
Lock for arrival: locks a date for arrival meaning the room cannot be booked on that specific day.
Lock for departure: this feature is used mostly for offers to enforce a minimum of days to be booked.
Once you press the Save button the desired changes will apply. Make sure you select the from to period, the days for which the modifications should apply and enter the desired values to modify for that period. You can modify only one field if needed.
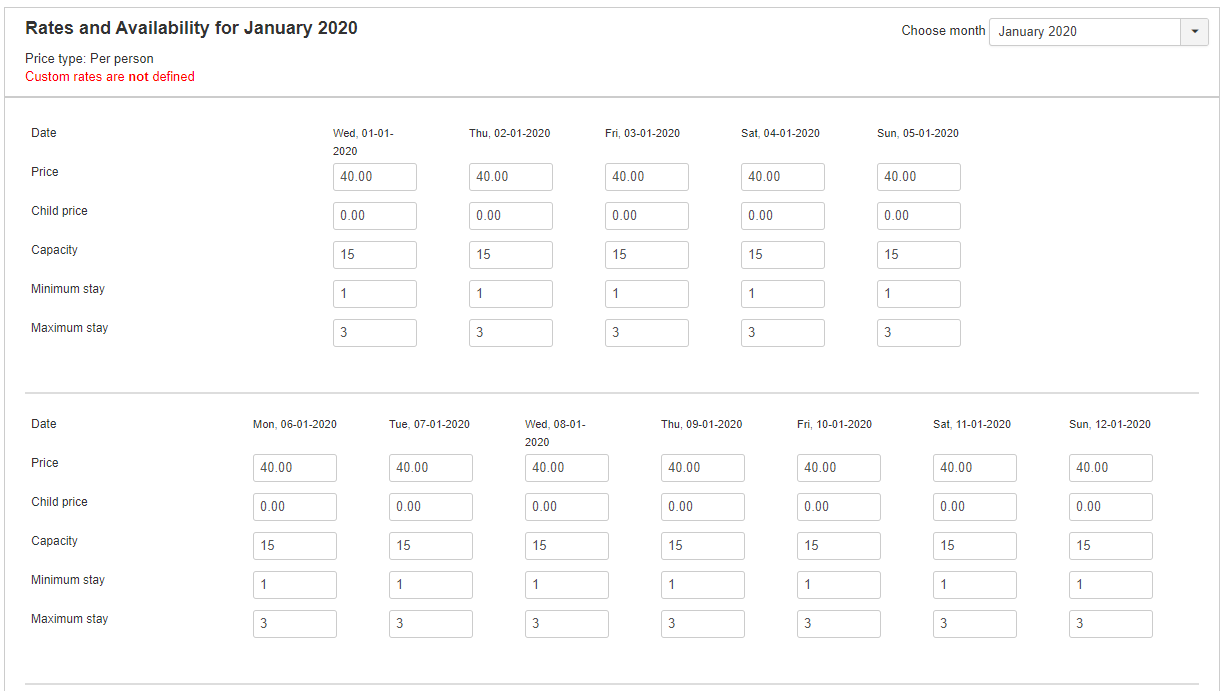
You can view your settings in the table presented below the Quick setup section. Please see below.
To change the month your viewing use the select located at the top right of the table.
Room pictures
This section allows you to upload pictures for the hotel. To upload a picture simply click the browse button located at the bottom of the page. Choose the desired file using the popup browser provided. For each image you can enter a description. You can also define the order of the displayed images by using the Up and Down options.
Don’t forget to save in order to apply the changes.
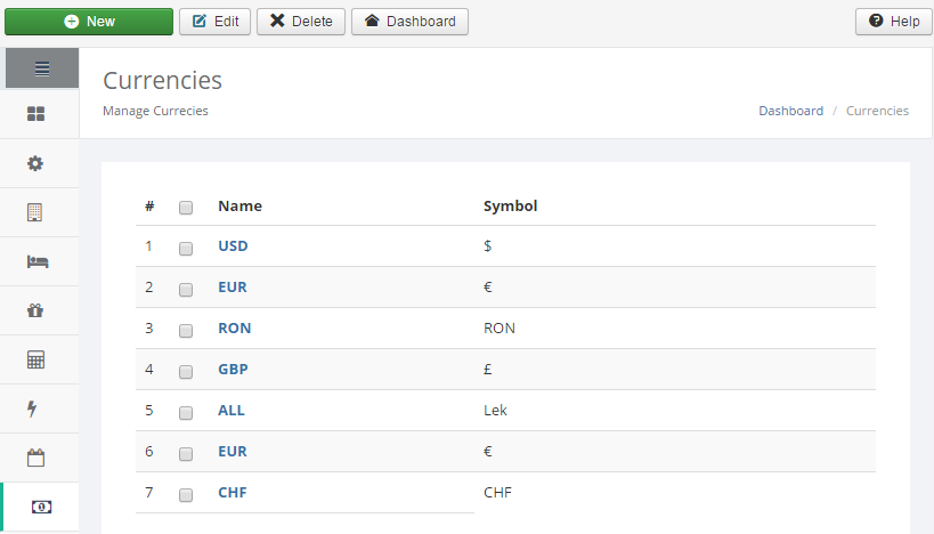
Currency Settings
This feature will allow you to define the currencies you are using in reservation process. A currency is set at hotel level. Please refer to the Manage Hotels section Clicking the Currency Settings option will display a list with all the currencies available
You can add a new currency by pressing the new button located at the top or edit a currency by clicking on the currency name.
Adding/Editing a currency will display the following:
Select the currency you wish to use in your hotel and click the save button located at the top.
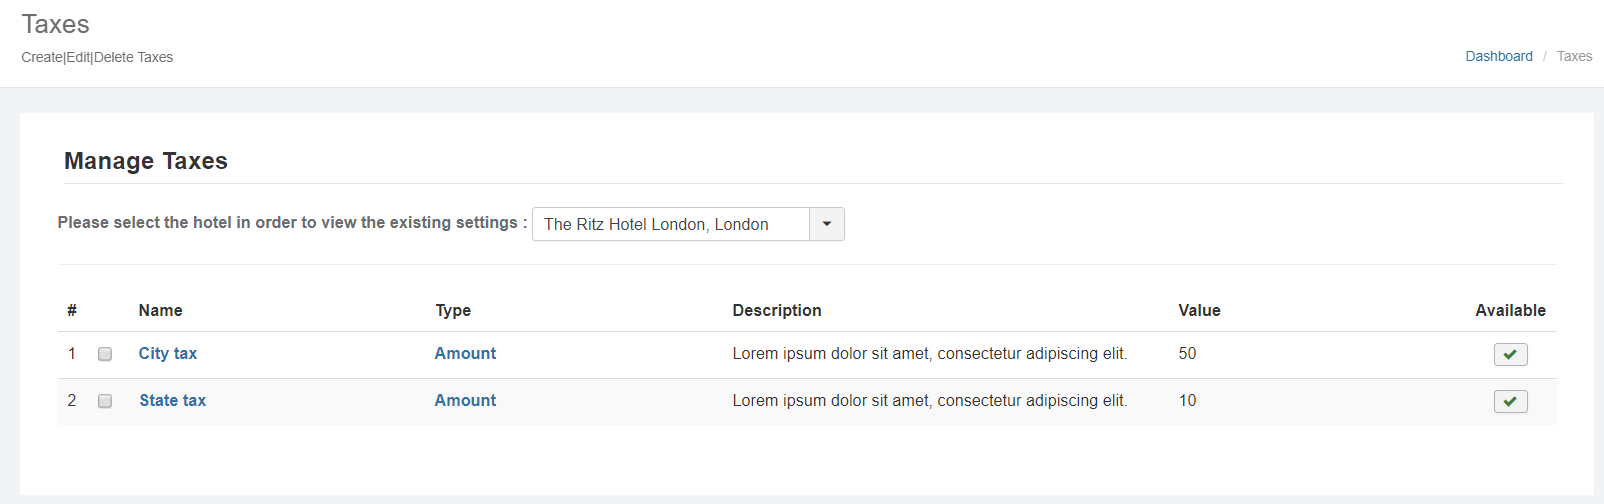
Manage Taxes
You can define the taxes you are collecting from your client in the Manage Taxes section.
Choose a hotel to have a list of defined taxes to be displayed. An example of display is presented below.

With the Available option you can specify whether a tax is active or not. One click will enable/disable a tax from being taken in consideration when the reservation total is calculated.
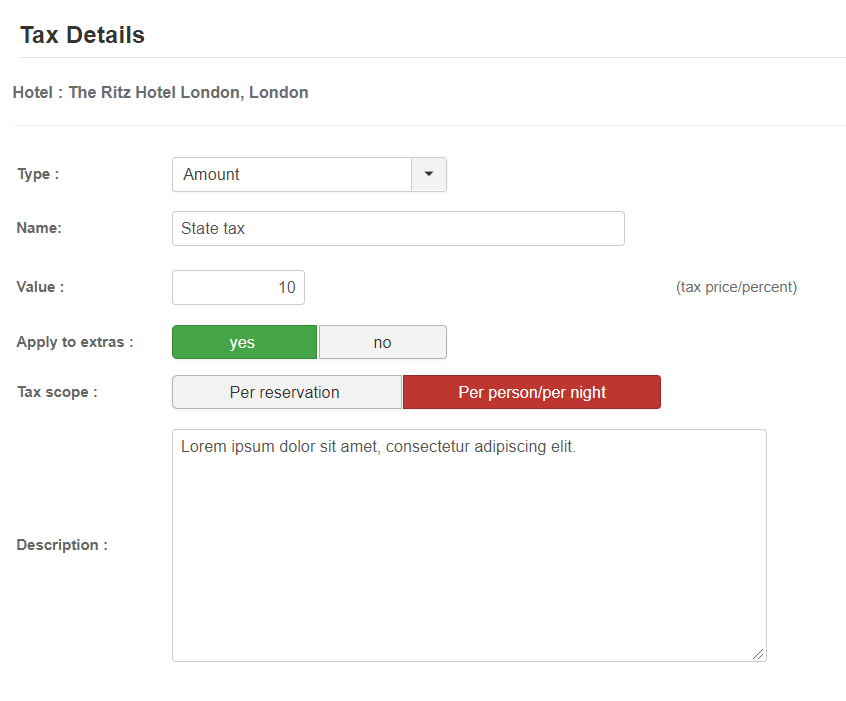
You have the possibility to create a new tax or edit and existing one. When editing/adding a new tax the user will be presented with screen displayed below.
A tax name, tax type, a tax value and a description can be defined.
The tax type determines how the tax is calculated. You can choose between a fixed amount and a percent. The tax value represents the tax amount, which is either a percent of the total sum or a fixed amount depending on the chosen tax type.
Active taxes will be displayed on the payment information page along with reservation details summary.
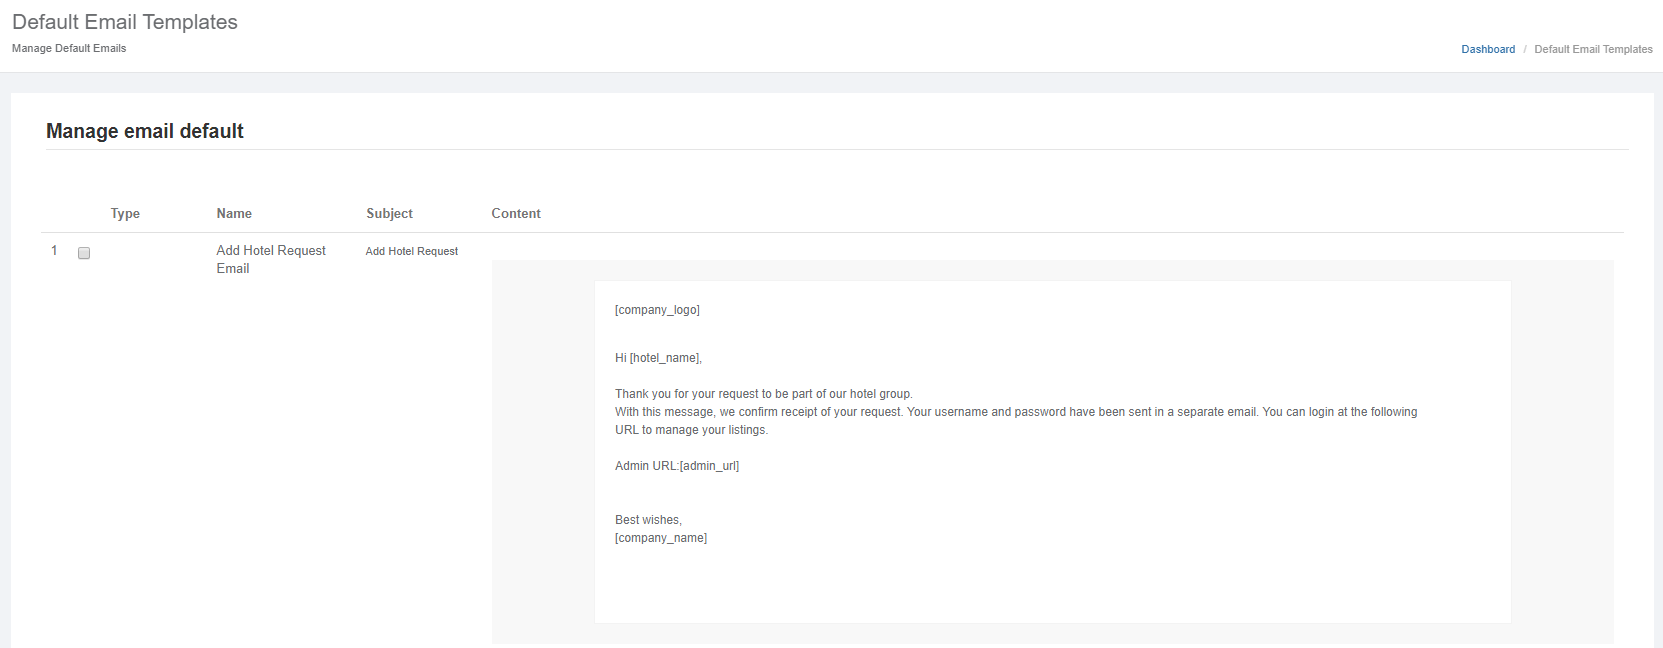
Manage Email Templates
Same as the other sections the Email Template section will display all the added email templates at the moment. Multiple email templates for the same task can be defined but only one of them can be used as the default.
The default template for that specific task will be taken in consideration when sending out an email: for example if there are two cancellation email templates the default one will be sent out to the customer upon cancelation.
Each hotel has its own email templates which you can customize. When a new hotel is created the default email templates (manageable through application settings) are assigned to the hotel by default.
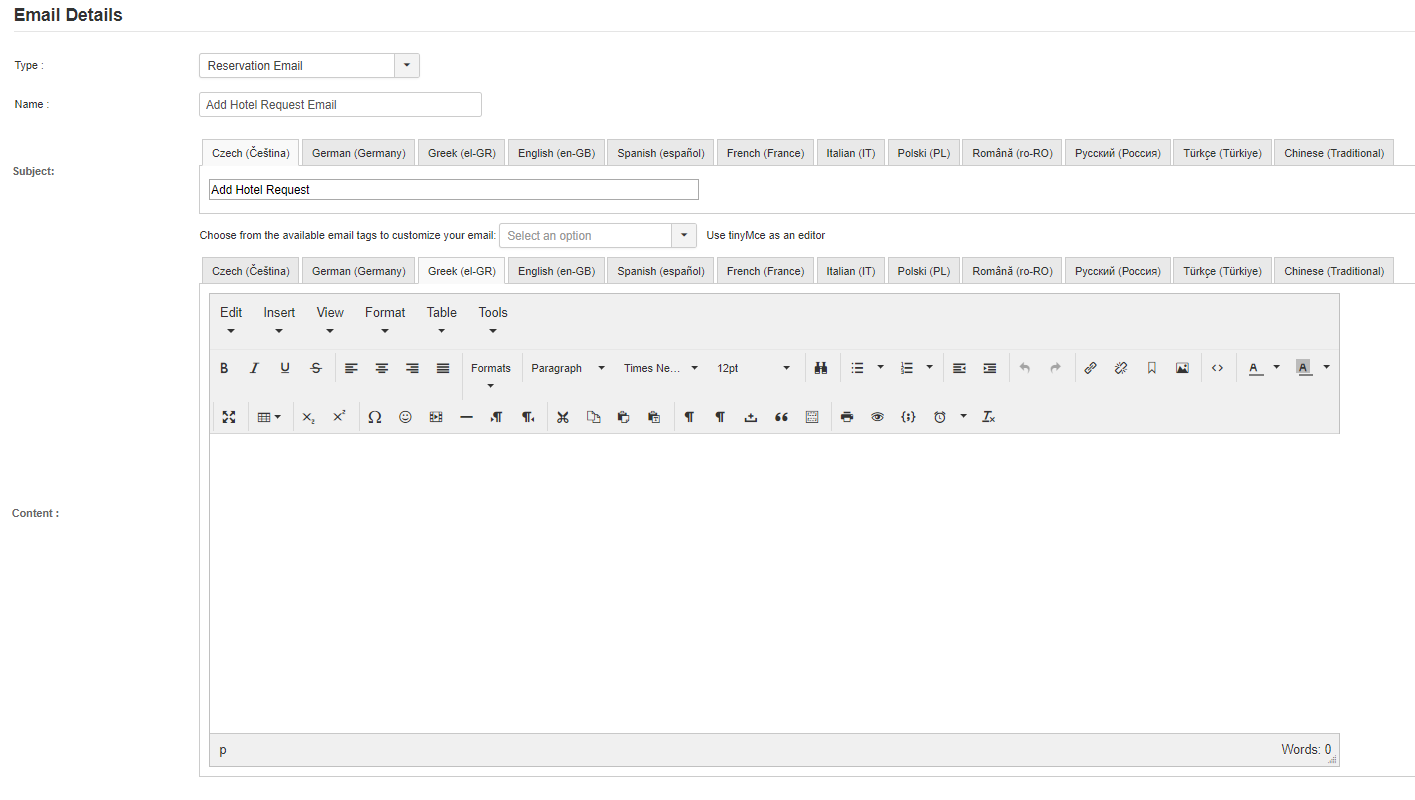
When editing or adding a template you will be presented with screen below.
For a template the following need to be defined:
Template Name: the name of the template
- Email Type the type of email defined :
- Reservation Email: email sent out to the client upon reservation
- Cancelation Email: email sent out to the client upon reservation cancelation
- Review Email: email sent the client to review the hotel. The email is sent after one day after the reservation ends.
- Invoice Email: email sent out for invoicing affiliated hotel.
- Booking List: this email type is sent to hotel administrators. The email holds a list of all the bookings for the previous month. This email type is used in conjunction with the invoice functionality.
f. Guest List: this email type generates a list with all the guests for the following day. To automate the process of sending out invoices you can create a cron job that runs every day for the following URL: http://yourdomain.com/component/jhotelreservation/?task=confirmation.sendGuestList Simply replace yourdomain.com with your domain.
The email content: will be defined using an editor which holds a series of email tags. When selecting a tag this will be automatically inserted in the email’s content. You can define email content for all the available languages in the J-HotelReservation.
These email tags will be processed when the email is sent out and will replaced with the corresponding information The list of the available email tags is:
- [first_name]: clients first name
- [last_name]: clients last name
- [reservation_details]: reservation information, including room, extra options, amount,etc.
- [biling_informations]: billing related information: name, address, telephone, etc,
- [company_name]: represents the name of the lodging facility, this will be picked up from the Application Settings section -> Hotel Information -> Name.
- [company_logo]: The company logo. Currently setup in Applications Settings.
- [hotel_image]: the first hotel image for which the email is sent out.
- [rating_url]: use this tag when sending out the review email. This will generate the review URL specific for the reservation being reviewed.
- [social_sharing]: share the email content via social networks
- [invoice_hotel_details]: represents the hotel invoice details. Use this tag when sending out invoices to hotel.
- [invoice_date]: represents the invoice date. Use this tag when sending out invoices to hotel.
- [invoice_number]: represents the invoice number. Use this tag when sending out invoices to hotel.
- [invoice_fileds]: represents the invoice specific fields. Use this tag when sending out invoices to hotel.
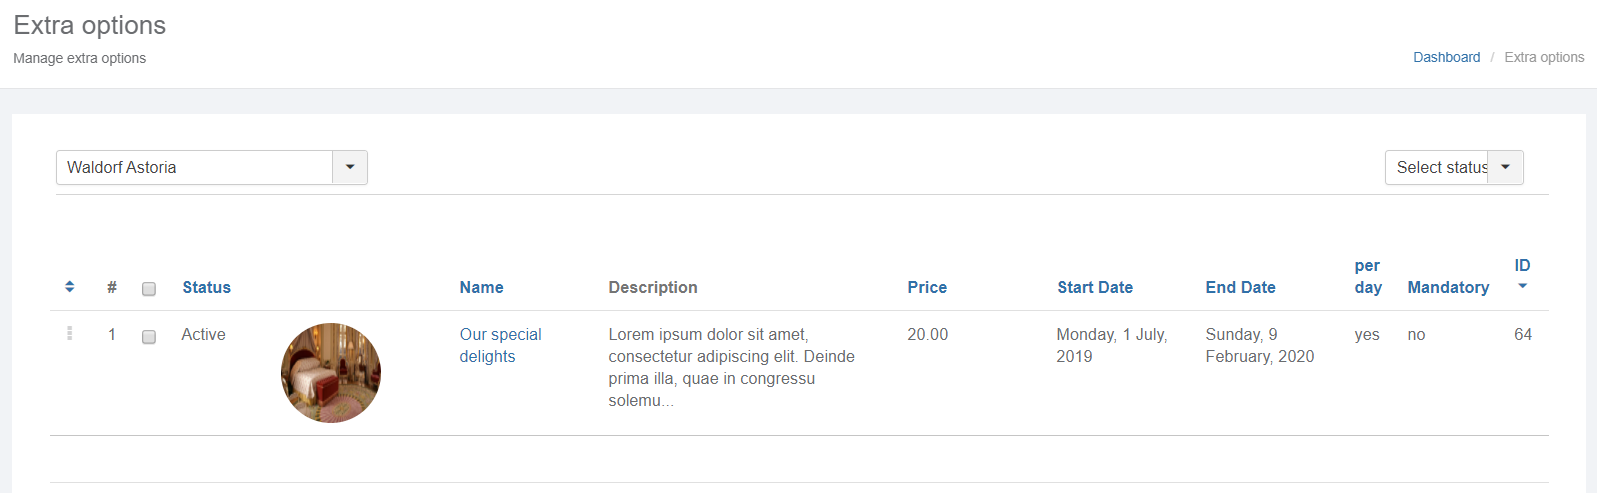
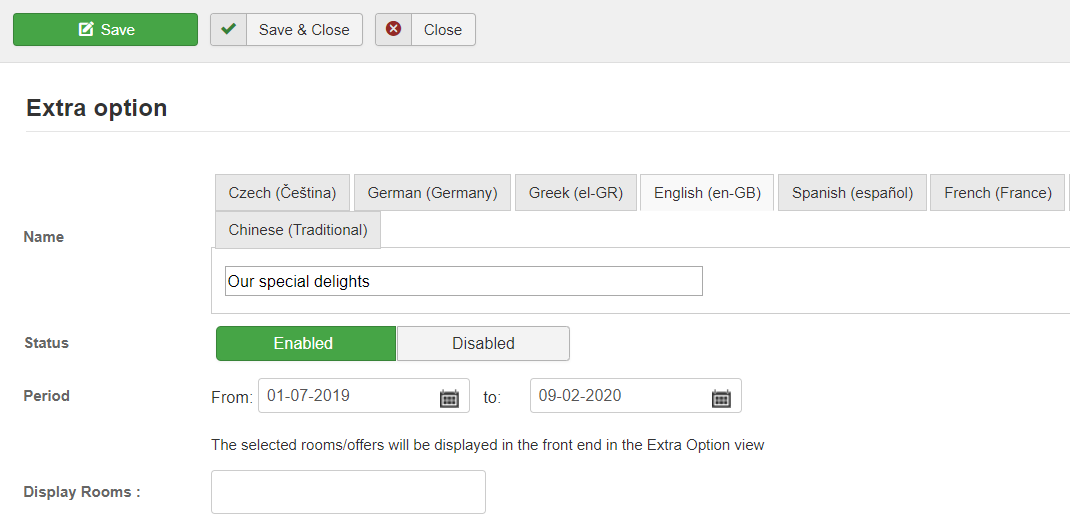
Manage Extra Options (Not available in standard versions)
You can offer your customer the choice of a welcoming gift such as flowers, champagne and other treats by defining the extra options.
A list of existing extra options will be displayed when you select the option Manage Extra Options. An example of display is presented below.
You have the possibility to create a new extra option or edit and existing one. When editing/adding a new extra option the user will be presented with screen below.
- To define an extra option you’ll need to enter the following:
- Name: the name of the extra option
- Status: you can choose between enabled or disabled
- Period: the period the extra option is available
- Description: the description for the extra option
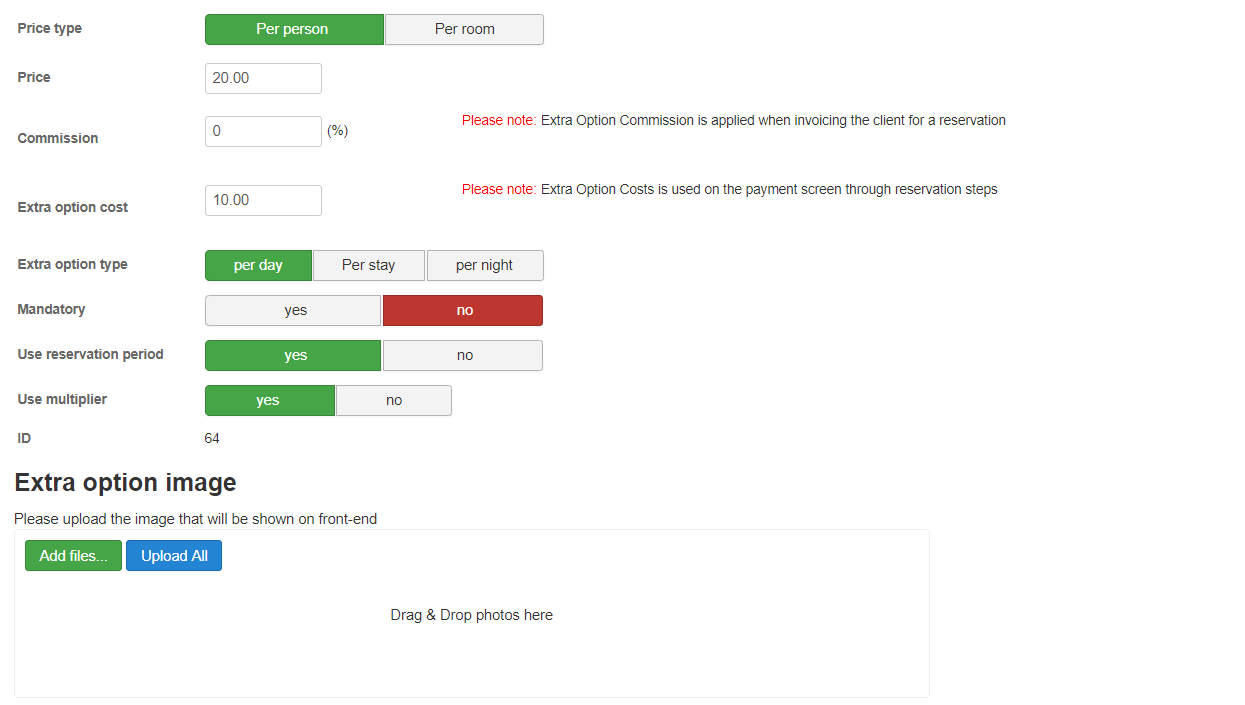
- Price Type: define a price type, per person, meaning the price will be applied per person. In the reservation process the client is given the option to select the number of persons. Per room, meaning the price will be applied per room.
- Price: the price for the extra option.
- Extra Option type: Per day- extra option will be offered per day. Per Night – extra option will be offered per night. Per stay- extra option will be offered per entire stay.
- Mandatory: whether the extra option is mandatory or not. When set to yes the client has to select this extra option in the reservation process.
To save the extra option settings click the Save button located at the very top of the screen.
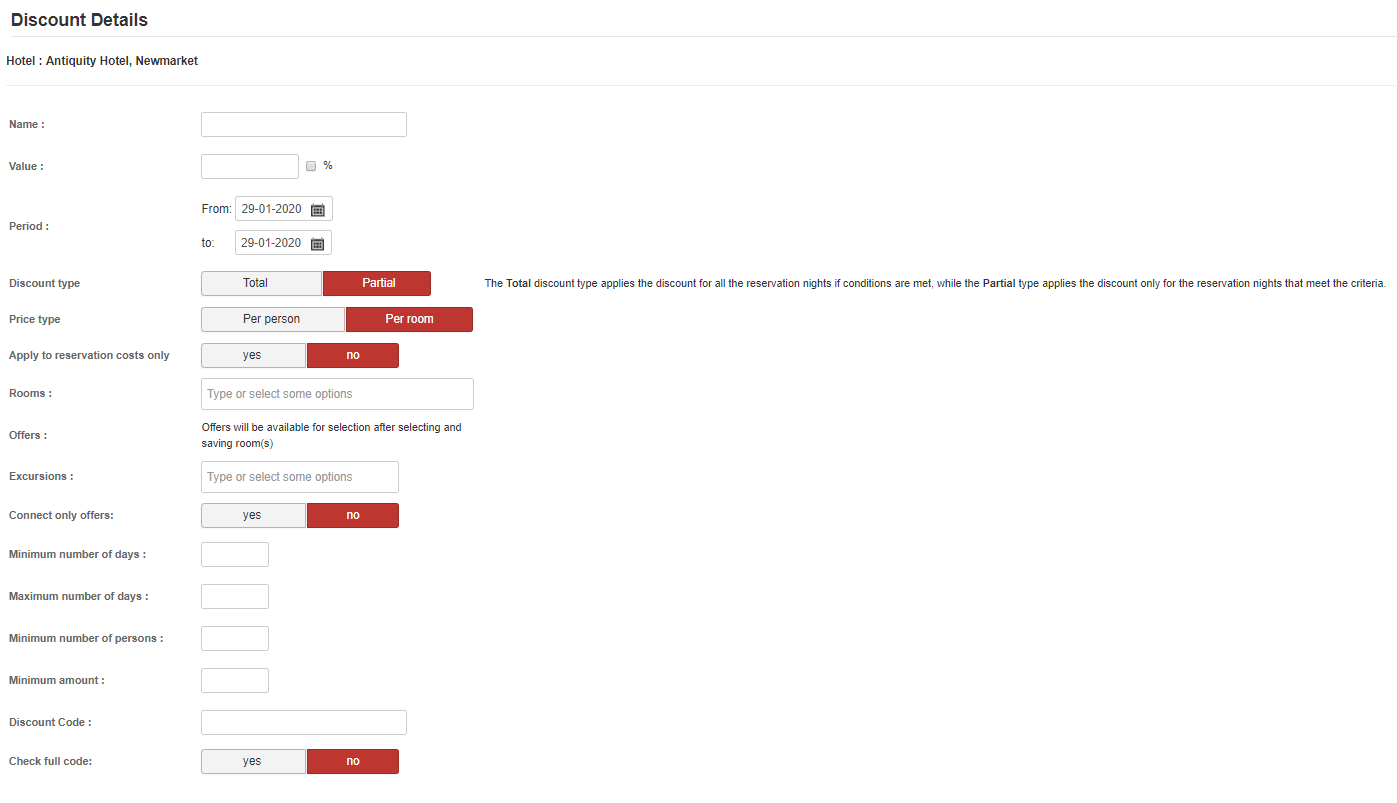
Manage Discounts (Not available in standard versions)
You can offer discounts for different types of items like rooms, offers, excursions. You can either define a new discount or edit an existing one.
- To define a discount you’ll need to enter the following:
- Name: the name of the extra option
- Period: the period the discount is available
- Rooms: select the rooms it applies to
- Offers: select the offers it applies to
- Excursions: select the excursions it applies to
- Connect only offers: if set to yes, only offers will be discounted
- Price Type: define a discount type, per person, meaning the discount will be applied per person. In the reservation process the discount will be multiplied according to the selected the number of persons. Per room, meaning the discount will be applied per room.
- Minimum number of days: minimum number of days to apply the discount for
- Maximum number of days: maximum number of days to apply the discount for
- Minimum number of persons: minimum number of persons to apply the discount for
- Minimum amount: minimum amount to apply the discount for
- Value: discount value. If the percent checkbox is client the value enter will be consider to be a percent.
- Discount codes: you can assign a code to discount so that only certain users can access the discount. When a code is entered clients have to enter a code to apply a discount.
- Check full code: set this to yes if you want to check full discount code, otherwise set to no.
When verifying that a discount applies to reservation item each day is checked against the defined rules. If the rules apply a discount is calculated for the validated day.
Manage Offers (Not available in standard versions)
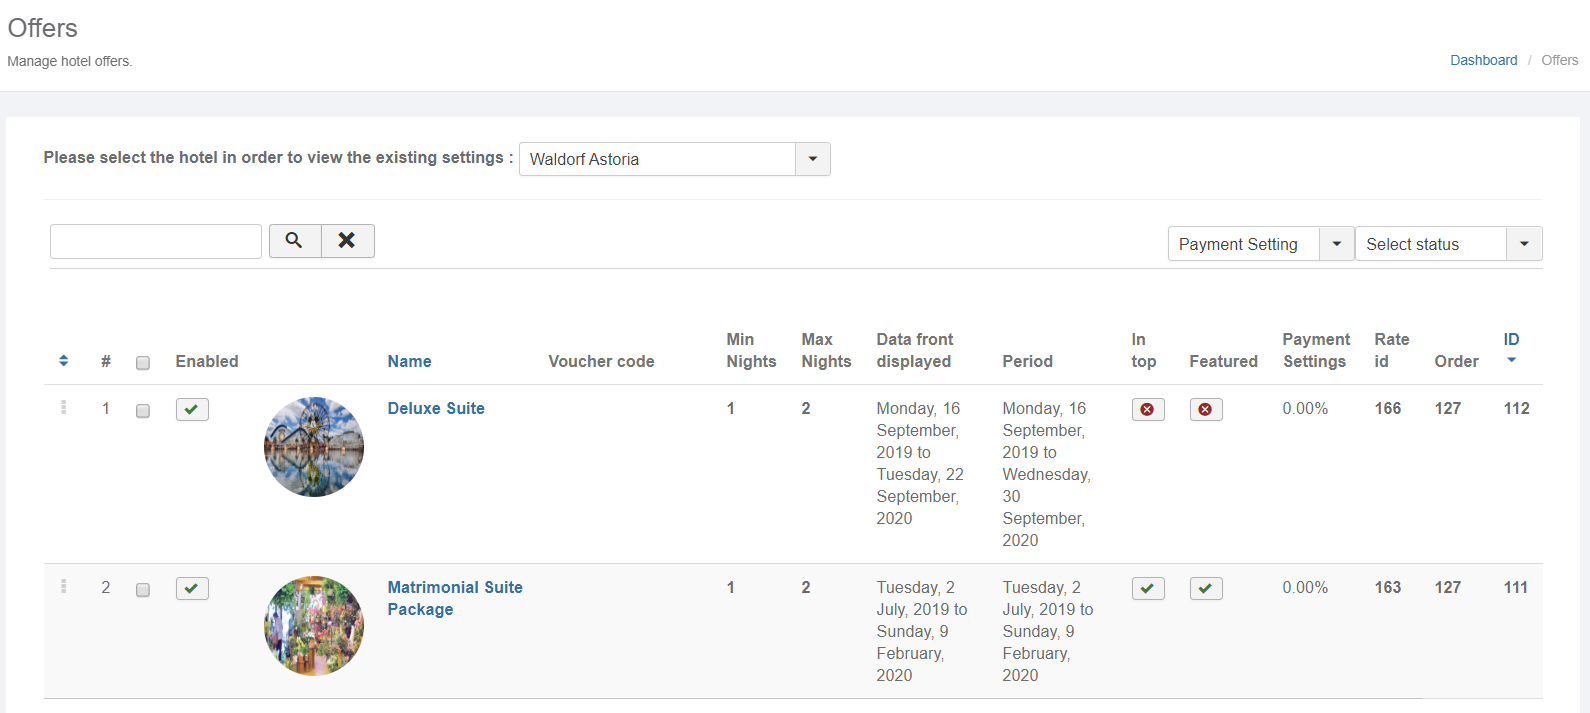
In the Manage Offers section you can define offers in attract customers to book your hotel(s). A special offer can contain one or more rooms as well as extra options. A list of existing offers will be displayed when you select the option Manage Offers. An example of display is presented below.
With the Enabled option you can specify whether an offer is enabled or not. One click will enable/disable an offer from being taken in consideration in the reservation process.
With the Featured option you can specify whether an offer is featured or not. One click will enable/disable an offer as being featured. Featured offers are displayed in the JTopOffers module.
With the up and down option you can choose the order in which the offers are displayed, should you have more than one.
- You have the possibility to create a new offer or edit and existing one. When editing/adding a new offer the user will be presented with following five tabs:
- Offer Details
- Rooms
- Room Details
- Extra options
- Pictures
We’ll explain in detail all of these sections.
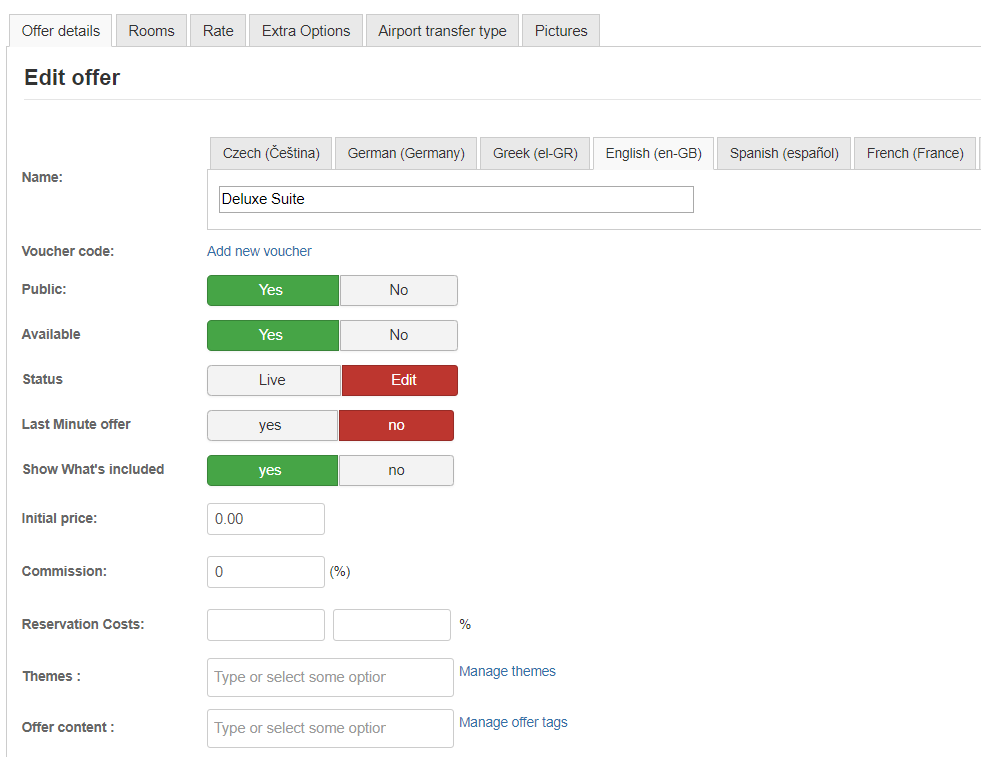
Offer Details Tab
In this tab you be able to define the offer details such as
- Name – the name of the offer. This will be displayed to your customers
- Voucher code – you can define one or more voucher codes for your offers if you want to allow only certain clients to access this offer. Offers that have a voucher defined won’t be displayed in the front end unless a client knows the voucher code and uses it when searching for a hotel. Offers that don’t have a voucher code defined will be displayed in the hotel overview along with the available rooms.
- Commission – is a percentage charged for each reservation made though this offer.
- Reservation Costs – it is charged directly when the user books an offer. You can define a percentage or a cost. The reservation cost is paid by the customer.
- Themes – you can define one or more themes for an offer. Here you can find also the manage themes option by pressing the Manage themes option next to the select. You can add or delete themes to your liking.
- Description – the description of your offer. You can include the offer conditions and what is the offer is providing the customer.
- Content – is what the offer contains. This will be shown on reservation invoice, providing more confidence to hotel customer.
- Other info – other information related to the offer.
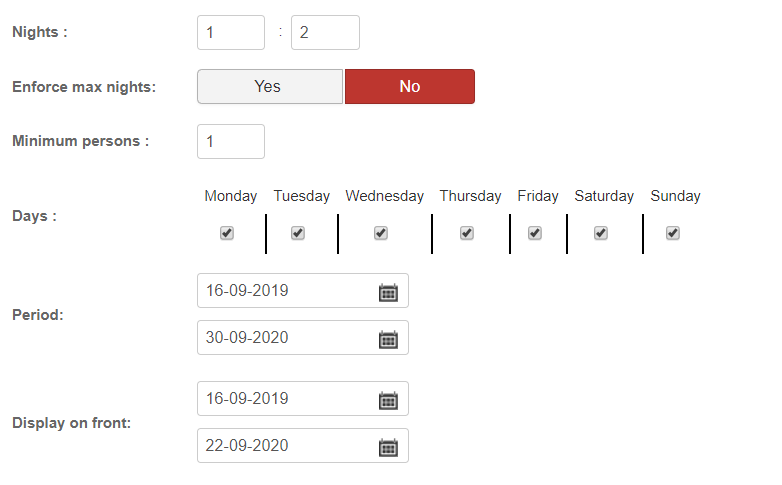
- Nights – with this option you can define the number of minimum and maximum nights for which the offer should be considered. For example if you want an offer to be available for minimum 2 nights and maximum 10 nights you should set the values to 2 and 10. After 10 nights the extra night price will be applied.
- Days – this represents the day of the week for which the offer is available. You have the possibility to select/deselect a day by clicking the checkbox button specific to that day.

- Period –the time frame for which the offer is active/bookable. First input corresponds to the start date, the second input corresponds to the end date.
- Display on front - represents the time frame for which the offer is displayed on front end to your clients. First input corresponds to the start date, the second input corresponds to the end date
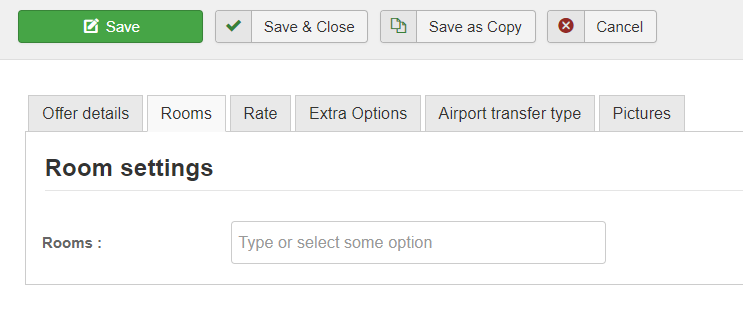
Rooms Tab
In this section you can choose for which Rooms you want to apply the offer. You can simply select the desired rooms by holding down the CTRL key and clicking the left mouse button on the targeted room. The selected rooms will be available for setup on the Room details tab.
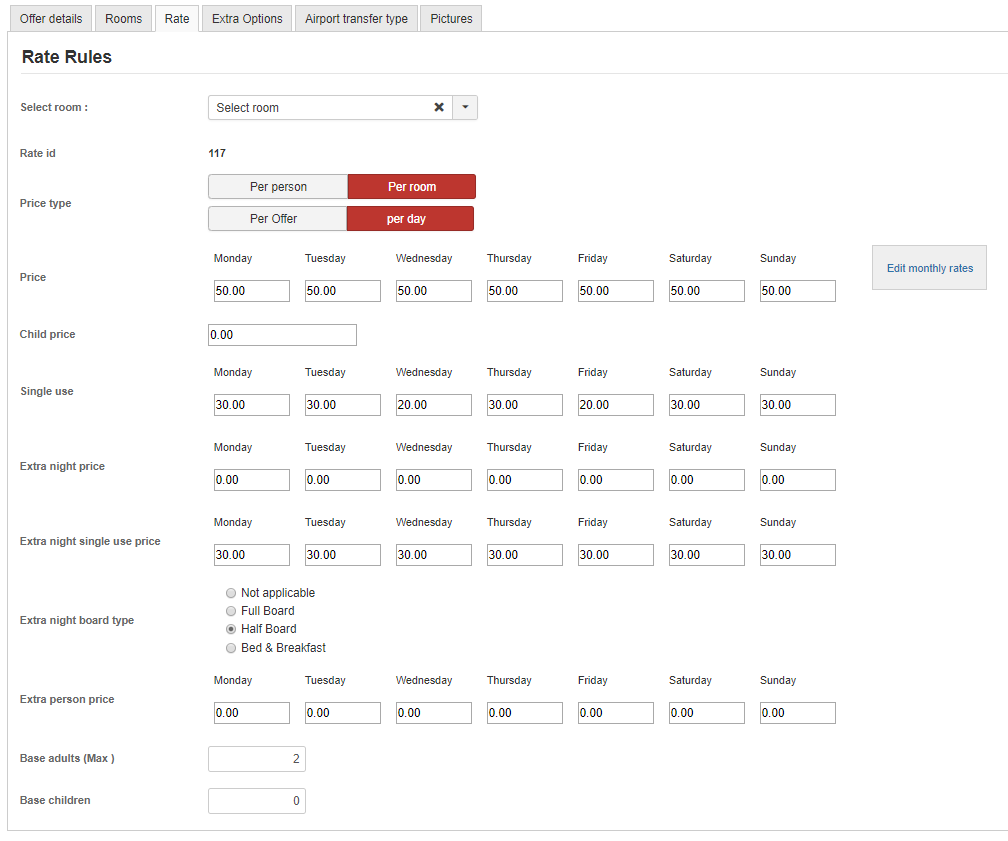
- Room details Tab
This section allows you to define the room prices for the selected rooms in the Room Tab.
Once you have selected a room type you can define the following:
- Price type – there are two types available
- Per person – defines the price per person. This takes in account each person that occupies the room. Here you can set a price for a person which will be multiplied with the number of persons occupying the room up to the maximum capacity defined. For example if you set the price to 100$ and you have 2 persons occupying the room than the total cost of the room will be 200$
- Per room – defines the price per room. The cost of the room will be the same no matter how many persons occupy this room within the maximum capacity defined.
- Per day – the price will be calculated per day, meaning that the defined price will be multiplied with the number of days booked.
- Per offer – the price will be calculated per offer.
Price – you can set the price for each day of the week
Single supplement – Associated with the Per Person price type is the Single Supplement option which allows setting an additional amount should there be only one person booking the room. This is useful in the situations when a single person is booking, let’s say, a four person room and you want to charge extra for that.
Single Discount - Associated with the Per Room price type is the Single Discount option which allows to set a discount amount should there only one person booking the room. This is useful in the situations when a single person is booking, let’s say, a four person room and you want to provide a discount for that.
Extra night price – if a stay is longer than the maximum nights of an offer, the extra night price is added to the reservation multiplied by the number of extra nights.
Extra person price – if a stay is bigger than the maximum nights of an offer, the extra person price is added to the reservation multiplied by the number of extra nights.
Base adults (Max 2) – the number of adults occupying the room. Maximum is given by the room capacity set for each Room in the Manage Rooms section.
Note
Important: Please note that if custom rates are defined, the values set for Custom Rates will be applied. Use the Edit custom rates button located next to the price to see and define custom rates.
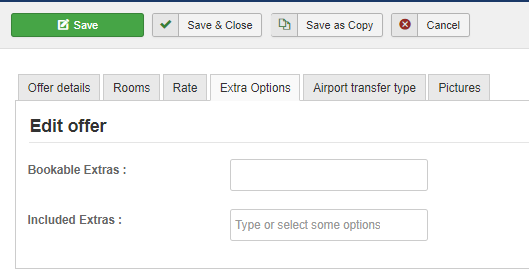
- Extra options Tab
On this tab you can define the Extra Option associated with an offer, if any.
Simply choose an extra option from the Extra options select available. When selected, an extra option will be added to the offer. The changes will be applied when the Save button is clicked.
You can select/deselect all extra option by clicking on the Check all/Uncheck all links located at the bottom.
You can also choose to duplicate an offer by clicking on the duplicate button.
Pictures
You can set pictures along with your offer to create a visual of what your offer is about.
To upload pictures simply click the Choose File button. You’ll be present with a window which allows you to select the desired picture. All uploaded pictures will be displayed in this section.
Add Reservations
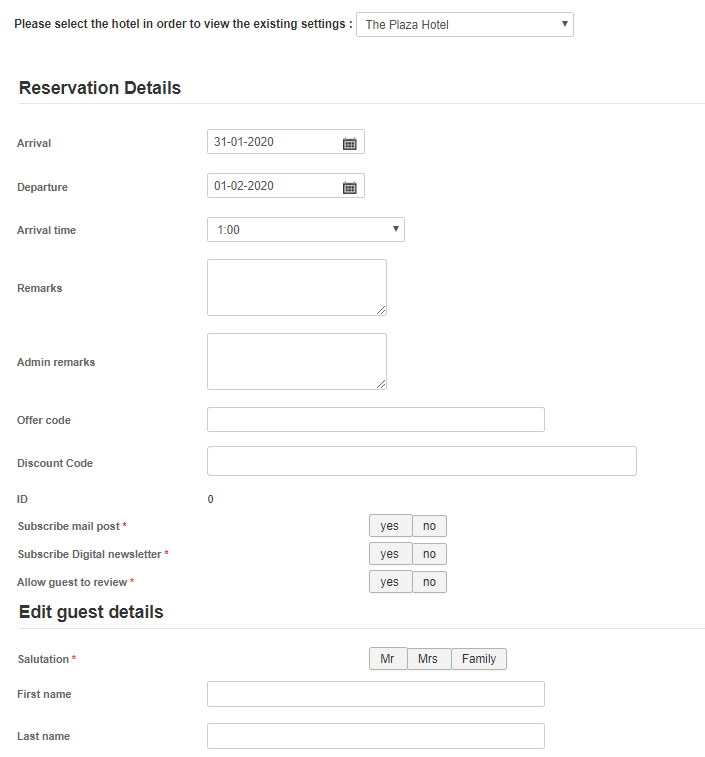
Admin users can add reservation by using the backend functionality. The Add Reservation Feature was designed to use as little data as possible in other to facilitate email or phone reservations.
On the add reservation you’ll presented with a one page checkout screen where you can enter all the needed data. Please see the screen below.
You can also add remarks of client in the Remarks input. Should there be any remarks for the administrator you can use the Admin remarks input. Only admins will be able to see this column.
You are not required to enter all the personal fields as it is required in the frontend reservation process, only some of the fields are mandatory.
To create a new reservation you’ll have to assign a room to it. For the selected hotel you have to select one room from the available rooms. You can also select the number of adults to ocupy the rooom. After making the desired selection click on the Add Room button to add a room. You can add multiple rooms to a reservation. To delete an already selected room press the red highlighted Delete link next to the room number
Editing a reservation
To edit a reservation simply click on the reservation id while in the manage reservations screen or press the edit icon in the action column on the same reservation screen. You’ll be presented with the screen below where you can modify the existing reservation info.
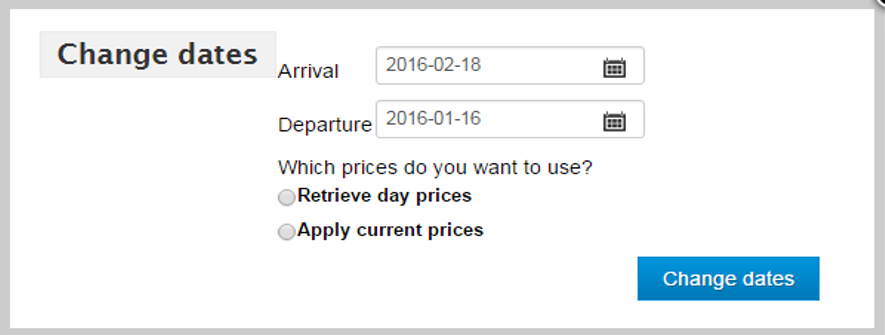
To change the reservation dates simply click on the Change Dates link located next to the Arrival date. The screen below will be displayed on the screen.
You can change the reservation dates and you also have a choice to apply current reservation price(Apply Current Prices) or retrieve the current price set in for the room(Retrieve Day prices), if different.
When you’re done with your selection, click on the Change dates button to apply your changes. Availability will be checked automatically against the hotel’s availability. You’ll be notified if the change has been made successfully or if theirs is no availability for the selected rooms.
Managing Reservations
This feature allows you to manage all the reservations made. Clicking the Manage Reservation option will display a list with all the available reservations.
You can search a reservation by hotel, room type, reservation status or payment status. You can also search a reservation by first name or last name when using the Filter input. Reservations made with a specific voucher can be searched by using the Voucher input
- Several statuses apply to the reservation:
- Reserved (Navy Blue): The client has made a reservation and he/she will be expected to checking in.
- Canceled (Red): The client reservation was canceled.
- Checked in (Yellow): The client has checked-in.
- Checked out (Grey): The client has checked-out.
- Late (Orange): The client hasn’t checked-in and his/hers reservation is already due.
Further we will explain how to use these statuses.
Canceled Status
The canceled status means that a reservation has been canceled. If the client cancels a reservation via email or telephone, or doesn’t show up you can cancel a reservation. The client can also cancel a reservation from his/hers profile. Upon cancellation an email will be sent out to the client.
Checked Out Status
When checking-out a client, you need to set his/hers status to Checked Out. This way you can track when a client has checked out.
Reservations Reports
Reservation reports will help you in getting an overall idea of what’s booked in your lodging facility. Currently there are three types of reports available:
Simple Reservations Report
The reservation report displays a report of what rooms types have been booked, on what days and how many rooms are still available. You can choose a period for which you can generate the report along with the room type. An example is generated below.
Advanced Reservations Report (Not available in standard versions)
The detailed reservation report displays a report of what rooms types have been booked, on what days and how many rooms are still available. You can choose a period for which you can generate the report along with the room type. An example is generated below.
All reservation statuses are displayed on this report. You can see the status of a reservation from the beginning until the checkout.
When clicking on a reservation you will be presented with the reservation details. Please see below:
Offers Report (Not available in standard versions)
This report is designed to provide a statistic on how many views and how many bookings where done through a special offer (voucher) and which media channel has been used. Please see below.
Income Report (Not available in standard versions)
This report is designed to provide a graphical statistic on the realized income. In generating the chart only paid reservation are considered, whether is the whole reservation amount or part of it. You have the option to generate a report by Day, Month or Year. You can also filter by room type and adjust the interval for which the report should be generated.
Reservations by Country Report (Not available in standard versions)
This report is designed to provide a graphical statistic on where the customers are coming from. In generating the chart all valid reservation are considered. You have the option to generate a report by room type and adjust the interval for which the report should be generated.
Manage user access (Available for JHotelPortal or on demand)
This section will help to manage the way hotel administrators are accessing the different functionalities available. You can allow or restrict access to certain functionality.
The Super User role has access to all the functionality without any restrictions.
- We have a flexible 3 layered user access structure.
- First you define a role which includes the features a role has access to.
- Next you define a group which includes the roles a group has access to.
- As a last step you assign groups to a user.
Currently only users within the Hotel Manager group are considered. Other groups can be added.
Adding a Hotel Manager
To start off you have to create a new user group in Joomla called “Hotel Manager”. All hotel admins need to be created under this group. The following instructions work on both Joomla 2.5 and Joomla 3.x
To create this group, go to Users->Group Management->Add New Group.
Enter Hotel Manager for the name and select the Public group as the parent group.
Allow the Hotel Manager group to login in the backend
To enable backend login for the Hotel Manager group please follow these steps
- Go to Users -> Access Levels
- Select the Special item from the list of available access levels
- Check the Hotel Manager group to allow assign to access level.
- Don’t forget to save.
To create a new hotel admin you need first to create a new user in Joomla. In the main menu in the backend go to Users-> Users Management ->Add New User. You’ll be presented with the screen below.
Make sure you assign the Hotel Manager Group. See below.
Restrict access to J-HotelReservation functionality only
- If you want to restrict access so that hotel admins can access the reservation functionality only, please follow these steps:
- In Global Configuration-> Permission Tab->Hotel Manager set permissions as follows
- In component->J-HotelReservation->Application Settings
- Click the Options button located at the top
- Select the Permission tab
- Set the following permissions:
After the hotel admin user has been created you proceed to the next step of assigning the hotel admin to hotels and groups.
All the users under Hotel Manager group will be displayed under the Users tab in the Manager Users Access section.
You’ll be presented with a list of all the hotel managers and their assignments.
Assigning a Hotel
To assign the hotel(s) to the hotel manager who is in charge of simply click the Assign Hotels link in the Assigned Hotel(s) column (see below).
You’ll be presented with the screen below.
To assign a hotel simply click on a value from the left panel to move it to the right panel. To remove a selected value from right panel click on the desired value and it will be moved to the left panel.
Don’t forget to save your changes by clicking the Save button.
Assigning a Group
To assign a group to the hotel manager simply click the Assign Groups link in the Assigned Hotel(s) column (see below). If a group is already assigned click the name of the group(s) to edit the Group assignment.
You’ll be presented with the screen below.
To assign a group simply click on a value from the left panel to move it to the right panel. To remove a selected value from right panel click on the desired value and it will be moved to the left panel.
Don’t forget to save your changes by clicking the Save button.
Roles
When accessing the roles you’ll be presented with a list of all the available roles. You can either add, edit or delete a role.
To add role click the New Role button located at the top right. To edit a Role simply click on the Role name.
When adding or editing a role you’ll be presented with the screen below. You can define the following:
- Role Name – the name of the Role
- Role Description – the description of the Role. This is used to better describe what the role does.
- Assign permissions – each main functionality in the application is associated with a permission. When defining a role you define the permissions available for that role. You are actually assigning permissions to a role. You can assign one or multiple permissions to a role.
To assign a permission simply click on a value from the left panel to move it to the right panel. To remove a selected value from right panel click on the desired value and it will be moved to the left panel.
Don’t forget to save your changes by clicking the Save button.
Groups
Further you can assign roles to a group. A certain group can have one or multiple roles depending on the group level of access. This is something that you control.
When accessing the Groups you’ll be presented with a list of all the available groups. You can either add, edit or delete a group.
To add a group click the New Group button located at the top right. To edit a Group simply click on the Group name.
- When adding or editing a role you’ll be presented with the screen below. You can define the following:
- Role Name – the name of the Role
- Role Description – the description of the Role. This is used to better describe what the role does.
- Assign permissions –Each main functionality in the application is associated with a permission. When defining a role you define the permissions available for that role. You are actually assigning permissions to a role. You can assign one or multiple permissions to a role.
To assign a role simply click on a value from the left panel to move it to the right panel. To remove a selected value from right panel click on the desired value and it will be moved to the left panel.
Don’t forget to save your changes by clicking the Save button.

Reviews Functionality (Not available in standard versions)
Hotel Clients can review their stay at the hotel by using the review functionality. The reviews made will be displayed in the front end in the reservation process. Based on the reviews a total score is calculated and displayed. A summary with all the scores is also available
Reviews are being sent one day after the end date of the reservation. An automated process needs to be set in place to generate reviews automatically. The following URL needs to be set in a cron job or can be called manually.
http://yourdomain.com/index.php?option=com_jhotelreservation&task=hotelratings.sendReviews
An email will be sent to client asking to review the stay.
Manage Review Questions
You can manage the review question that your clients are answering to in the Manage Review Questions section.
You’ll be presented with a list of all the available questions. You can add, edit or delete a review question. You can also set the order of how questions are displayed by clicking on the options Up/Down located at the right of table.
When adding/editing a question you’ll be presented with the screen below
You can enter/modify the desired question and click the Save button to save your changes.
Manage Hotel Reviews
As a hotel administrator you can see and manage all the reviews made for your hotel. You can publish/unpublish a review by clicking on the checkbox associated with each review in the Published column.
To view a review click on the View option associated with each review. You’ll be presented with the review content.
Manage invoices (Available for JHotelPortal only)
At the beginning of each month an invoice is sent to hotels (based on a cron job) considering the commission charged for each reservation on the previous month. The room reservations commission rates can be set in when editing a hotel, in the Extra Options tab. The offers commission rates can be set in the Manage Offer section.
The invoicing process is a three-step process:
- Generating the invoice
An invoice is generated and a booking list is sent to each hotel for acknowledgement and approval. To automate the process of sending out invoices you can create a cronjob on the 1st of every month for the following URL: www.yourdomain.com/component/jhotelreservation/?task=manageinvoicesfront.createMontlyInvoices Simply replace yourdomain.com with your domain.
- Reservations sign off by hotel admins
The hotel admin has now the possibility to login on to the hotel portal site and check or cancel bookings or modify the amount paid.
In the Manage Invoice screen the hotel admin see a list of all the invoiced months along with a summary of the reservations costs total and Commission Costs total. Please see below
The hotel admin will be able to see the invoices only for the hotel(s) he/she manages. The portal administrator (Super User) will have access to all invoices.
The hotel admin can view an invoice details by click on the invoice number or by selecting an invoice and clicking the Edit button located at the top. The screen below will be displayed.

Initially when the hotel admin receives the invoice he/she can modify the status of the existing bookings. Some of the bookings have been canceled and the hotel admin can rectify their status. Currently there 3 statuses to choose from:
- Agreed: the client respected his/her reservation
- No-show, no charge: the client cancelled the reservation, no charges apply.
- No-show, taxed according to cancellation policy: the reservation was canceled and a cancellation fee was charged. Commission is charged based on cancellation fee. The hotel admin will be able to enter the amount.

The hotel admin modifying the invoice has to enter his/hers name to sign off the invoice and agree with the terms and conditions of the invoice.
- Final Invoice
After 7 days the final invoice is generated and the hotel admin will no longer have the possibility to edit bookings. To automate the process of finalizing invoices you can create a cronjob on the 7th of every month for the following URL: www.yourdomain.com/component/jhotelreservation/?task=manageinvoicesfront.issueInvoices Simply replace yourdomain.com with your domain.
Update
The update section allows you to stay up to date with the latest improvements and bug fixes available.
To update your functionality please follow this steps.
Complete your order information
Enter your Order ID and Order email: upon order completion on CMSJunkie you will receive an email with your order. The order email contains an order id. Please copy that id and enter it in the Order Id input as presented below.
Your Order Email is the email address you used when placing the order. Please input this in the Order email input.
Click Save Order to save the order info.
Note
Notice: without the order email and id the update process won’t work

Find updates
Once you’ve entered your order info click on the Find Updates button located at the top to see if there are any updates available.
Update
If an update is available select the update in the update table and click on the Update button located at the top.
Note
Please note that any custom modifications you made to the code or css might be overwritten. Please back up your modifications before updating.
The update works for all versions including J-HotelReservation Starter.